Click! Your camera just turned photons into bits. You took a photo with your iPhone.
Let's say you're outside and looking around you. The sun, 150 million kilometers away, is emitting photons. These travel from the sun to our cozy planet in about eight minutes. Some of these photons hit the things around you and get reflected and hit the retina inside your eyes, and this triggers your brain to create an image, a visual representation of your surroundings.
Photography is about capturing that image. It was invented some 200 years ago. And even before then, for thousands upon thousands of years, humans tried to capture what they saw by making drawings.
Most of us carry a camera with us almost every minute of the day; today's smartphones are some of the most used cameras. Before the era of digital photography, photography would record light onto paper or film. Today, photography turns light into bits and bytes.
This article will go through some of what's making this happen — how a smartphone camera works.
Shutter Speed, ISO, Aperture
Before we dive into the magic of turning photons into a JPEG file, we will take a look at some of the general concepts of how a photo comes to life. These concepts are as true today as they were back in the days of film photography. Not so long ago, almost all photography was done with film. A biochemical process affected by light captured the image, while today we're using a digital image sensor. But since everything else having to do with taking pictures is based on the same principles, a lot of what was true for film photography with bulky film-based cameras still applies when we're shooting images with an iPhone.
Quantities of Light
The process of capturing a single image is sometimes referred to as an exposure. Exposure also refers to the amount of light per unit area. This amount of light needs to be within a certain range. If we don't capture enough light, the image will be underexposed — the image is drowning in the inherent noise floor of the image sensor or film. If we capture too much light, the image will be overexposed — the image sensor/film is too saturated and can no longer differentiate between different amounts of light, meaning all areas will seem to have the same exposure.
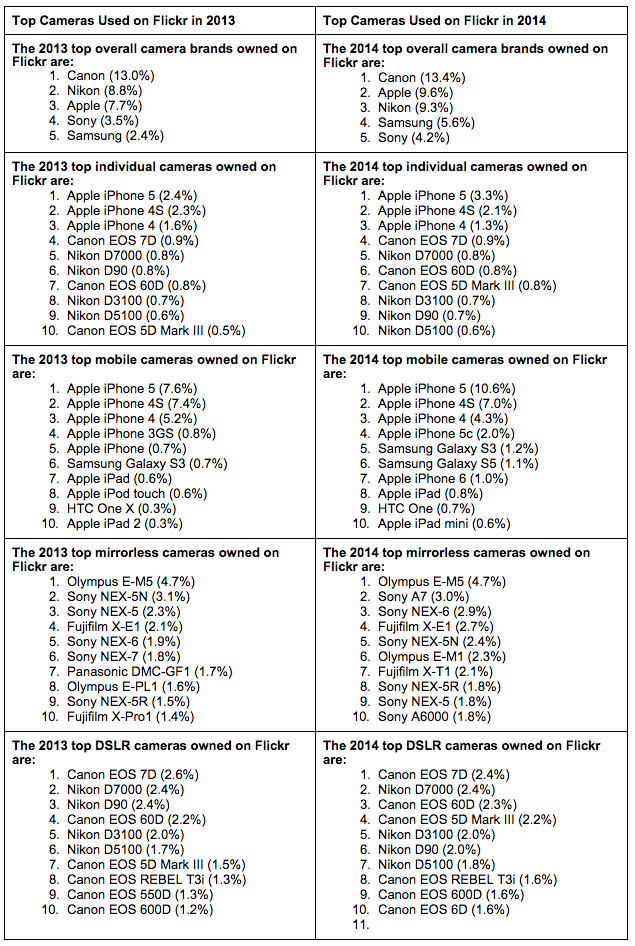
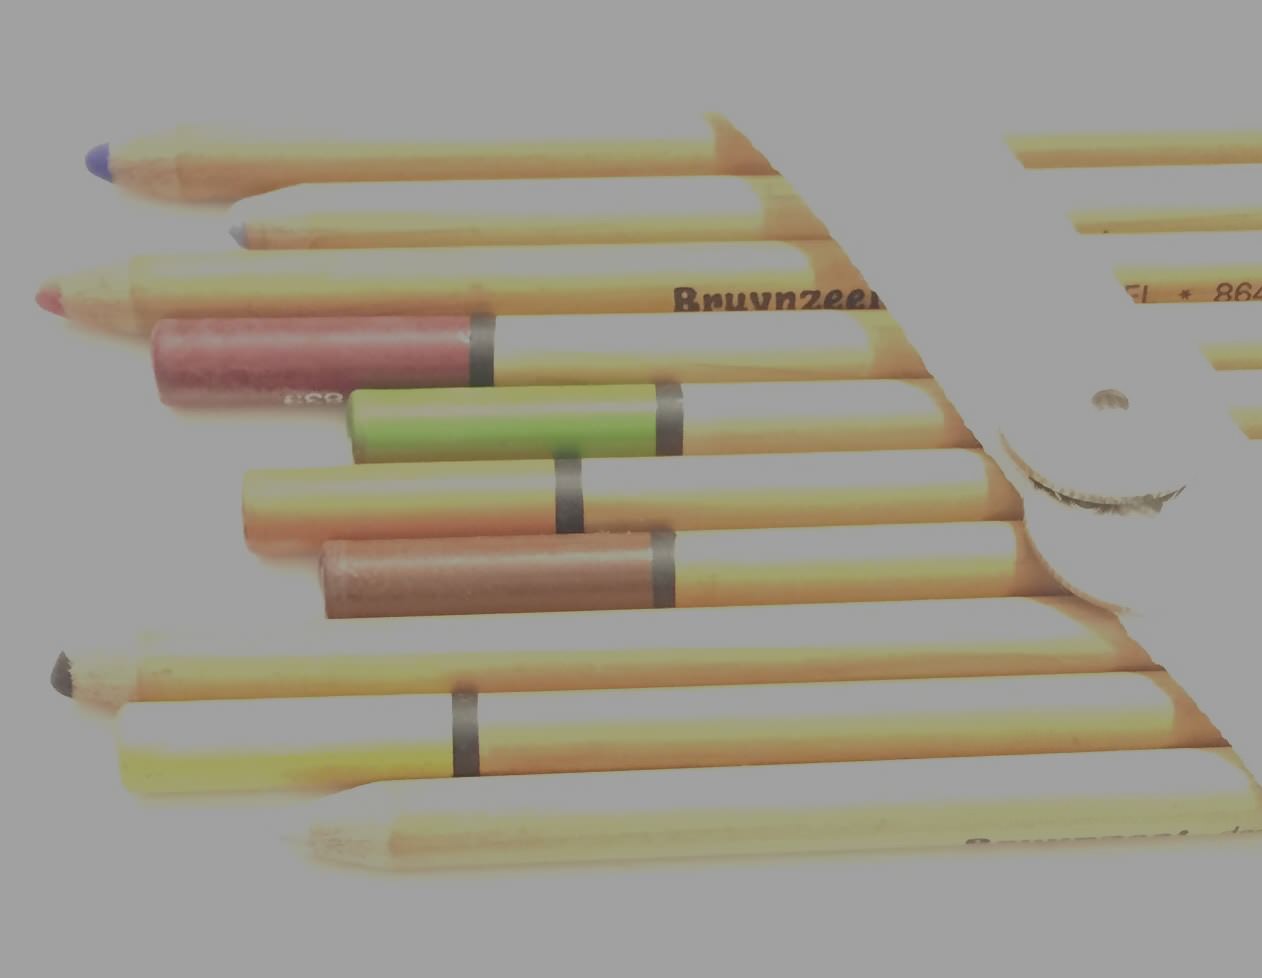
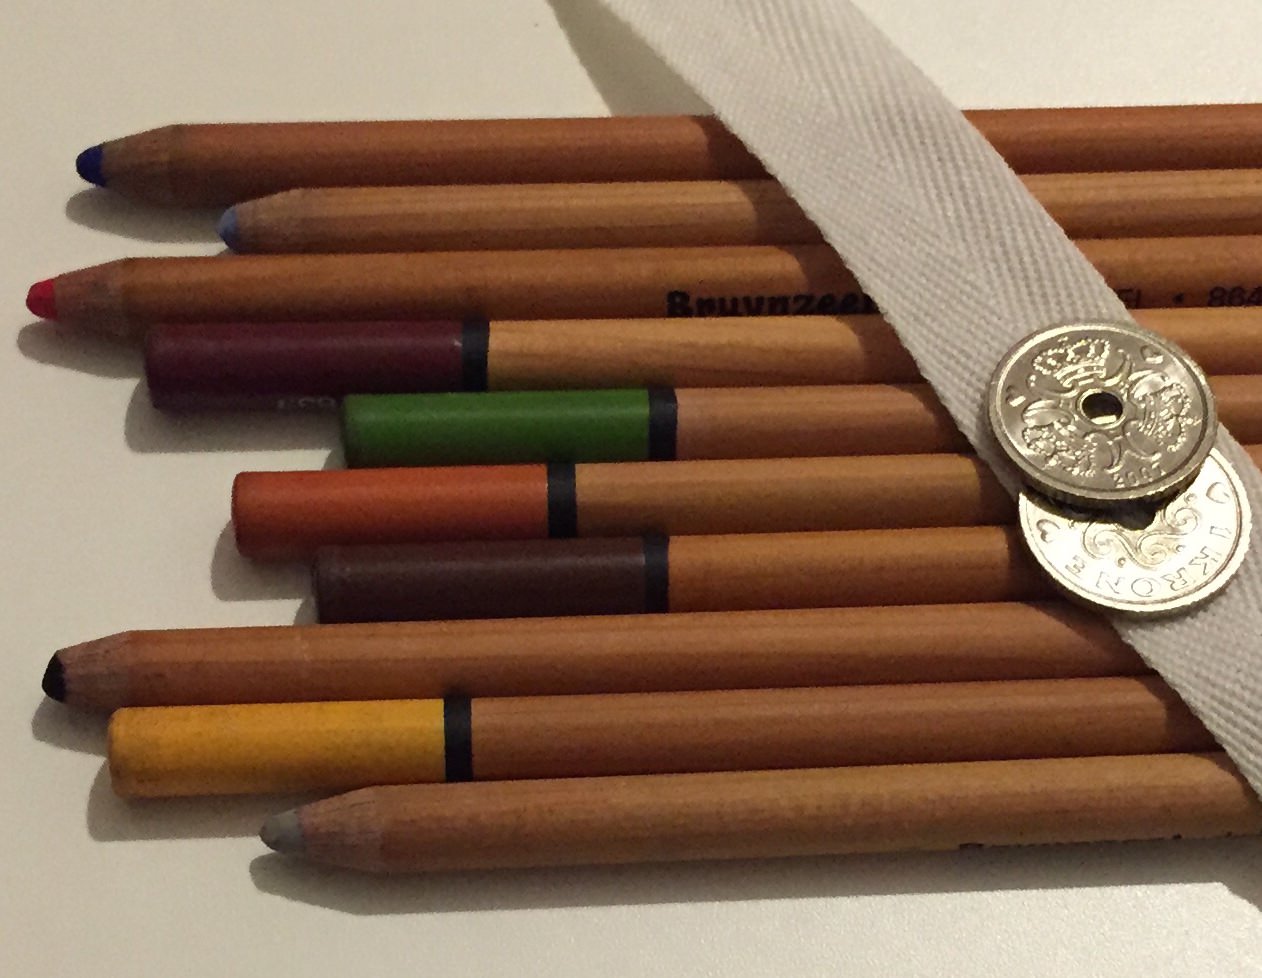
When taking a photo, we must adjust the camera in such a way that the amount of light is sufficiently high but not too high. Here are samples of the same scene, underexposed and overexposed. The right-hand side shows the same image with the exposure adjusted with Pixelmator. This is to show that there is no way to fix an image once it is severely overexposed or underexposed:
| unadjusted | "adjusted" |
|------------|------------|
|  |
|  |
|
|
|  |
|  |
|
In the underexposed image, even after trying to make it brighter, the dark regions of the image are "stuck" as black, and there is no way to make out that the pens in the image actually have different colors. The overexposed image has large regions that are stuck at the same level of white/gray. Note how the pattern on the fabric band and the coins is completely lost.
Stops
There are three things that affect the amount of light of an exposure: shutter speed, ISO value, and aperture. We will go through these in a bit.
In photography, a change to any one of these three which either doubles or halves the amount of light is called “one stop.” For each of these three (shutter speed, ISO, aperture), a single stop corresponds to a different numerical change. But if we adjust the shutter speed by one stop, we need to compensate by adjusting either the ISO or the aperture by exactly one stop, too, in order to get the same amount of light. We'll look at this in detail shortly.
The tricky part is that all three (shutter speed, ISO, and aperture) also affect other aspects of the exposure. And there are countless combinations of these three parameters that result in the same amount of light. Let's take a closer look.
Shutter Speed
When we capture an image, the image sensor captures light for a specific amount of time. This duration is called the shutter speed, because it describes how fast the shutter opens and closes.
A shutter speed of e.g. 1/50 second lets the image sensor capture light for 1/50 s (= 0.02 s or 20 ms). If we change the shutter speed to 1/25 s (40 ms), the image sensor will capture light for twice as long, and it will capture twice the amount of photons, i.e. twice the amount of light.
A so-called stop for the shutter speed either doubles or halves the shutter speed. Going from 1/50 s to 1/25 s is an adjustment by one stop.
The iPhone 6 can adjust the shutter speed from 1/8000 s up to 1/2 s. We can change the shutter speed to adjust the amount of light, but it will also affect motion blur of the image. If the camera and the scene that we're taking a photo of are completely still, we can make the exposure time (shutter speed) arbitrarily long, but more often than not, things around us are moving. And particularly with an iPhone, the camera itself is also moving.
When things move fast enough such that they will not be at a single spot on our image sensor during the entire time of the exposure, the resulting image will be blurred. We generally want things to be sharp and without blur, so we often need a shutter speed around 1/100 s or faster/shorter. For action shots of things that move at a fast speed, we may have to choose an even faster shutter speed. But we can also intentionally use a long shutter speed to blur things and show their motion. This works best when the camera is fixed on a tripod or something similar to make sure stationary objects in the scene are still sharp.
ISO
The ISO value is also called the film speed. It's a measure of how sensitive the image sensor is to light, and hence how noisy the exposure will be. The exact details are obviously a lot more complicated, and Wikipedia will give you a more detailed explanation.
The iPhone 6 can adjust the ISO of its camera from ISO 32 up to ISO 1600. A stop corresponds to either doubling or halving the ISO value. Every time we double the ISO (e.g. from ISO 100 to ISO 200) we only need half the amount of light. We pay for this by increasing the amount of noise in the photo.
At ISO 32, the images off the iPhone sensor will have the least amount of noise, but also need the most amount of light. At ISO 1600, the iPhone's image sensor will only need 1/50 (0.02) the amount of light, but the image will be a lot more noisy.
Here are two samples of the same scene taken with the iPhone 6 mounted on a tripod. The images show a small cutout of the full image. The left one is taken at ISO 32 and exposed for 1/3 s. The right one is taken at ISO 1600 and exposed for 1/180 s. The amount of light captured is about the same, but the left one has way less noise than the right one. Without the tripod, we wouldn't have been able to take a sharp photo with an exposure time of 1/3 s, though:
| ISO 32 | ISO 1600 |
|--------|----------|
|  |
|  |
|
Aperture
Finally, the aperture of a camera (more specifically of the camera's lens) is a measure of how large the opening is through which light reaches the image sensor. The aperture is specified as an f-number, such as ƒ/5.6 — the number 5.6 is the ratio of the focal length to the effective diameter of the aperture (the opening).
The f-numbers can be a bit confusing. A stop with f-numbers corresponds to a multiplication or division by the square root of 2 (√₂ ≃ 1.4). At ƒ/4, we will get half the light that we'd get at ƒ/2.8.
When using the iPhone camera, things are a lot easier because the aperture is fixed. An iPhone 6 has a fixed aperture of ƒ/2.2.
In addition to the amount of light, aperture also affects the depth of field. This relates to focus. The optical system in a camera will render things sharply within a range of distances away from the camera. As we change the aperture, this range becomes wider or narrower. We can use this to achieve nice effects. But sadly, we cannot adjust the aperture on the iPhone.
Combining
On the iPhone, we can only adjust the ISO and the shutter speed. We can hence trade noise (affected by the ISO) against motion blur/sharpness while maintaining the same level of exposure.
That explains why photos at night often look worse than those taken during the day: At night there's a lot less light. In order to still have an acceptable shutter speed, the auto exposure will bump up the ISO, probably to the maximum of what the camera allows. And even that may not be enough to achieve enough light, so the auto exposure will also lower the shutter speed. This combination results in more noise in the image, and the image being blurred.
Some iOS apps let you adjust the exposure manually. This can be done by either adjusting the EV/exposure value, which will still use the auto exposure logic of the camera, but lets you adjust the desired level of exposure. An EV value of −1 will result in an image that is one stop underexposed, according to the auto exposure logic. The auto exposure logic will still automatically pick some combination of ISO and shutter speed (since the aperture is fixed on the camera).
Another option for adjusting the exposure is shutter priority (often denoted with an S). This lets us directly set the desired shutter speed, while the auto exposure will try to compensate for the exposure by automatically adjusting the ISO.
Finally, we can do a fully manual exposure (often denoted with an M) by adjusting both the shutter speed and the ISO. When doing this, it's often convenient to use auto exposure first, and use the values it picks as a starting point.
Cameras that allow you to adjust the aperture have something called aperture priority (often denoted with an A), which is conceptually the same as shutter priority, only that we manually control the aperture and let the auto exposure logic pick the shutter speed (and ISO level, unless it is fixed).
There are several strategies for picking a good auto exposure. iOS has an auto exposure logic that looks at the overall image and makes a guess as to what you want to be exposed well. If parts of the image are very bright and others very dark, the camera cannot expose everything well. The auto exposure has to pick something, and if it, for example, finds faces, it will pick those. The built-in iOS camera app lets you tap on something in the image to hint to the auto exposure that this part of the image should be exposed well. That will cause the auto exposure to adjust itself. The camera app also lets you adjust the exposure value by dragging up or down on the screen. But to explicitly set the shutter speed and/or ISO, you need to use a different app.
Focus
A camera can only render sharply items that are within a certain range of distances from the camera. Items in the range are in focus. Items too close or too far away will be blurred; they're out of focus.
Most cameras, including the iPhone camera, have autofocus (AF). The camera will make a guess as to which part of the image should be in focus and adjust its focus accordingly. The built-in iOS camera app allows users to tap on something to make it focus on that part of the image — and some apps even allow users to manually set the focus.
Optical Components
The camera lens consists of multiple optical components. These direct and focus the light. When changing the focus of the camera, this is done by physically moving parts in the lens.
Modular cameras, such as SLRs, let you switch between different lenses. And even fixed lenses, such as the one in the iPhone, let you adjust the optical part of the camera by clipping external lenses on in front of the built-in one.
The key property of a lens system is its focal length — its magnification or angle of view. A wide-angle lens has low magnification, and lets the camera see a large area. A long-focus lens, particularly a telephoto lens, has a narrow angle of view, and it shows a small fraction of what a wide-angle lens would, due to its magnification.
The lens affects other aspects of the image too. It can introduce various unwanted distortions to the captured image, which affect both geometry and color (c.f. chromatic aberration).
Bucket Full of Light
Now we know how the basics work. But how does the camera actually capture an image?
Inside the camera of your iPhone, there's an image sensor. This is the part that's equivalent to the retina in our eyes. The image sensor converts light or photons into an electrical signal.
The image sensor consists of a huge number of individual pixel sensors that are lined up into a huge rectangle. We can think of each pixel sensor as a charge bucket. As photons hit the photodiode of the pixel sensor, they slowly build up a charge in that pixel's bucket. As a result, each pixel has its own tiny bucket of electrons. The charge, in turn, depends on the number of photons — and ultimately the intensity of the light hitting that particular spot.
Since we have a two-dimensional array of these pixel sensors, we now have a two-dimensional array of charges that reflect the intensity of the light at all these positions. On the iPhone 6, there are eight million of these tiny pixel sensors with their corresponding charge buckets.
At this point, we need two things: First, we need to be able to reset the charge. Second, we need to be able to read out the charges once the pixel sensors have been exposed to light. The reset can be done globally for all pixels. But as for the eight million small charges, we want to be able to turn them into voltage levels individually.
Digital cameras usually shift out rows of pixels. The image sensor will read the charge of the first electron bucket in the row, and then all buckets transfer their charge to the adjacent one. The first electron bucket now holds the charge that was in the second, which can now be read. Repeating this, one by one, all pixel values are read off the sensor's row.
The bucket or pixel sensor that is being read will have its value converted to a digital value through an analog-to-digital converter (ADC). The output of the ADC is a digital number for each pixel sensor corresponding to the amount of light that hit it. Finally, these values are then passed on to a digial image processor. We'll talk a bit more about the image processing below.
Pixel Size Matters
With this, we can already start to understand why the number of megapixels don't matter for image quality. Or rather: what's very important for the quality of the image is the size of the individual pixel. These pixel sensors are tiny. On an iPhone 6, they're 1.5 µm (microns or micrometers) on each side. On prosumer DSLR cameras, they can be as large as 9 µm on each side.
Two things happen as the size increases. First, the larger the pixel, the more light will hit it, and the more charge will build up. The more charge we have, the lower the noise in the readout. Imagine you're listening to music next to a busy street. If all you have is the built-in speaker of your phone, you may barely be able to make out the music. If you have a large stereo set, the noise of the street will disappear. The same for the charge in the pixels vs. the noise in the image sensor. Larger pixels are good. A 9 µm image pixel will capture 36 times as many photons as a 1.5 µm pixel.
The second thing is that larger pixels are less affected by bleed. The image sensor is a semiconductor made out of silicon, just like the CPU and RAM. As light hits the sensor, it will, to some extent, bleed into neighboring pixels in a similar fashion to light hitting frosted glass. As pixels get smaller and smaller, the amount of light bleeding into neighboring pixels increases: the value for each pixel is affected more and more by the light that is actually hitting its neighboring pixels, but bleeds into this pixel.
Shutter
Film cameras use a mechanical shutter, a delicate mechanism that would open in front of the film, and then close after the time specified by the shutter speed has expired. Larger digital cameras still use mechanical shutters, but smartphones and other small digital cameras use an electronic shutter.
Many of these, including iOS devices, use a so-called rolling shutter, which reads out image data line by line. Since lines are not read out at the same time, but in turn, this can lead to odd artifacts in images when objects in the scene move at a fast speed. Some of these are quite funny.
Color
Now we know how the iPhone measures how much light hits each pixel. But this would only result in a black and white photo. Color photos require additional technologies. Before we dive into those, let's take a look at what color is. We will sidetrack a bit to scratch the surface of what is known as color science.
It may seem too obvious that a deep green forest is deep green, and that a bright yellow bike is bright yellow. But what is this thing called “color?” When working with computers, we might be tempted to answer that a particular color is just a combination of certain amounts of red, green, and blue. But in reality, things are more complicated.
Some people (CIE) try to define color, but end up with confusing words like these:
Color is the attribute of visual perception consisting of any combination of chromatic and achromatic content. This attribute can be described by chromatic color names such as yellow, orange, brown, red, pink, green, blue, purple, etc., or by achromatic color names such as white, grey, black, etc., and qualified by bright, dim, light, dark or by combinations of such names.
Note: Perceived color depends on the spectral distribution of the color stimulus, on the size, shape, structure and surroundings of the stimulus area, on the state of adaptation of the observer’s visual system, and on the person’s experience of prevailing and similar situations of observation.
They define color recursively by referring to color itself, or chromatic, which is just another word for color.
Visual Perception
The important takeaway from the above is: "Color is a visual perception." Someone has to be looking at the thing for there to be color. Color doesn't exist outside our perception. You need a light source and something that reflects this light. And that light then has to be seen in order for there to be color.
Newton first discovered that light is a spectrum. Light consists of wavelengths roughly in the range of 380-720 nm. This is visible light. But we see light at different wavelengths differently.
The human eye has photo detectors. Some of these are so-called cones. There are three different kinds of cones: S, M, and L. Each kind responds differently to different wavelengths of light. These cones are sometimes referred to as red, green, and blue photoreceptors, although that's not really true. It would be more accurate to call them reddish, slightly less reddish, and blueish. As this graph shows, there's a quite a bit of overlap between their response curves:

A light source such as a lightbulb has a certain spectrum of light — a certain intensity at each wavelength. An object, e.g. a bike's frame, will in turn reflect or absorb different wavelengths with different intensities. For each cone, we can multiply (in fact, integrate over the wavelength) the light source's spectrum with the object's reflectance spectrum and the cone's response curve. For each cone, that will result in a single value. The resulting S, M, and L cones' three stimulus values are the perceived color. Our brain interprets this combination of the values for reddish, slightly less reddish, and blueish cones as a color. The perceived color, however, does not only depend on these three values, but also spatial and temporal information.
Specifying a Color
We now know how color is formed, but how can we specify a given color? What if we want to describe a particular red that a bicycle has?
It turns out, we need something called a color space for that. We can think of a color space as a unit of measurement.
When someone asks "How fast can an elephant run?", an answer like "18" or "2.8" would not make sense. We need to qualify it with a unit of measurement such as "18 km/h." The same goes for a color. When we ask: "What color is this bicycle?", we similarly need a "unit of measurement" in order to quantify our answer. This unit of measurement is a color space.
While the details are complicated, the main concept of color spaces is quite easy to understand: If we use three sources of light — a red, a green, and a blue source of light — we can mix these together to yield various colors of light. If we want to match, say, the color of a banana that's reflecting light from our desk lamp, we might end up with the values 10, 8, and 4. The color of the sky may end up being 4, 8, and 10. These values depend on exactly which light sources (which primaries) we picked for our three light sources that we're dialing in to give us those three values: 4, 8, and 10. If we had picked a different set of lamps (i.e. primaries), the values 11, 9, and 2 may have resulted in exactly the same color. The primaries we pick define our color space.
When asked "What color is this bicycle?", we can say that with a specific set of primary light sources, these have to be adjusted to 23 percent, 45 percent, and 53 percent intensity. Someone else with the same set of primaries can then recreate that color.
The de facto default color space used by modern computers, and iOS, is the sRGB color space. Its three primaries are defined in ITU-R BT.709. There are different ways to define a color space than through three primaries. In the end, though, the concept remains the same.
It is worth pointing out that most color spaces can only represent a subset of the visible colors. Let's take a look at the diagram of the sRGB color space:

The horseshoe-shaped diagram represents all colors visible to the human eye. The black triangle shows the colors that can be represented by the sRGB color space. The three corners are the primaries of the color space, i.e. the colors that consist of just one of the primaries at full intensity. The colors outside the triangle cannot be represented by the sRGB color space, even though the human eye can perceive them. And on a side note: All the colors outside the triangle in this diagram appear to be very similar to those on the edge of the triangle. That's because the real colors outside the triangle cannot be represented by the sRGB color space that the image file is using. It can only represent colors within the sRGB space and has to fall back to the one closest to the real color.
When we pick a color using hex values, say #dde834, or use UIKit's API UIColor(red:0.867, green:0.910, blue:0.204, alpha:1.000), we implicitly say 86.7 percent of the sRGB red primary, 91 percent of the sRGB green primary, and 20.4 percent of the sRGB blue primary.
One of the reasons to have RGB color spaces other than sRGB is that some of these have a larger gamut, i.e. can represent more of the visible colors. An example of a color space that is not based on RGB primaries is the CIELUV color space (aka. CIELAB). It also has three components: an L component for lightness, and u and v components (sometimes a and b) for the color-opponent dimensions.
Be sure to check out the Wikipedia article on color spaces for more information. And play around with the ColorSync Utility.app that's part of OS X.
White Is Not White
One additional thing that makes color tricky is that our brains do a lot of processing to make things look "right" — a huge part of this is what's referred to as white balancing. We all know what white or gray is. When we see something as gray, it's, more often than not, anything but gray. But our brains "figure out" that due to the lighting conditions, it ought to be gray. Hence we see it as such.
The light reflected from a white building will be vastly different in the light of the morning sun than in the evening. But our brains figure out that the building did not turn from one color into another. This may seem obvious, because we're used to our brains doing this all the time.
Our brains are capable of chromatic adaption — it is color balancing for us by independently regulating the sensitivity of each cone type. In addition to that, our brains pull some very complicated tricks beyond just simple adjustments. How the brain interprets the color signals from the cones depends on local, spatial, and temporal effects. Akiyoshi's illusion pages show some mind-boggling examples of what our brains are up to. When it comes to photos and color, the important takeaway is that a camera cannot simply capture the color it sees, because that would look very wrong to us.
When we take a photo with a camera, the camera is not as clever as our brains are. But cameras have an automatic white balance algorithm that tries to figure out what the neutral color/gray in the scene is. The camera's image processor will then try to adjust all colors in the photo accordingly. Sometimes this works, sometimes it fails. When it fails, it's most often due to strange lighting conditions, for example, if part of the scene is lit by one kind of light, and another lit by a different kind of light source.
With all of this in mind, let's move on and take a look at how our digital cameras see these colors.
The Digital Color Sensor
The pixel sensors in and of themselves do not differentiate between different wavelengths. By putting color filters in front of them, the pixel sensors will have distinct response curves based on the wavelength of the light.
If we use green, red, and blue color filters, some pixel sensors will only receive green light, some will only receive red light, and some only blue light (in reality, they'll have response curves similar to how our eyes' cones do). Today, cameras almost exclusively use a so-called Bayer filter. With such a filter, there are twice as many green pixel sensors as there are red or blue. It looks like this:

The digital camera now has color information, but it also looses a lot of information. It only knows what the level of red is for 1/4 of all pixels. Likewise for blue. For green, it knows what the level is for 1/2 of all pixels. In other words: 66 percent of the data is missing. The process of recreating full color information for all pixels is called debayering. This involves advanced algorithms which will interpolate the existing information into a full-resolution color image.
A simple interpolation would cause a lot of artifacts, and over the years, more and more advanced methods have been developed by various debayering algorithms to work around these. As an example of a problem, most debayering algorithms rely heavily upon the green pixels for luminosity. As a result, almost all debayering algorithms perform poorly in areas that are mostly red. Here's a cutout of an image taken with an iPhone 6:
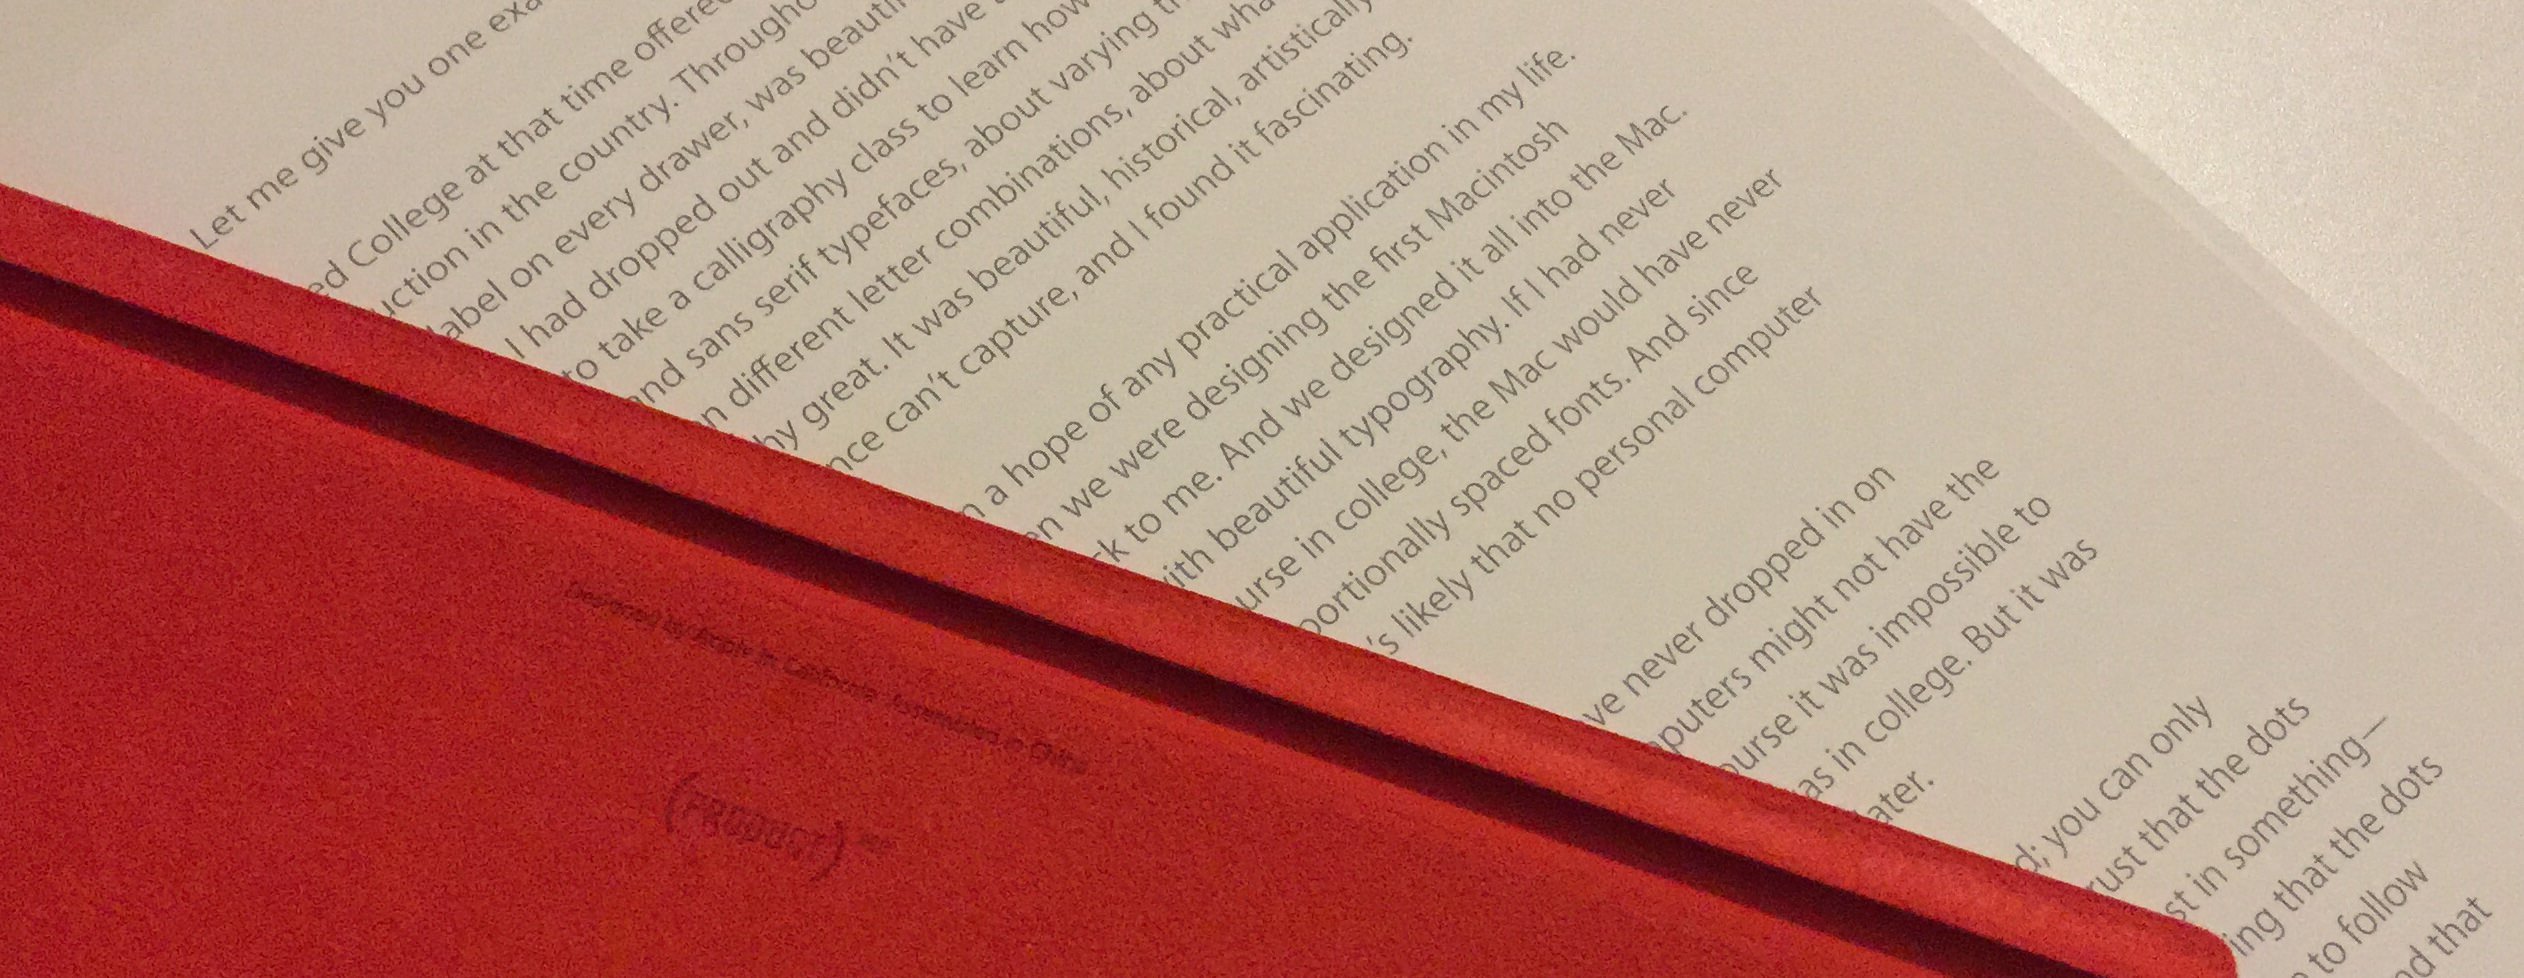
Note how the letters C and T of the large “PRODUCT” written on the inside of the iPad cover are extremely fuzzy compared to the black text in the booklet. It seems like the denoise part of the debayering is getting confused by the lack of green information in the part of the image that's the iPad cover.
Compensating for Imperfections
Aside from recreating color information, the image processor inside the camera will also do a handful of other adjustments to the image.
As image sensors have more and more pixels, the likelihood of some of these pixels being defect increases. Quite often, the camera will have a list of pixels (sometimes entire rows) which are misbehaving. During the image processing of the raw image data, the image processor will fix up any dead pixels.
Image sensors have pixels that are outside the area that receives visible light. These image sensor pixels will always be black. Their readout value, however, is not 0. But these pixels allow the image processor to adjust the image's black level by subtracting the value of those pixels from the ones that contain the actual image. This way, the image processor can also compensate for most inter-row variations in the image sensor (and/or ADC).
File Formats
The final step of a digital camera is to write the image data to a file. In just about all cases, digital photos are saved as JPEGs. JPEG compression modifies the image data in order to heavily compress it. The pixel data in an iPhone 6 image takes up almost 23 MB (3.264 x 2.448 x 3 = 23.970.816), while the JPEG files for such an image are typically 1.5 to 2.5 MB. Read more about JPEG compression in issue #3.
Some digital cameras allow the user to save a so-called RAW file. The camera's image processor will still have done some work on the raw image data coming off the sensor, but the file will contain something very close to the real pixel values. The benefit of this is that we can do the debayering at a later point.
For example, the debayering built into OS X is more powerful than that of most DSLRs. Working on a RAW file of a supported camera allows us to make more adjustments to the images without losing image quality, as we would when working on the data contained in the JPEG file. The RAW image processing of Core Image will apply various user-defined adjustments to the image as part of the debayering. When working on JPEG images, adjustments can only be done after the fact.
Check out CoreImage/CIRAWFilter.h in the OS X SDK, and WWDC 2014 session 514 at 32:40 for more details.
Final Words
Digital cameras of today are the result of decades of research and engineering. We've barely scratched the surface of all the technologies involved. But with this, we hope you will be able to get more out of your (iPhone) camera... and make better photo apps for iOS and OS X.