A Bit of Background
OpenCV is an open-source computer vision and machine learning library. It contains thousands of optimized algorithms, which provide a common toolkit for various computer vision applications. According to the project's about page, OpenCV is being used in many applications, ranging from stitching Google's Street View images to running interactive art shows.
OpenCV started out as a research project inside Intel in 1999. It has been in active development since then, and evolved to support modern technologies like OpenCL and OpenGL and platforms like iOS and Android.
In 1999, Half-Life was released and became extremely popular. Intel Pentium 3 was the state-of-the-art CPU, and 400-500MHz clock speeds were considered fast. And a typical CPU in 2006 when OpenCV 1.0 was released had about the same CPU performance as the A6 in an iPhone 5. Even though computer vision is traditionally considered to be a computationally intensive application, clearly our mobile devices have already passed the threshold of being able to perform useful computer vision tasks, and can be extremely versatile computer vision platforms with their attached cameras.
In this article, I will provide an overview of OpenCV from an iOS developer's perspective and introduce a few fundamental classes and concepts. Additionally, I cover how to integrate OpenCV to your iOS projects, and share the basics of Objective-C++. Finally, we'll look at a demo project to see how OpenCV can be used on an iOS device to perform facial detection and recognition.
Overview of OpenCV
Concepts
OpenCV is a C++ API consisting of various modules containing a wide range of functions, from low-level image color space conversions to high-level machine learning tools.
Using C++ APIs for iOS development is not something most of us do daily. You need to use Objective-C++ for the files calling OpenCV methods, i.e. you cannot call OpenCV methods from Swift or Objective-C. The OpenCV iOS tutorials tell you to simply change the file extensions to .mm for all classes where you'd like to use OpenCV, including view controllers. While this might work, it is not a particularly good idea. The correct approach is to write Objective-C++ wrapper classes for all OpenCV functionality you would like to use in your app. These Objective-C++ wrappers translate OpenCV's C++ APIs to safe Objective-C APIs and can be used transparently in all Objective-C classes. Going the wrapper route, you will be able to contain C++ code in your project to the wrappers only and most likely save lots of headaches further down the road in resolving hard-to-track compile errors because a C++ header was erroneously included in a wrong file.
OpenCV declares the cv namespace, such that classes are prefixed with cv::, like cv::Mat, cv::Algorithm, etc. It is possible to use using namespace cv in your .mm files in order to be able to drop the cv:: prefixes for a lot of classes, but you will still need to write them out for classes like cv::Rect and cv::Point, due to collisions with Rect and Point defined in MacTypes.h. While it's a matter of personal preference, I prefer to use cv:: everywhere for the sake of consistency.
Modules
Below is a list of the most important modules as described in the official documentation.
-
core: a compact module defining basic data structures, including the dense multi-dimensional array
Mat, and basic functions used by all other modules -
imgproc: an image processing module that includes linear and non-linear image filtering, geometrical image transformations (resize, affine and perspective warping, generic table-based remapping), color space conversion, histograms, and so on
-
video: a video analysis module that includes motion estimation, background subtraction, and object tracking algorithms
-
calib3d: basic multiple-view geometry algorithms, single and stereo camera calibration, object pose estimation, stereo correspondence algorithms, and elements of 3D reconstruction
-
features2d: salient feature detectors, descriptors, and descriptor matchers
-
objdetect: detection of objects and instances of the predefined classes (for example: faces, eyes, mugs, people, cars, and so on)
-
ml: various machine learning algorithms such as K-Means, Support Vector Machines, and Neural Networks
-
highgui: an easy-to-use interface for video capturing, image and video codecs, and simple UI capabilities (only a subset available on iOS)
-
gpu: GPU-accelerated algorithms from different OpenCV modules (unavailable on iOS)
-
ocl: common algorithms implemented using OpenCL (unavailable on iOS)
-
a few more helper modules such as Python bindings and user-contributed algorithms
Fundamental Classes and Operations
OpenCV contains hundreds of classes. Let's limit ourselves to a few fundamental classes and operations in the interest of brevity, and refer to the full documentation for further reading. Going over these core classes should be enough to get a feel for the logic behind the library.
####cv::Mat
cv::Mat is the core data structure representing any N-dimensional matrix in OpenCV. Since images are just a special case of 2D matrices, they are also represented by a cv::Mat, i.e. cv::Mat is the class you'll be working with the most in OpenCV.
An instance of cv::Mat acts as a header for the image data and contains information to specify the image format. The image data itself is only referenced and can be shared by multiple cv::Mat instances. OpenCV uses a reference counting method similar to ARC to make sure that the image data is deallocated when the last referencing cv::Mat is gone. Image data itself is an array of concatenated rows of the image (for N-dimensional matrices, the data consists of concatenated data arrays of the contained N-1 dimensional matrices). Using the values contained in the step[] array, each pixel of the image can be addressed using pointer arithmetic:
uchar *pixelPtr = cvMat.data + rowIndex * cvMat.step[0] + colIndex * cvMat.step[1]
The data format for each pixel is retrieved by the type() function. In addition to common grayscale (1-channel, CV_8UC1) and color (3-channel, CV_8UC3) images with 8-bit unsigned integers per channel, OpenCV supports many less frequent formats, such as CV_16SC3 (16-bit signed integer with 3 channels per pixel) or even CV_64FC4 (64-bit floating point with 4 channels per pixel).
####cv::Algorithm
Algorithm is an abstract base class for many algorithms implemented in OpenCV, including the FaceRecognizer we will be using in the demo project. It provides an API not unlike CIFilter in Apple's Core Image framework, where you can create an Algorithm by calling Algorithm::create() with the name of the algorithm, and can set and get various parameters using the get() and set() methods, vaguely similar to key-value coding. Moreover, the Algorithm base provides functionality to save and load parameters to/from XML or YAML files.
Using OpenCV on iOS
Adding OpenCV to Your Project
You have three options to integrate OpenCV into your iOS project.
-
Just use CocoaPods:
pod "OpenCV". -
Download the official iOS framework release and add the framework to your project.
-
Pull the sources from GitHub and build the library on your own according to the instructions here.
Objective-C++
As mentioned previously, OpenCV is a C++ API, and thus cannot be directly used in Swift and Objective-C code. It is, however, possible to use OpenCV in Objective-C++ files.
Objective-C++ is a mixture of Objective-C and C++, and allows you to use C++ objects in Objective-C classes. The clang compiler treats all files with the extension .mm as Objective-C++, and it mostly works as you would expect, but there are a few precautions you should take when using Objective-C++ in your project. Memory management is the biggest point where you should be extra careful, since ARC only works with Objective-C objects. When you use a C++ object as a property, the only valid attribute is assign. Therefore, your dealloc should ensure that the C++ object is properly deleted.
The second important point when using Objective-C++ in your iOS project is leaking the C++ dependencies, if you include C++ headers in your Objective-C++ header. Any Objective-C class importing your Objective-C++ class would be including the C++ headers too, and thus needs to be declared as Objective-C++ itself. This can quickly spread like a forest fire through your project if you include C++ headers in your header files. Always wrap your C++ includes with #ifdef __cplusplus, and try to include C++ headers only in your .mm implementation files wherever possible.
For more details on how exactly C++ and Objective-C work together, have a look at this tutorial by Matt Galloway.
Demo: Facial Detection and Recognition
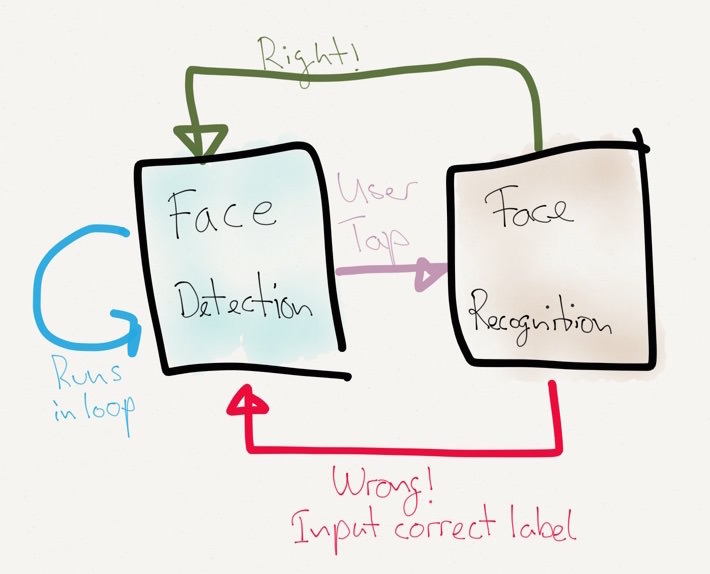
So, now that we have an overview of OpenCV and how to integrate it into our apps, let's build a small demo app with it: an app that uses the video feed from the iPhone camera to continuously detect faces and draw them on screen. When the user taps on a face, our app will attempt to recognize the person. The user must then either tap "Correct" if our recognizer was right, or tap on the correct person to correct the prediction if it was wrong. Our face recognizer then learns from its mistakes and gets better over time:
The source code for the demo app is available on GitHub.
Live Video Capture
The highgui module in OpenCV comes with a class, CvVideoCamera, that abstracts the iPhone camera and provides our app with a video feed through a delegate method, - (void)processImage:(cv::Mat&)image. An instance of the CvVideoCamera can be set up like this:
								CvVideoCamera *videoCamera = [[CvVideoCamera alloc] initWithParentView:view];
videoCamera.defaultAVCaptureDevicePosition = AVCaptureDevicePositionFront;
videoCamera.defaultAVCaptureSessionPreset = AVCaptureSessionPreset640x480;
videoCamera.defaultAVCaptureVideoOrientation = AVCaptureVideoOrientationPortrait;
videoCamera.defaultFPS = 30;
videoCamera.grayscaleMode = NO;
videoCamera.delegate = self;
Now that we have set up our camera with a 30-frames-per-second frame rate, our implementation of processImage: will be called 30 times per second. Since our app will detect faces continuously, we should perform our facial detection here. Please note that if the facial detection at each frame takes longer than 1/30 seconds, we will be dropping frames.
Face Detection
You don't actually need OpenCV for facial detection, since Core Image already provides the CIDetector class. This can perform pretty good facial detection, and it is optimized and very easy to use:
								CIDetector *faceDetector = [CIDetector detectorOfType:CIDetectorTypeFace context:context options:@{CIDetectorAccuracy: CIDetectorAccuracyHigh}];

NSArray *faces = [faceDetector featuresInImage:image];
The faces array contains a CIFaceFeature instance for each detected face in the image. Face features describe the location and the size of the face, in addition to optional eye and mouth positions.
OpenCV, on the other hand, provides an infrastructure for object detection, which can be trained to detect any object you desire. The library comes with multiple ready-to-use detector parameters for faces, eyes, mouths, bodies, upper bodies, lower bodies, and smiles. The detection engine consists of a cascade of very simple detectors (so-called Haar feature detectors) with different scales and weights. During the training phase, the decision tree is optimized with known positive and false images. Detailed information about the training and detection processes is available in the original paper. Once the cascade of correct features and their scales and weights have been determined in training, the parameters can be loaded to initialize a cascade classifier:
								//Path to the training parameters for frontal face detector
NSString *faceCascadePath = [[NSBundle mainBundle] pathForResource:@"haarcascade_frontalface_alt2"
                                                   ofType:@"xml"];

const CFIndex CASCADE_NAME_LEN = 2048;
char *CASCADE_NAME = (char *) malloc(CASCADE_NAME_LEN);
CFStringGetFileSystemRepresentation( (CFStringRef)faceCascadePath, CASCADE_NAME, CASCADE_NAME_LEN);

CascadeClassifier faceDetector;
faceDetector.load(CASCADE_NAME);
The parameter files can be found under the data/haarcascades folder inside the OpenCV distribution.
After the face detector has been initialized with the desired parameters, it can be used to detect faces:
								cv::Mat img;
vector<cv::Rect> faceRects;
double scalingFactor = 1.1;
int minNeighbors = 2;
int flags = 0;
cv::Size minimumSize(30,30);
faceDetector.detectMultiScale(img, faceRects,
                              scalingFactor, minNeighbors, flags
                              cv::Size(30, 30) );
During detection, the trained classifier is moved across all the pixels in the input image at different scales to be able to detect faces of different sizes. The scalingFactor parameters determine how much the classifier will be scaled up after each run. The minNeighbors parameter specifies how many positive neighbors a positive face rectangle should have to be considered a possible match; when a potential face rectangle is moved a pixel and does not trigger the classifier any more, it is most likely that it's a false positive. Face rectangles with fewer positive neighbors than minNeighbors are rejected. When minNeighbors is set to zero, all potential face rectangles are returned. The flags parameter is a relic from the OpenCV 1.x API and should always be 0. And finally, minimumSize specifies the smallest face rectangle we're looking for. The faceRects vector will contain the frames of detected faces in img. The image for the face can then be extracted with the () operator on cv::Mat simply by calling cv::Mat faceImg = img(aFaceRect).
Once we have at least one face rectangle, either using a CIDetector or an OpenCV CascadeClassifier, we can try to identify the person in the image.
Facial Recognition
OpenCV comes with three algorithms for recognizing faces: Eigenfaces, Fisherfaces, and Local Binary Patterns Histograms (LBPH). Please read the very informative OpenCV documentation if you would like to know how they work and how they differ from each other.
For the purposes of our demo app, we will be using the LBPH algorithm, mostly because it can be updated with user input without requiring a complete re-training every time a new person is added or a wrong recognition is corrected.
In order to use the LBPH recognizer, let's create an Objective-C++ wrapper for it, which exposes the following methods:
								+ (FJFaceRecognizer *)faceRecognizerWithFile:(NSString *)path;
- (NSString *)predict:(UIImage*)img confidence:(double *)confidence;
- (void)updateWithFace:(UIImage *)img name:(NSString *)name;
Our factory method creates an LBPH instance like this:
								+ (FJFaceRecognizer *)faceRecognizerWithFile:(NSString *)path {
    FJFaceRecognizer *fr = [FJFaceRecognizer new];
    fr->_faceClassifier = createLBPHFaceRecognizer();
    fr->_faceClassifier->load(path.UTF8String);
    return fr;
}
Prediction can be implemented as follows:
								- (NSString *)predict:(UIImage*)img confidence:(double *)confidence {
    cv::Mat src = [img cvMatRepresentationGray];
    int label;
    self->_faceClassifier->predict(src, label, *confidence);
    return _labelsArray[label];
}
Please note that we had to convert from UIImage to cv::Mat through a category method. The conversion itself is quite straightforward and is achieved by creating a CGContextRef using CGBitmapContextCreate pointing to the data pointer of a cv::Image. When we draw our UIImage on this bitmap context, the data pointer of our cv::Image is filled with the correct data. What's more interesting is that we are able to create an Objective-C++ category on an Objective-C class and it just works!
Additionally, the OpenCV face recognizer only supports integers as labels, but we would like to be able to use a person's name as a label, and have to implement a simple conversion between them through an NSArray property.
Once the recognizer predicts a label for us, we present this label to the user. Then it's up to the user to give feedback to our recognizer. The user could either say, "Yes, that's correct!" or "No, this is person Y, not person X." In both cases, we can update our LBPH model to improve its performance in future predictions by updating our model with the face image and the correct label. Updating our facial recognizer with user feedback can be achieved by the following:
								- (void)updateWithFace:(UIImage *)img name:(NSString *)name {
    cv::Mat src = [img cvMatRepresentationGray];
    NSInteger label = [_labelsArray indexOfObject:name];
    if (label == NSNotFound) {
        [_labelsArray addObject:name];
        label = [_labelsArray indexOfObject:name];
    }
    vector<cv::Mat> images = vector<cv::Mat>();
    images.push_back(src);
    vector<int> labels = vector<int>();
    labels.push_back((int)label);
    self->_faceClassifier->update(images, labels);
}
Here again we do the conversion from UIImage to cv::Mat and from int labels to NSString labels. We also have to put our parameters into std::vector instances, as expected by the OpenCV FaceRecognizer::update API.
This "predict, get feedback, update cycle" is known as supervised learning in literature.
Conclusion
OpenCV is a very powerful and multi-faceted framework covering many fields which are still active research areas. Attempting to provide a fully detailed instruction manual in an article would be a fool's errand. Therefore, this article is meant to be a very high-level overview of the OpenCV framework. I attempted to cover some practical tips to integrate OpenCV in your iOS project, and went through a facial recognition example to show how OpenCV can be used in a real project. If you think OpenCV could help you for your project, the official OpenCV documentation is mostly very well written and very detailed. Go ahead and create the next big hit app!