This article is a beginner's introduction to Core Image, an image processing framework for OS X and iOS.
If you would like to follow along with the code in this article, you can download the sample project at GitHub. The sample project is an iOS app that lists a large selection of system-provided image filters, and it provides a UI for tweaking their parameters and observing the effects.
Although the sample code is written in Swift for iOS, the concepts transfer readily to Objective-C and OS X.
Fundamental Concepts
To talk about Core Image, we first need to introduce a few fundamental concepts.
A filter is an object that has a number of inputs and outputs and performs some kind of transformation. For example, a blur filter might take an input image and a blur radius and produce an appropriately blurred output image.
A filter graph is a network (directed acyclic graph) of filters, chained together so that the output of one filter can be the input of another. In this way, elaborate effects can be achieved. We'll see below how to connect filters to create a vintage photographic effect.
Getting Acquainted with the Core Image API
With these concepts in our toolkit, we can start to explore the specifics of image filtering with Core Image.
Core Image Architecture
Core Image has a plug-in architecture, which means that it allows users to extend its functionality by writing custom filters that integrate with the system-provided filters. We will not be taking advantage of Core Image's extensibility in this article; I mention it only because it influences the API of the framework.
Core Image is written to make the most of the hardware on which it is running. The actual implementation of each filter, the kernel, is written in a subset of GLSL, the shading language of OpenGL. When multiple filters are connected to form a filter graph, Core Image strings together these kernels to build one efficient program that can be run on the GPU.
Whenever possible, Core Image defers work until the future. Oftentimes, no allocations or processing will take place until the output of the final filter in a filter graph is requested.
In order to do work, Core Image requires an object called a context. The context is the actual workhorse of the framework, allocating the necessary memory and compiling and running the filter kernels that do the image processing. Contexts are very expensive to create, so you will most often want to create one context and use it repeatedly. We will see how to create a context below.
Querying for Available Filters
Core Image filters are created by name. To get a list of system filters, we ask Core Image for the names of filters in the kCICategoryBuiltIn category:
let filterNames = CIFilter.filterNamesInCategory(kCICategoryBuiltIn) as [String]
The list of filters available on iOS is very nearly a subset of the filters available on OS X. There are 169 built-in filters on OS X, and there are 127 on iOS.
Creating a Filter by Name
Now that we have a list of available filters, we can create and use a filter. For example, to create a Gaussian blur filter, we pass the filter name to the appropriate CIFilter initializer:
let blurFilter = CIFilter(named:"CIGaussianBlur")
Setting Filter Parameters
Because of Core Image's plug-in structure, most filter properties are not set directly, but with key-value coding (KVC). For example, to set the blur radius of the blur filter, we use KVC to set its inputRadius property:
blurFilter.setValue(10.0 forKey:"inputRadius")
Since this method takes AnyObject? (id in Objective-C) as its value parameter, it is not particularly type safe. Therefore, setting filter parameters requires some vigilance to ensure that you are passing the expected type.
Querying Filter Attributes
To know what input and output parameters are offered by a filter, we can ask for its inputKeys and outputKeys arrays, respectively. These each return an array of NSStrings.
To get more information about each parameter, we can look in the attributes dictionary provided by the filter. Each input and output parameter name maps to a dictionary of its own, describing what kind of parameter it is, and its minimum and maximum values, if applicable. For example, here is the dictionary corresponding to the inputBrightness parameter of the CIColorControls filter:
								inputBrightness = {
    CIAttributeClass = NSNumber;
    CIAttributeDefault = 0;
    CIAttributeIdentity = 0;
    CIAttributeMin = -1;
    CIAttributeSliderMax = 1;
    CIAttributeSliderMin = -1;
    CIAttributeType = CIAttributeTypeScalar;
};
For numerical parameters, the dictionary will contain kCIAttributeSliderMin and kCIAttributeSliderMax keys, which bound the expected input quantities. Most parameters also contain a kCIAttributeDefault key, which maps to the default value of the parameter.
Filtering an Image in Practice
The work of filtering an image consists of three parts: building and configuring a filter graph, sending an image in to be filtered, and retrieving the filtered image. The sections below cover this in detail.
Building a Filter Graph
Building a filter graph consists of instantiating filters to do the kind of work we want to perform, setting their parameters, and wiring them up so that the image data flows through each filter in turn.
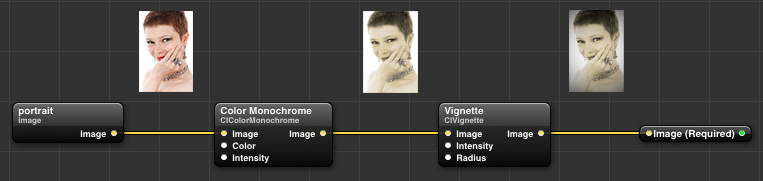
In this section, we will construct a filter graph for producing images in the style of a 19th-century tintype photograph. We will chain together two effects to create this effect: a monochrome filter to simultaneously desaturate and tint the image, and a vignette filter to create a shadow effect that frames the image.
Quartz Composer, available for download from the Apple Developer website, is useful for prototyping Core Image filter graphs. Below, we have composed the desired photo filter by wiring together the Color Monochrome filter and the Vignette filter:
Once we're satisfied with the effect, we can recreate the filter graph in code:
								let sepiaColor = CIColor(red: 0.76, green: 0.65, blue: 0.54)
let monochromeFilter = CIFilter(name: "CIColorMonochrome",
    withInputParameters: ["inputColor" : sepiaColor, "inputIntensity" : 1.0])
monochromeFilter.setValue(inputImage, forKey: "inputImage")

let vignetteFilter = CIFilter(name: "CIVignette",
    withInputParameters: ["inputRadius" : 1.75, "inputIntensity" : 1.0])
vignetteFilter.setValue(monochromeFilter.outputImage, forKey: "inputImage")

let outputImage = vignetteFilter.outputImage
Note that the output image of the monochrome filter becomes the input image of the vignette filter. This causes the vignette to be applied to the tinted monochrome image. Also note that we can specify parameters in the initializer, instead of setting them individually with KVC.
Creating the Input Image
Core Image filters require that their input image be of type CIImage. For iOS programmers who are used to UIImage, this may be a little unusual, but the distinction is merited. A CIImage is actually a more general entity than a UIImage, since a CIImage may have infinite extent. Obviously, we can't store an infinite image in memory, but conceptually, this means that you can request image data from an arbitrary region in the 2D plane and get back a meaningful result.
All of the images we will be using in this article are finite, and it's easy enough to create a CIImage from a UIImage. In fact, it's just one line of code:
let inputImage = CIImage(image: uiImage)
There are also convenience initializers for creating CIImages directly from image data or a file URL.
Once we have a CIImage, we can set it as the input image of the filter graph by setting the inputImage parameter of the filter:
filter.setValue(inputImage, forKey:"inputImage")
Fetching a Filtered Image
Filters have a property named outputImage. As you might guess, it has type CIImage. So how do we perform the inverse operation of creating a UIImage from a CIImage? Well, although we've spent all our time thus far building up a filter graph, now is the time to invoke the power of the CIContext and do the actual work of filtering the image.
The simplest way to create a context is to pass a nil options dictionary to its constructor:
let ciContext = CIContext(options: nil)
To get an image out of the filter graph, we ask our CIContext to create a CGImage from a rect in the output image, passing the extent (bounds) of the input image:
let cgImage = ciContext.createCGImage(filter.outputImage, fromRect: inputImage.extent())
The reason we use the input image's extent is that the output image often has different dimensions than the input image. For example, a blurred image has some extra pixels around its border, due to sampling beyond the edge of the input image.
We can now create a UIImage from this newly created CGImage:
let uiImage = UIImage(CGImage: cgImage)
It is possible to create a UIImage directly from a CIImage, but this approach is fraught: if you try to display such an image in a UIImageView, its contentMode property will be ignored. Using an intermediate CGImage takes an extra step, but obviates this annoyance.
Improving Performance with OpenGL
It's time-consuming and wasteful to use the CPU to draw a CGImage, only to hand the result right back to UIKit for compositing. We'd prefer to be able to draw the filtered image to the screen without having to take a trip through Core Graphics. Fortunately, because of the interoperability of OpenGL and Core Image, we can do exactly that.
To share resources between an OpenGL context and a Core Image context, we need to create our CIContext in a slightly different way:
								let eaglContext = EAGLContext(API: .OpenGLES2)
let ciContext = CIContext(EAGLContext: context)
Here, we create an EAGLContext with the OpenGL ES 2.0 feature set. This GL context can be used as the backing context for a GLKView or for drawing into a CAEAGLLayer. The sample code uses this technique to draw images efficiently.
When a CIContext has an associated GL context, a filtered image can be drawn with OpenGL using the following call:
ciContext.drawImage(filter.outputImage, inRect: outputBounds, fromRect: inputBounds)
As before, the fromRect parameter is the portion of the image to draw in the filtered image's coordinate space. The inRect parameter is the rectangle in the coordinate space of the GL context into which the image should be drawn. If you want to respect the aspect ratio of the image, you may need to do some math to compute the appropriate inRect.
Forcing Filtering onto the CPU
Whenever possible, Core Image will perform filtering on the GPU. However, it does have the ability to fall back to the CPU. Filtering done on the CPU may have better accuracy, since GPUs often exchange some fidelity for speed in their floating-point calculations. You can force Core Image to run on the CPU by setting the value of the kCIContextUseSoftwareRenderer key in the options dictionary to true when creating a context.
You can determine whether a CPU or GPU renderer is in use by setting the CI_PRINT_TREE environment variable to 1 in your scheme configuration in Xcode. This will cause Core Image to print diagnostic information every time a filtered image is rendered. This setting is useful for examining the composed image filter tree as well.
A Tour of the Sample App
The sample code for this article consists of an iPhone app that showcases a broad variety of the image filters available in Core Image for iOS.
Creating a GUI from Filter Parameters
To demonstrate a maximum number of filters, the sample app takes advantage of the introspective nature of Core Image and generates a user interface for controlling the parameters of the filters it supports:
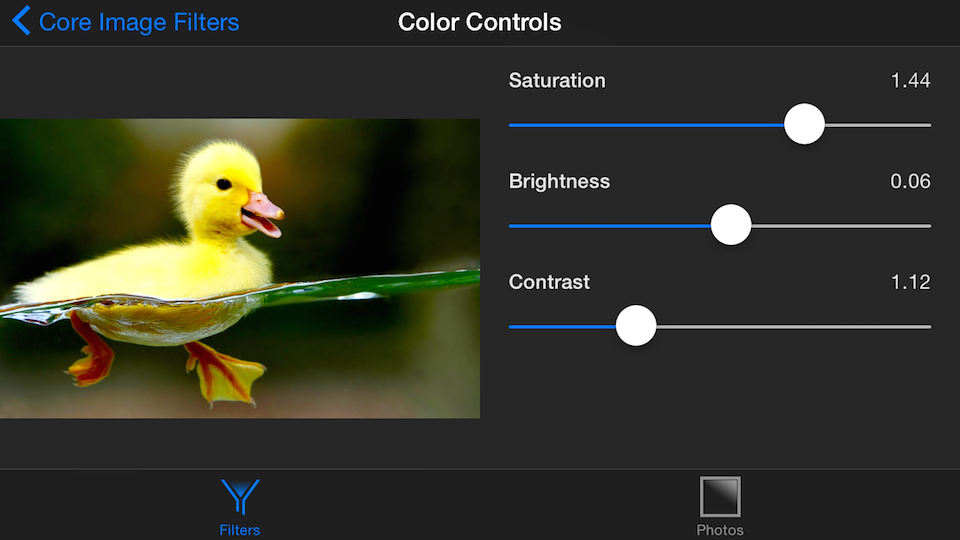
The sample app is restricted to filters that have a single input image, and zero or more numerical inputs. There are some interesting filters that do not fall into this category (notably the compositing and transition filters). Even so, the app gives a good overview of the functionality available in Core Image.
For each input parameter to the filter, a slider is configured with the minimum and maximum value of the parameter, and its value is set to the default value. When the value of the slider changes, it conveys the change to its delegate, which is a UIImageView subclass that holds a CIFilter reference.
Using the Built-In Photo Filters
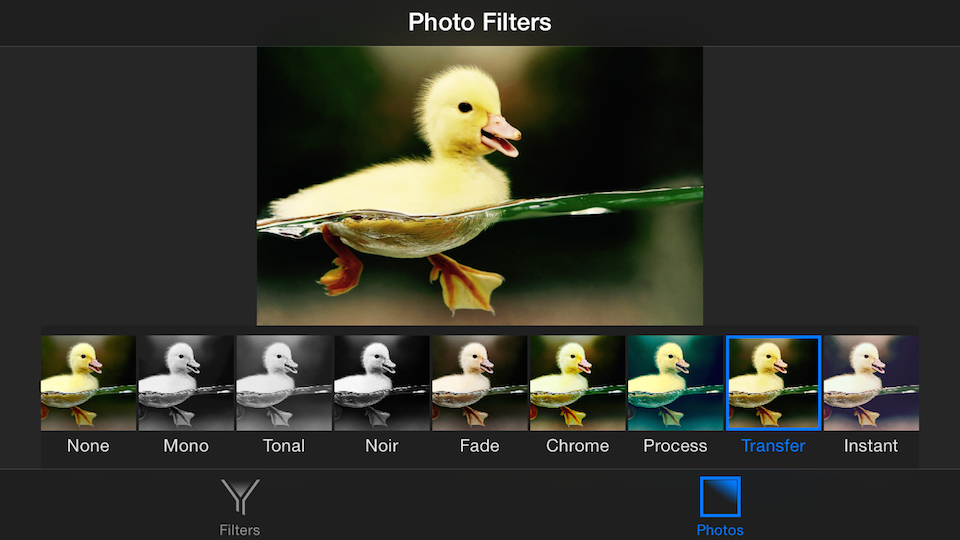
In addition to numerous other built-in filters, the sample app demonstrates the photo filters introduced in iOS 7. These filters have no parameters we can tune, but they merit inclusion, since they show how you can emulate the effects in the Photos app for iOS:
Conclusion
This article has been a brief introduction to Core Image, a framework for high-performance image processing. We've tried to cover as many features of the framework as practically possible in this short format. You've learned how to instantiate and wire together Core Image filters, get images in and out of filter graphs, and tune parameters to get the desired outcome. You also learned how to access the system-provided photo filters, with which you can emulate the behavior of the Photos app on iOS.
You now know enough to go out and write your own photo editing applications. With a little more exploration, you'll be able to write your own filters that exploit the amazing power of your Mac or iPhone to perform previously unimagined effects. Go forth and filter!
References
The Core Image Reference Collection is the canonical set of documentation on Core Image.
The Core Image Filter Reference contains a comprehensive list of the image filters available in Core Image, along with usage examples.
For a take on writing Core Image code in a more functional style, see Florian Kugler's article in objc.io issue #16.