Introduction
Scripting between Mac applications has long been a part of the desktop ecosystem. It was originally introduced in October 1993 as part of System 7 as a way to create complex workflows using publishing applications like QuarkXPress. Since then, many applications have supported AppleScript through the use of scripting dictionaries (Brent's article shows you how to do this.) In this article, I'm going to explain how to communicate with another app using the commands and objects in its scripting dictionary.
But before we do that, we need to take a look at some recent events on the Mac platform. After opening the Mac App Store in late 2010, Apple announced that all developer submissions would need to run in a sandbox by November 2011. This deadline was pushed back several times, until it eventually went into effect on June 1, 2012.
The moving deadline should be your first clue that getting Mac apps to run in a sandbox was not exactly straightforward. Unlike their counterparts on iOS that had always run in a sandbox, many long-time developers realized that a secure environment would mean a lot of changes to their apps. As I heard one Apple security engineer put it, "We're putting the genie back into the bottle."
One of the major challenges with this effort was with apps that used AppleScript. Many functions that used to be easy were suddenly difficult. Other things became outright impossible to accomplish. The main cause of this frustration was that apps could no longer arbitrarily control another app via scripting. From a security point of view, there are many good reasons why this is a bad idea. From a developer and customer point of view, a lot of things broke.
Initially, Apple helped ease the transition by granting 'temporary exceptions' in an application's entitlements. These exceptions allowed apps to retain functionality that would have otherwise been lost. And as the name indicates, many of these special cases are disappearing, as alternative ways of controlling other apps have been made available in more recent versions of OS X.
This tutorial will show you the current best practices for controlling another app using AppleScript. I'll also show you some tricks that will help you and your customers get AppleScripts set up with a minimum amount of effort.
First Steps
The first thing you need to learn is how to run an AppleScript from your own app. Typically, the hardest part of this is writing AppleScript code. Behold:
								on chockify(inputString)
    set resultString to ""

    repeat with inputStringCharacter in inputString
        set asciiValue to (ASCII number inputStringCharacter)
        if (asciiValue > 96 and asciiValue < 123) then
            set resultString to resultString & (ASCII character (asciiValue - 32))
        else
            if ((asciiValue > 64 and asciiValue < 91) or (asciiValue = 32)) then
                set resultString to resultString & inputStringCharacter
            else
                if (asciiValue > 47 and asciiValue < 58) then
                    set numberStrings to {"ZERO", "ONE", "TWO", "THREE", "FOR", "FIVE", "SIX", "SEVEN", "EIGHT", "NINE"}
                    set itemIndex to asciiValue - 47
                    set numberString to item itemIndex of numberStrings
                    set resultString to resultString & numberString & " "
                else
                    if (asciiValue = 33) then
                        set resultString to resultString & " DUH"
                    else
                        if (asciiValue = 63) then
                            set resultString to resultString & " IF YOU KNOW WHAT I MEAN"
                        end if
                    end if
                end if
            end if
        end if
    end repeat

    resultString
end chockify
In my opinion, AppleScript's greatest strength is not its syntax. Nor is its ability to process strings, even when it's making them AWESOME DUH
When developing scripts like this, I constantly refer to the AppleScript Language Guide. The good news is that scripts that communicate with other apps are typically short and sweet. AppleScript can be thought of as a transport mechanism rather than a processing environment. The script shown above is atypical.
Once you have your script written and tested, you can move back to the comfortable environs of Objective-C. And the first line of code you'll write is a trip back in time to the Carbon era:
#import <Carbon/Carbon.h> // for AppleScript definitions
Don't worry; you're not going to do anything crazy like add a framework to the project. You just need Carbon.h because it has a list of all the AppleEvent definitions. Remember, this code has been around for more than 20 years!
Once you have the definitions, you can create an event descriptor. This is a chunk of data that is passed both to and from your script. At this point, you can think of it as an encapsulation of a target that will execute the event, a function to call, and a list of parameters for that function. Here is one for the "chockify" function above, using an NSString as a parameter:
								- (NSAppleEventDescriptor *)chockifyEventDescriptorWithString:(NSString *)inputString
{
    // parameter
    NSAppleEventDescriptor *parameter = [NSAppleEventDescriptor descriptorWithString:inputString];
    NSAppleEventDescriptor *parameters = [NSAppleEventDescriptor listDescriptor];
    [parameters insertDescriptor:parameter atIndex:1]; // you have to love a language with indices that start at 1 instead of 0

    // target
    ProcessSerialNumber psn = {0, kCurrentProcess};
    NSAppleEventDescriptor *target = [NSAppleEventDescriptor descriptorWithDescriptorType:typeProcessSerialNumber bytes:&psn length:sizeof(ProcessSerialNumber)];

    // function
    NSAppleEventDescriptor *function = [NSAppleEventDescriptor descriptorWithString:@"chockify"];

    // event
    NSAppleEventDescriptor *event = [NSAppleEventDescriptor appleEventWithEventClass:kASAppleScriptSuite eventID:kASSubroutineEvent targetDescriptor:target returnID:kAutoGenerateReturnID transactionID:kAnyTransactionID];
    [event setParamDescriptor:function forKeyword:keyASSubroutineName];
    [event setParamDescriptor:parameters forKeyword:keyDirectObject];

    return event;
}
Note: This code is available on GitHub. The Automation.scpt file contains the chockify function and all the other scripts used in this tutorial. The Objective-C code is all in AppDelegate.m.
Now that you have an event descriptor that tells AppleScript what you want to do, you need to give it somewhere to do it. That means loading an AppleScript from your application bundle:
								NSURL *URL = [[NSBundle mainBundle] URLForResource:@"Automation" withExtension:@"scpt"];
if (URL) {
    NSAppleScript *appleScript = [[NSAppleScript alloc] initWithContentsOfURL:URL error:NULL];

    NSAppleEventDescriptor *event = [self chockifyEventDescriptorWithString:[self.chockifyInputTextField stringValue]];
    NSDictionary *error = nil;
    NSAppleEventDescriptor *resultEventDescriptor = [appleScript executeAppleEvent:event error:&error];
    if (! resultEventDescriptor) {
        NSLog(@"%s AppleScript run error = %@", __PRETTY_FUNCTION__, error);
    }
    else {
        NSString *string = [self stringForResultEventDescriptor:resultEventDescriptor];
        [self updateChockifyTextFieldWithString:string];
    }
}
An instance of NSAppleScript is created using a URL from the application bundle. That script, in turn, is used with the chockify event descriptor created above. If everything goes according to plan, you end up with another event descriptor. If not, you get a dictionary back that contains information describing what went wrong. Although the pattern is similar to many other Foundation classes, the error is not an instance of NSError.
All that's left to do now is extract the information you want from the descriptor:
								- (NSString *)stringForResultEventDescriptor:(NSAppleEventDescriptor *)resultEventDescriptor
{
    NSString *result = nil;

    if (resultEventDescriptor) {
        if ([resultEventDescriptor descriptorType] != kAENullEvent) {
            if ([resultEventDescriptor descriptorType] == kTXNUnicodeTextData) {
                result = [resultEventDescriptor stringValue];
            }
        }
    }

    return result;
}
Your InputString just got a facelift, and you've seen everything you need to run AppleScripts from your app. Sort of.
The Way It Used To Be
There was a time when you could send AppleEvents to any application, not just to the currently running application, as we did with chockify above.
Say you wanted to know what URL was loaded into the foremost window of Safari. All you needed to do was tell application "Safari" what to do:
								on safariURL()
    tell application "Safari" to return URL of front document
end safariURL
These days, all doing that is likely to produce is the following in your Debug Console:
								AppleScript run error = {
    NSAppleScriptErrorAppName = Safari;
    NSAppleScriptErrorBriefMessage = "Application isn\U2019t running.";
    NSAppleScriptErrorMessage = "Safari got an error: Application isn\U2019t running.";
    NSAppleScriptErrorNumber = "-600";
    NSAppleScriptErrorRange = "NSRange: {0, 0}";
}
Even though Safari is running. What. The.
Sandbox Restrictions
You're trying to run this script from an application sandbox. As far as that sandbox is concerned, Safari is, in fact, not running.
The problem is that no one gave your app permission to talk to Safari. This turns out to be a pretty big security hole: a script can easily get the contents of the current page or even run JavaScript against any tab of any window in your browser. Imagine how great that would be if one of those pages was for your bank account. Or if one of the pages contained a form field with your credit card number. Ouch.
That, in a nutshell, is why arbitrary script execution was banned from the Mac App Store.
Luckily, things have gotten much better in recent releases of OS X. In 10.8 Mountain Lion, Apple introduced a new abstract class called NSUserScriptTask. There are three concrete subclasses that let you run Unix shell commands (NSUserUnixTask), Automator workflows (NSUserAutomatorTask), and our beloved AppleScript (NSUserAppleScriptTask). The remainder of this tutorial will focus on that last class, since it's the one most commonly used.
Apple's mantra for the application sandbox is to drive security policy through user intent. In practice, this means a user has to decide to want to run your script. It might have come from the Internet or it might be a part of your application; the only thing that matters is that your customer says "Yes, I want to run this script." Once that permission is granted, the scripts are run in a way where the interaction with the rest of the system is limited. The NSUserScriptTask class makes all this possible.
Installing Scripts
So how does a user grant access for an application that wants to run scripts?
The mechanism is surprisingly simple: your application can only run scripts from a specific folder in the user's account. The only way scripts can get into that folder is if the user copies them there. Essentially, OS X gives you a read-only view of what's in those scripts.
This presents a challenge: the folder is in User > Library > Application Scripts and is named using the application's bundle identifier. For Scriptinator, that folder is named in a way only a programmer could love: com.iconfactory.Scriptinator. None of this is very user-friendly, especially since the Library folder is hidden by default on OS X.
One approach to this problem is to implement some code that opens this hidden folder for your customer. For example:
								NSError *error;
NSURL *directoryURL = [[NSFileManager defaultManager] URLForDirectory:NSApplicationScriptsDirectory inDomain:NSUserDomainMask appropriateForURL:nil create:YES error:&error];
[[NSWorkspace sharedWorkspace] openURL:directoryURL];
That's a great solution for scripts written by a user. The user can then open that folder using a control in your app and edit scripts in any way seen fit.
But sometimes you'll want to help the end user install scripts that you've written. Chances are, you're a better programmer than your average customer, and you know how to write code that makes your app work better with your customer's other apps. The natural place to put your own scripts is in the application bundle, but how do you get scripts into the user's scripts folder?
The solution here is to get permission to write into that folder. In Xcode, you need to update your app's Capabilities to "User Selected File to Read/Write," under App Sandbox > File Access. Again, user intent is the guiding factor here, since you're being given permission to add scripts to the folder:
								NSError *error;
NSURL *directoryURL = [[NSFileManager defaultManager] URLForDirectory:NSApplicationScriptsDirectory inDomain:NSUserDomainMask appropriateForURL:nil create:YES error:&error];
NSOpenPanel *openPanel = [NSOpenPanel openPanel];
[openPanel setDirectoryURL:directoryURL];
[openPanel setCanChooseDirectories:YES];
[openPanel setCanChooseFiles:NO];
[openPanel setPrompt:@"Select Script Folder"];
[openPanel setMessage:@"Please select the User > Library > Application Scripts > com.iconfactory.Scriptinator folder"];
[openPanel beginWithCompletionHandler:^(NSInteger result) {
    if (result == NSFileHandlingPanelOKButton) {
        NSURL *selectedURL = [openPanel URL];
        if ([selectedURL isEqual:directoryURL]) {
            NSURL *destinationURL = [selectedURL URLByAppendingPathComponent:@"Automation.scpt"];
            NSFileManager *fileManager = [NSFileManager defaultManager];
            NSURL *sourceURL = [[NSBundle mainBundle] URLForResource:@"Automation" withExtension:@"scpt"];
            NSError *error;
            BOOL success = [fileManager copyItemAtURL:sourceURL toURL:destinationURL error:&error];
            if (success) {
                NSAlert *alert = [NSAlert alertWithMessageText:@"Script Installed" defaultButton:@"OK" alternateButton:nil otherButton:nil informativeTextWithFormat:@"The Automation script was installed succcessfully."];
                [alert runModal];
            }
            else {
                NSLog(@"%s error = %@", __PRETTY_FUNCTION__, error);
                if ([error code] == NSFileWriteFileExistsError) {
                    // this is where you could update the script, by removing the old one and copying in a new one
                }
                else {
                    // the item couldn't be copied, try again
                    [self performSelector:@selector(installAutomationScript:) withObject:self afterDelay:0.0];
                }
            }
        }
        else {
            // try again because the user changed the folder path
            [self performSelector:@selector(installAutomationScript:) withObject:self afterDelay:0.0];
        }
    }
}];
That Automation.scpt file that we used to run from inside the application bundle is now exposed in the regular file system.
It's important throughout this entire process to let your customer know exactly what's going on. You have to remember that the customer is the one in control of the script, not you. If the customer decides to clear out all his or her scripts from the folder, you need to cope with that. You may need to disable an app feature that requires the script, or explain why the script needs to be installed again.
Note: The Scriptinator sample code includes both of the approaches shown above. For a real world example, take a look at the Overlay tool in the free trial version of xScope. It has a user-friendly setup procedure and sophisticated scripting that lets the app communicate with the customer's web browser. As a bonus, you may find that xScope is a great tool for doing your own development!
Scripting Tasks
Now that you have the automation scripts in the right place, you can start to use them.
In the code below, the event descriptors that we created above have not changed. The only thing that's different is how they're run: you'll be using an NSUserAppleScriptTask instead of NSAppleScript.
Presumably, you'll be using these script tasks frequently. The documentation warns that NSUserAppleScriptTask "should be invoked no more than once for a given instance of the class," so it's a good idea to write a factory method that creates these tasks as needed:
								- (NSUserAppleScriptTask *)automationScriptTask
{
    NSUserAppleScriptTask *result = nil;

    NSError *error;
    NSURL *directoryURL = [[NSFileManager defaultManager] URLForDirectory:NSApplicationScriptsDirectory inDomain:NSUserDomainMask appropriateForURL:nil create:YES error:&error];
    if (directoryURL) {
        NSURL *scriptURL = [directoryURL URLByAppendingPathComponent:@"Automation.scpt"];
        result = [[NSUserAppleScriptTask alloc] initWithURL:scriptURL error:&error];
        if (! result) {
            NSLog(@"%s no AppleScript task error = %@", __PRETTY_FUNCTION__, error);
        }
    }
    else {
        // NOTE: if you're not running in a sandbox, the directory URL will always be nil
        NSLog(@"%s no Application Scripts folder error = %@", __PRETTY_FUNCTION__, error);
    }

    return result;
}
If you're writing a Mac app that has both a sandboxed and non-sandboxed version, you'll need to be careful getting the directoryURL. The NSApplicationScriptsDirectory is only available when sandboxed.
After creating the script task, you execute it with an AppleEvent and provide a completion handler:
								NSUserAppleScriptTask *automationScriptTask = [self automationScriptTask];
if (automationScriptTask) {
    NSAppleEventDescriptor *event = [self safariURLEventDescriptor];
    [automationScriptTask executeWithAppleEvent:event completionHandler:^(NSAppleEventDescriptor *resultEventDescriptor, NSError *error) {
        if (! resultEventDescriptor) {
            NSLog(@"%s AppleScript task error = %@", __PRETTY_FUNCTION__, error);
        }
        else {
            NSURL *URL = [self URLForResultEventDescriptor:resultEventDescriptor];
            // NOTE: The completion handler for the script is not run on the main thread. Before you update any UI, you'll need to get
            // on that thread by using libdispatch or performing a selector.
            [self performSelectorOnMainThread:@selector(updateURLTextFieldWithURL:) withObject:URL waitUntilDone:NO];
        }
    }];
}
For scripts that a user has written, the user may expect your app to simply 'run' the script (and not call a function specified in an event descriptor). In this case, you'll pass nil for the event and the script will behave as if the user double-clicked on it in the Finder.
One of the nice things about NSUserAppleScriptTask is the completion handler. Scripts are run asynchronously, so your user interface doesn't need to block while a (potentially lengthy) script is run. Be careful about what you do when that completion handler is invoked; it's not running on the main thread, so you can't make any updates to your user interface there.
Behind the Scenes
What's going on behind the scenes?
As you may have guessed by the fact that scripts can only run once asynchronously, the code is now executed out of process using XPC. Just as iOS 8 uses XPC to make sure extensions don't affect the calling application in any way, a running script has no access to the address space of your calling application.
If you look at the keySenderPIDAttr attribute in an incoming event descriptor, you'll see that the process ID belongs to /usr/libexec/lsboxd, not your own application. This mysterious process is presumably the Launch Services sandbox daemon. In any case, your requests to another process are most certainly being marshaled.
To understand more about the security goals of the application sandbox at a high level, I'd recommend Ivan Krstić's talk "The OS X App Sandbox" at WWDC 2012. It's a surprisingly entertaining talk, and at 36 minutes into the presentation, the automation changes shown above are introduced. At that same conference, a talk entitled "Secure Automation Techniques in OS X" by Sal Soghoian and Chris Nebel goes into the details of the automation changes. Skip ahead to the 35-minute mark if you just want to learn about Application-Run User Scripts.
Another important security announcement discussed in these talks — but not covered in this tutorial — are access groups. If you're going to be scripting system applications like Mail or iTunes, you'll definitely want to pay attention to this topic in the videos above.
Synchronicity
As I mentioned above, there is a subtle difference between NSAppleScript and NSUserAppleScriptTask: the new mechanism runs asynchronously. For the most part, using a completion handler is a much better way to deal with things, because there's nothing to block your application while a script runs.
However, there are cases where it can get tricky if you're executing tasks with dependencies. If one task needs to complete before another is started, you'll quickly be missing the synchronous nature of NSAppleScript.
A simple way to get behavior that mimics the old way of doing things is to use a semaphore that makes sure only one task is running at a time. In your class or application initialization, create the semaphore using libdispatch:
self.appleScriptTaskSemaphore = dispatch_semaphore_create(1);
Then simply wait on that semaphore before initiating the script task. When the task completes, signal on that same semaphore:
								// wait for any previous tasks to complete before starting a new one — remember that you're blocking the main thread here!
dispatch_semaphore_wait(self.appleScriptTaskSemaphore, DISPATCH_TIME_FOREVER);

// run the script task
NSAppleEventDescriptor *event = [self openNetworkPreferencesEventDescriptor];
[automationScriptTask executeWithAppleEvent:event completionHandler:^(NSAppleEventDescriptor *resultEventDescriptor, NSError *error) {
    if (! resultEventDescriptor) {
        NSLog(@"%s AppleScript task error = %@", __PRETTY_FUNCTION__, error);
    }
    else {
        [self performSelectorOnMainThread:@selector(showNetworkAlert) withObject:nil waitUntilDone:NO];
    }

    // the task has completed, so let any pending tasks proceed
    dispatch_semaphore_signal(self.appleScriptTaskSemaphore);
}];
Again, don't do this unless you have a really good reason.
What Can You Script?
In the last example, the Network pane of System Preferences was opened with the following AppleScript code:
								tell application "System Preferences"
    launch
    activate

    reveal pane id "com.apple.preference.network"
end tell
Pretty cool, but how the heck do you know what the IDs of the various panes are? How would you open the Accessibility view of the Security & Privacy pane instead of the Network pane?
As you can see in Brent's article, every application that supports AppleScript has a scripting dictionary. That dictionary describes the objects and properties of the app's data model. So just learn to poke around in that data model to find what you want!
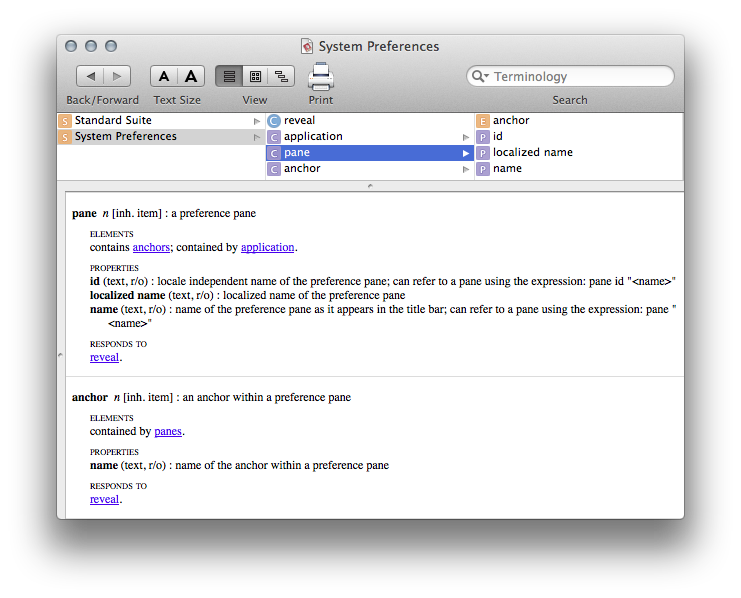
Begin by opening the Script Editor application in your Applications > Utilities folder. Then, from the File menu, select "Open Dictionary…." At that point, every application that supports AppleScript will be listed — more than you probably imagined! Select the System Preferences app from the list and click "Choose."
At this point, you'll see a Standard Suite and System Preferences listed in a tree browser. The standard suite lists commands like "open," classes like "window," and other things that are common to most scripting dictionaries. The interesting stuff is in the other scripting suite: System Preferences. When you select it, you'll see a command named "reveal" and three classes (object types) named "application," "pane," and "anchor."
When you look at "application," you'll see two things: elements and properties. Elements are collections of objects that are managed by the selected object. The properties list data maintained by the selected object.
So an application contains panes. That sounds promising. In a new Script Editor window, create a simple script to show all the pane objects:
								tell application "System Preferences"
    panes
end tell
Our goal is to open the Accessibility view of the security pane, so look through the Result in the output until you find something useful like:
pane id "com.apple.preference.security" of application "System Preferences"
Learn more about it by looking at its "localized name" property:
								tell application "System Preferences"
    localized name of pane id "com.apple.preference.security"
end tell
Security & Privacy. Bingo! Now try writing another script that uses that "pane id" along with the "reveal" command we saw earlier:
								tell application "System Preferences"
    reveal pane id "com.apple.preference.security"
end tell
System Preferences just showed you the pane. Now let's figure out how to get to the right view. Start by querying for the only elements contained in a pane, the anchor objects:
								tell application "System Preferences"
    anchors of pane "com.apple.preference.security"
end tell
Lo and behold, we see:
anchor "Privacy_Accessibility" of pane id "com.apple.preference.security" of application "System Preferences"
That's what we want. It also shows the hierarchy of the objects in System Preferences: an application has panes, which in turn have anchors. So let's tweak our script:
								tell application "System Preferences"
    reveal anchor "Privacy_Accessibility" of pane id "com.apple.preference.security"
end tell
Done! Now imagine how helpful that could be to a user who needs to add accessibility permissions for your app. Rather than tell the user how to navigate to that preference panel, you just open it for him or her. Nice.
Wrapping Up
There you have it: everything you need to know about controlling another app from your own app. Whether you're giving users the ability to automate their workflows or simply enabling internal functionality in your app, AppleScript is a powerful component of every Mac application, even if it's running in a sandbox. Hopefully this tutorial has given you new tools and insight on how to take advantage of these capabilities in your own projects!