The applications we write are rarely a static experience, as they adapt to the user's needs and change states to perform a multitude of tasks.
When transitioning between these states, it is important to communicate what is going on. Rather than jumping between screens, animations help us explain where the user is coming from and where he or she going.
The keyboard slides in and out of view to give the illusion that it is a natural part of the phone that was simply hidden below the screen. View controller transitions reinforce the navigational structure of our apps and give the user hints in which direction he or she is moving. Subtle bounces and collisions make interfaces life-like and evoke physical qualities in what is otherwise an environment without visual embellishments.
Animations are a great way to tell the story of your application, and by understanding the basic principles behind animation, designing them will be a lot easier.
First Things First
In this article (and for most of the rest of this issue), we will look at Core Animation specifically. While a lot of what you will see can also be accomplished using higher-level UIKit methods, Core Animation will give you a better understanding of what is going on. It also allows for a more explicit way of describing animations, which is useful for readers of this article, as well as readers of your code.
Before we can have a look at how animations interact with what we see on the screen, we need to take a quick look at Core Animation's CALayer, which is what the animations operate on.
You probably know that UIView instances, as well as layer-backed NSViews, modify their layer to delegate rendering to the powerful Core Animation framework. However, it is important to understand that animations, when added to a layer, don't modify its properties directly.
Instead, Core Animation maintains two parallel layer hierarchies: the model layer tree and the presentation layer tree. 1 Layers in the former reflect the well-known state of the layers, whereas only layers in the latter approximate the in-flight values of animations.
Consider adding a fade-out animation to a view. If you, at any point during the animation, inspect the layer's opacity value, you most likely won't get an opacity that corresponds to what is onscreen. Instead, you need to inspect the presentation layer to get the correct result.
While you may not set properties of the presentation layer directly, it can be useful to use its current values to create new animations or to interact with layers while an animation is taking place.
By using -[CALayer presentationLayer] and -[CALayer modelLayer], you can switch between the two layer hierarchies with ease.
A Basic Animation
Probably the most common case is to animate a view's property from one value to another. Consider this example:

Here, we animate our little red rocket from an x-position of 77.0 to one of 455.0, which is just beyond the edge of its parent view. In order to fill in all the steps along the way, we need to determine where our rocket is going to be at any given point in time. This is commonly done using linear interpolation:

That is, for a given fraction of the animation t, the x-coordinate of the rocket is the x-coordinate of the starting point 77, plus the distance to the end point ∆x = 378, multiplied with said fraction.
Using CABasicAnimation, we can implement this animation as follows:
								CABasicAnimation *animation = [CABasicAnimation animation];
animation.keyPath = @"position.x";
animation.fromValue = @77;
animation.toValue = @455;
animation.duration = 1;

[rocket.layer addAnimation:animation forKey:@"basic"];
Note that the key path we animate, position.x, actually contains a member of the CGPoint struct stored in the position property. This is a very convenient feature of Core Animation. Make sure to check the complete list of supported key paths.
However, when we run this code, we realize that our rocket jumps back to its initial position as soon as the animation is complete. This is because, by default, the animation will not modify the presentation layer beyond its duration. In fact, it will even be removed completely at this point.
Once the animation is removed, the presentation layer will fall back to the values of the model layer, and since we've never modified that layer's position, our spaceship reappears right where it started.
There are two ways to deal with this issue:
The first approach is to update the property directly on the model layer. This is the recommended approach, since it makes the animation completely optional.
Once the animation completes and is removed from the layer, the presentation layer will fall through to the value that is set on the model, which matches the last step of the animation:
								CABasicAnimation *animation = [CABasicAnimation animation];
animation.keyPath = @"position.x";
animation.fromValue = @77;
animation.toValue = @455;
animation.duration = 1;

[rocket.layer addAnimation:animation forKey:@"basic"];

rocket.layer.position = CGPointMake(455, 61);
Alternatively, you can tell the animation to remain in its final state by setting its fillMode property to kCAFillModeForwards and prevent it from being automatically removed by setting removedOnCompletion to NO. However, it's a good practice to keep the model and presentation layers in sync, so this approach should be used carefully.
Andy Matuschak also pointed out, that keeping completed animations around adds additional overhead and may cause the renderer to draw unnecessary frames.
								CABasicAnimation *animation = [CABasicAnimation animation];
animation.keyPath = @"position.x";
animation.fromValue = @77;
animation.toValue = @455;
animation.duration = 1;

animation.fillMode = kCAFillModeForward;
animation.removedOnCompletion = NO;

[rectangle.layer addAnimation:animation forKey:@"basic"];
It's worth pointing out that the animation object we create is actually copied as soon as it is added to the layer. This is useful to keep in mind when reusing animations for multiple views. Let's say we have a second rocket that we want to take off shortly after the first one:
								CABasicAnimation *animation = [CABasicAnimation animation];
animation.keyPath = @"position.x";
animation.byValue = @378;
animation.duration = 1;

[rocket1.layer addAnimation:animation forKey:@"basic"];
rocket1.layer.position = CGPointMake(455, 61);

animation.beginTime = CACurrentMediaTime() + 0.5;

[rocket2.layer addAnimation:animation forKey:@"basic"];
rocket2.layer.position = CGPointMake(455, 111);
Setting the beginTime of the animation 0.5 seconds into the future will only affect rocket2, since the animation was copied by [rocket1.layer addAnimation:animation forKey:@"basic"];, and further changes to the animation object are not taken into account by rocket1.
Check out David's excellent article on animation timing to learn how to have even more fine-grained control over your animations.
I've also decided to use CABasicAnimation's byValue property, which creates an animation that starts from the current value of the presentation layer and ends at that value plus byValue. This makes the animation easier to reuse, since you don't need to specify the precise from- and toValue that you may not know ahead of time.
Different combinations of fromValue, byValue, and toValue can be used to achieve different effects, and it's worth consulting the documentation if you need to create animations that can be reused across your app.
A Multi-Stage Animation
It's easy to imagine a situation in which you would want to define more than two steps for your animation, yet instead of chaining multiple CABasicAnimation instances, we can use the more generic CAKeyframeAnimation.
Keyframes allow us to define an arbitrary number of points during the animation, and then let Core Animation fill in the so-called in-betweens.
Let's say we are working on a log-in form for our next iPhone application and want to shake the form whenever the user enters his or her password incorrectly. Using keyframe animations, this could look a little like so:

								CAKeyframeAnimation *animation = [CAKeyframeAnimation animation];
animation.keyPath = @"position.x";
animation.values = @[ @0, @10, @-10, @10, @0 ];
animation.keyTimes = @[ @0, @(1 / 6.0), @(3 / 6.0), @(5 / 6.0), @1 ];
animation.duration = 0.4;

animation.additive = YES;

[form.layer addAnimation:animation forKey:@"shake"];
The values array defines which positions the form should have.
Setting the keyTimes property allows us to specify at which point in time the keyframes occur. They are specified as fractions of the total duration of the keyframe animation.
2
Setting the additive property to YES tells Core Animation to add the values specified by the animation to the value of the current render tree. This allows us to reuse the same animation for all form elements that need updating without having to know their positions in advance. Since this property is inherited from CAPropertyAnimation, you can also make use of it when employing CABasicAnimation.
Animation Along a Path
While a simple horizontal shake is not hard to specify in code, animations along complex paths would require us to store a large amount of boxed CGPoints in the keyframe animation's values array.
Thankfully, CAKeyframeAnimation offers the more convenient path property as an alternative.
For instance, this is how we would animate a view in a circle:
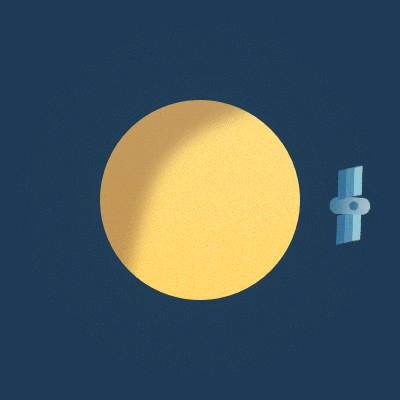
								CGRect boundingRect = CGRectMake(-150, -150, 300, 300);

CAKeyframeAnimation *orbit = [CAKeyframeAnimation animation];
orbit.keyPath = @"position";
orbit.path = CFAutorelease(CGPathCreateWithEllipseInRect(boundingRect, NULL));
orbit.duration = 4;
orbit.additive = YES;
orbit.repeatCount = HUGE_VALF;
orbit.calculationMode = kCAAnimationPaced;
orbit.rotationMode = kCAAnimationRotateAuto;

[satellite.layer addAnimation:orbit forKey:@"orbit"];
Using CGPathCreateWithEllipseInRect(), we create a circular CGPath that we use as the path of our keyframe animation.
Using calculationMode is another way to control the timing of keyframe animations. By setting it to kCAAnimationPaced, we let Core Animation apply a constant velocity to the animated object, regardless of how long the individual line segments of our path are.
Setting it to kCAAnimationPaced also disregards any keyTimes we would've set.
Setting the rotationMode property to kCAAnimationRotateAuto ensures that the satellite follows the rotation along the path. By contrast, this is what the animation would look like had we left the property nil:

You can achieve a couple of interesting effects using animations with paths;
fellow objc.io author Ole Begemann wrote a great post about how you can combine path-based animations with CAShapeLayer to create cool drawing animations with only a couple of lines of code.
Timing Functions
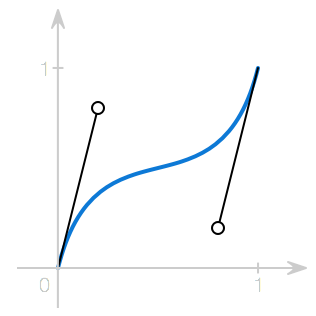
Let's look at our first example again:
You'll notice that there is something very artificial about the animation of our rocket. That is because most movements we see in the real world take time to accelerate or decelerate. Objects that instantly reach their top speed and then stop immediately tend to look very unnatural. Unless you're dancing the robot, that's rarely a desired effect.
In order to give our animation an illusion of inertia, we could factor this into our interpolation function that we saw above. However, we then would have to create a new interpolation function for every desired acceleration or deceleration behavior, an approach that would hardly scale.
Instead, it's common practice to decouple the interpolation of the animated properties from the speed of the animation. Thus, speeding up the animation will give us an effect of an accelerating rocket without affecting our interpolation function.
We can achieve this by introducing a timing function (also sometimes referred to as an easing function). This function controls the speed of the animation by modifying the fraction of the duration:
![]()
The simplest easing function is linear. It maintains a constant speed throughout the animation and is effectively what we see above.
In Core Animation, this function is represented by the CAMediaTimingFunction
class:

								CABasicAnimation *animation = [CABasicAnimation animation];
animation.keyPath = @"position.x";
animation.fromValue = @50;
animation.toValue = @150;
animation.duration = 1;

animation.timingFunction = [CAMediaTimingFunction functionWithName:kCAMediaTimingFunctionLinear];

[rectangle.layer addAnimation:animation forKey:@"basic"];

rectangle.layer.position = CGPointMake(150, 0);
Core Animation comes with a number of built-in easing functions beyond linear, such as:
-
Ease in (
kCAMediaTimingFunctionEaseIn):
-
Ease out (
kCAMediaTimingFunctionEaseOut):
-
Ease in ease out (
kCAMediaTimingFunctionEaseInEaseOut):
-
Default (
kCAMediaTimingFunctionDefault):
It's also possible, within limits, to create your own easing function using +functionWithControlPoints::::.
3 By passing in the x and y components of two control points of a cubic Bézier curve, you can easily create custom easing functions, such as the one I chose for our little red rocket:

								CABasicAnimation *animation = [CABasicAnimation animation];
animation.keyPath = @"position.x";
animation.fromValue = @77;
animation.toValue = @455;
animation.duration = 1;

animation.timingFunction = [CAMediaTimingFunction functionWithControlPoints:0.5:0:0.9:0.7];

[rocket.layer addAnimation:animation forKey:@"basic"];

rocket.layer.position = CGPointMake(150, 0);
Without going into too much detail on Bézier curves, they are a common technique to create smooth curves in computer graphics. You've probably seen them in vector-based drawing tools such as Sketch or Adobe Illustrator.
The values passed to +functionWithControlPoints:::: effectively control the position of the handles. The resulting timing function will then adjust the speed of the animation based on the resulting path. The x-axis represents the fraction of the duration, while the y-axis is the input value of the interpolation function.
While the documentation states that the output range of +functionWithControlPoints:::: is [0, 1], some readers pointed out that you can actually use negative components to achieve anticipation -- where an animated object swings back before moving to its target -- or overshooting.
Since CAMediaTimingFunction is limited to functions that can be expressed as cubic Bézier curves, I wrote a small library, called RBBAnimation, that contains a custom CAKeyframeAnimation subclass which allows you to use more complex easing functions, including bounces:

								RBBTweenAnimation *animation = [RBBTweenAnimation animation];
animation.keyPath = @"position.y";
animation.fromValue = @50;
animation.toValue = @150;
animation.duration = 1;

animation.easing = RBBEasingFunctionEaseOutBounce;
Animation Groups
For certain complex effects, it may be necessary to animate multiple properties at once. Imagine we were to implement a shuffle animation when advancing to a random track in a media player app, it could look like this:

You can see that we have to animate the position, rotation and z-position of the artworks at once. Using CAAnimationGroup, the code to animate one of the covers could look a little something like this:
								CABasicAnimation *zPosition = [CABasicAnimation animation];
zPosition.keyPath = @"zPosition";
zPosition.fromValue = @-1;
zPosition.toValue = @1;
zPosition.duration = 1.2;

CAKeyframeAnimation *rotation = [CAKeyframeAnimation animation];
rotation.keyPath = @"transform.rotation";
rotation.values = @[ @0, @0.14, @0 ];
rotation.duration = 1.2;
rotation.timingFunctions = @[
    [CAMediaTimingFunction functionWithName:kCAMediaTimingFunctionEaseInEaseOut],
    [CAMediaTimingFunction functionWithName:kCAMediaTimingFunctionEaseInEaseOut]
];

CAKeyframeAnimation *position = [CAKeyframeAnimation animation];
position.keyPath = @"position";
position.values = @[
    [NSValue valueWithCGPoint:CGPointZero],
    [NSValue valueWithCGPoint:CGPointMake(110, -20)],
    [NSValue valueWithCGPoint:CGPointZero]
];
position.timingFunctions = @[
    [CAMediaTimingFunction functionWithName:kCAMediaTimingFunctionEaseInEaseOut],
    [CAMediaTimingFunction functionWithName:kCAMediaTimingFunctionEaseInEaseOut]
];
position.additive = YES;
position.duration = 1.2;

CAAnimationGroup *group = [[CAAnimationGroup alloc] init];
group.animations = @[ zPosition, rotation, position ];
group.duration = 1.2;
group.beginTime = 0.5;

[card.layer addAnimation:group forKey:@"shuffle"];

card.layer.zPosition = 1;
One benefit we get from using CAAnimationGroup is being able to expose all animations as a single object. This is useful if you have a factory object that creates animations to be reused at multiple points in your application.
You can also use the animation group to control the timing of all components at the same time.
Beyond Core Animation
By now, you've probably heard of UIKit Dynamics, a physics simulation framework introduced in iOS 7 that allows you to animate views by applying constraints and forces to them. Unlike Core Animation, the interaction with what you see onscreen is more indirect, but its dynamic nature allows you to create animations with outcomes you don't know beforehand.
Facebook recently made Pop, the animation engine that powers Paper, open source. Conceptually, it sits somewhere between Core Animation and UIKit Dynamics. It makes prominent use of spring animations, and target values can be manipulated while the animation is running, without having to replace it.
It's also available on OS X and allows us to animate arbitrary properties on every NSObject subclass.
Further Reading
-
There is actually a third layer tree called the rendering tree. Since it's private to Core Animation, we won't cover it here. ↩
-
Note how I chose different values for transitions from 0 to 30 and from 30 to -30 to maintain a constant velocity. ↩
-
This method is infamous for having three nameless parameters, not something that we recommend you make use of in your APIs. ↩