How an Hstack Lays out Its Children
For the most part SwiftUI's layout system is intuitive to use, letting you achieve what you want with a little bit of experimentation. However, sometimes you encounter behaviors that are hard to reason about without a deeper understanding of the underlying implementation.
HStacks are a good example of this: much of the time they work as you'd expect, but sometimes their behavior can be puzzling. A good way to reduce this puzzlement is by attempting to replicate the behaviours yourself. Through a process of ever-closer approximation, we can better understand the underlying mechanics.
In this article we'll talk about
HStack, but the same logic applies toVStack, except that the axes are flipped.
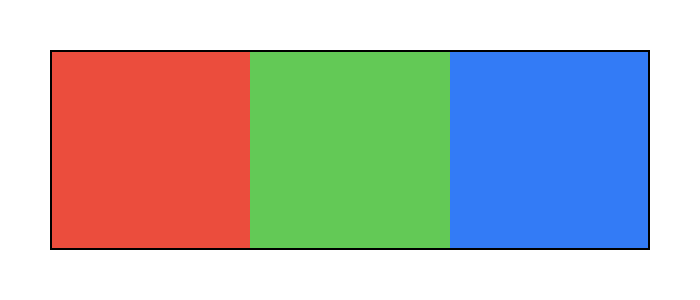
Let's start with a simple example that behaves just as you'd expect:
								HStack(spacing: 0) {
    Rectangle().fill(Color.red)
    Rectangle().fill(Color.green)
    Rectangle().fill(Color.blue)
}
.frame(width: 300, height: 100)
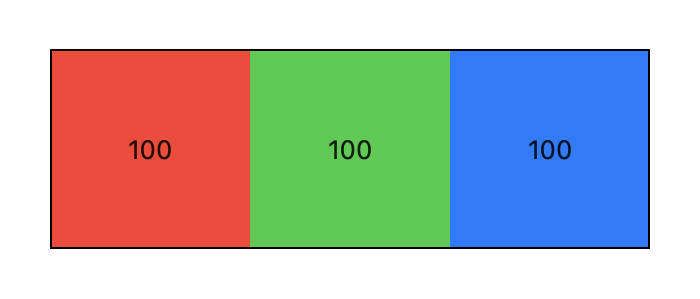
Each view becomes 100 points wide. The black border visualizes the bounds of the stack.
To understand SwiftUI's layout behavior by experimentation, it's helpful to visualize the view dimensions. We can create a simple helper that overlays the width of a view:
								extension View {
    func measure() -> some View {
        overlay(GeometryReader { proxy in
            Text("\(Int(proxy.size.width))")
        })
    }
}
By adding a .measure() to each of the three subviews, we get the following image:
So far, so good. Where things become interesting is when we add views that have a different flexibility.
For example, consider the following:
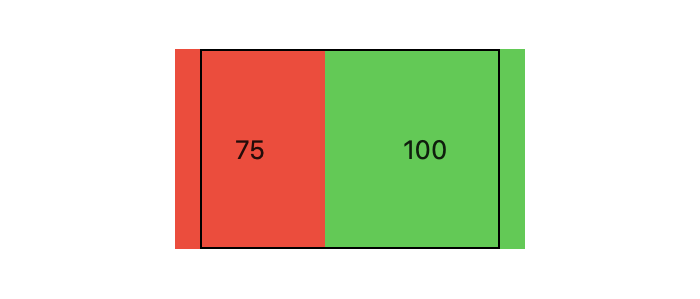
								HStack(spacing: 0) {
    Rectangle().fill(Color.red).frame(maxWidth: 100).measure()
    Rectangle().fill(Color.green).frame(minWidth: 100).measure()
}.frame(width: 150, height: 100)
How wide do the individual views become?
If you're used to constraint-based layout, you might reason like this: there are 150 points of available space and the green child needs to be at least 100 wide. Therefore, assigning the red child a width of 50 solves all the constraints. However, that's not at all how HStacks lay out their content.
As we can see below, the red rectangle becomes 75 wide, and the green rectangle becomes 100 wide. The HStack even draws out of bounds of its enclosing frame!
Why is this happening? To understand this behavior we need to revisit the WWDC session Building Custom Views with SwiftUI, and look at the algorithm they explain.
Because the stack gets proposed a width of 150, it first proposes half of that (75) to the red child. The rectangle's frame accepts that width, as does the rectangle, and the entire subview becomes 75 points wide.
Then, the stack proposes the remaining width (75) to the green child. Because it has a minimum width of 100, the view becomes 100 points wide. The HStack itself becomes 75 + 100 = 175 points wide.
If we swap the two subviews around, we get the exact same result, only drawn in a different order. This is because the stack orders its children by how flexible they are, and then processes them from least to most flexible child.
However, the meaning of "least flexible" is not defined, in either the WWDC session, or in the documentation. To figure out the order of flexibility, we spent much of our time carefully experimenting, and we came up with the following:
From least to most flexible
-
A fixed size view
-
A view with both a minimum width and a maximum width
-
A view with just a maximum width
-
A view with just a minimum width
For views with the same flexibility according to the list above, we had to sort again based on their minimum or maximum widths. We tested this exhaustively and it turned out to be a good intuition, but not quite the whole truth.
For example, consider the following hierarchy:
								HStack(spacing: 0) {
    Rectangle().fill(Color.red).frame(maxWidth: 100).measure()
    Rectangle().fill(Color.green).frame(minWidth: 90, maxWidth: 200).measure()
}
.frame(width: 150, height: 100)
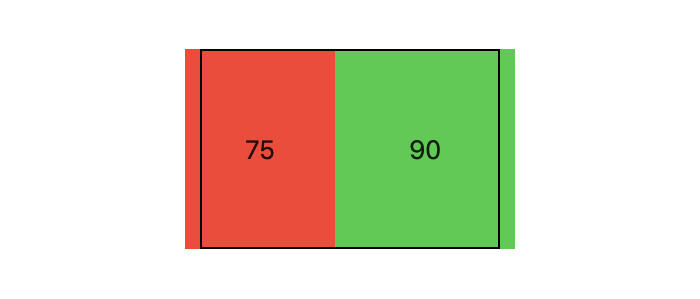
According to our sorting, the green child with a minimum and maximum width should get a width of 75 proposed first, becoming its minimum width of 90. Then the red child should get the remaining width of 60 proposed, taking on that width since it only has a maximum width constraint of 100.
However, the red rectangle becomes 75 wide. SwiftUI seems to propose to the red child first. Clearly, this is either a bug in SwiftUI, or an error in our understanding. (Spoiler: it's the latter!).
The truth of HStack's view sorting seems to be much simpler: the flexibility of a view is defined by the range of the widths it can become.
In the example above, the red child can become anywhere between 0 and 100 points wide, hence it has a flexibility of 100. The green child can become anywhere between 90 and 200 points wide, hence it has a flexibility of 110.
This also explains why our initial, slightly over complicated heuristic worked in most cases:
-
a fixed size view has a flexibility of 0.
-
a view with both
minWidthandmaxWidthhas a flexibility ofmaxWidth-minWidth. -
a view with just a
maxWidthhas a flexibility of0...maxWidth. -
a view with just a
minWidthhas the flexibility ofminWidth...CGFloat.someLargeNumber
A view with just a minimum width will always come last in practice, because the flexibility of minWidth...CGFloat.someLargeNumber is very large. Fixed size views will always come first, due to their flexibility of 0. However, the sorting of views with just a maximum width and views with both minimum and maximum widths were mixed up in our initial approach.
Note: we wrote
CGFloat.someLargeNumberinstead ofCGFloat.greatestFiniteMagnitude. The number has to be large enough, but not so large that we lose precision.
On Swift Talk, our weekly video series, we have been reimplementing all the important parts of SwiftUI's layout system as a way to fully understand its behavior — as always, the first episode of the series is free to watch.
In an upcoming episode, we will implement exactly the algorithm above for HStacks, so stay tuned!
For those who prefer reading, our book Thinking in SwiftUI includes chapters on view layout, including the layout algorithm, and how to build advanced layouts.
