We've talked about many different string topics in this issue, from Unicode over localization to parsing. But in most cases, strings ultimately have to be drawn onto the screen for the user to see and interact with them. This article covers the basics, best practices, and common pitfalls of how to present strings in the user interface.
How to Get Strings onto the Screen
For the sake of simplicity, we're first going to focus on what UIKit has to offer in terms of string drawing. Afterward, we'll talk about similarities and differences between iOS and OS X.
UIKit comes with multiple classes that can be used to display and edit text on screen. Each is made for specific use cases, and it's important to choose the right tool for the task at hand in order to avoid unnecessary trouble.
UILabel
UILabel is the simplest way to bring text onto the screen. It's a UIView subclass and is made to display small amounts of read-only text. The text can be laid out in a single line or in multiple lines, and it can be clipped in different ways if it doesn't fit into the specified space. Although labels are pretty straightforward to use, they have a couple of tricks up their sleeves that are worth mentioning.
By default, labels only show a single line, but you can change this behavior by setting the numberOfLines property to a value other than one. Setting it to a value greater than one will restrict the number of lines to the specified value, while setting it to zero tells the label that it should display the whole text no matter how many lines it takes.
Labels can display simple plain text by setting the text property, but they can also display rich text by setting an attributed string on the attributedText property. When using plain text, you can style its appearance using the label's font, textColor, textAlignment, shadowColor, and shadowOffset properties, either by setting them directly, or by using the label's appearance proxy if you want to alter the style of labels in your app in general. Attributed strings offer much more flexible styling options, and different parts of the string can be styled in different ways. See the section about common layouts below for some examples of attributed strings.
Beyond the styling of the label you define via the label's styling properties or the string attributes, you can give UILabel permission to adjust your styling if the text wouldn't fit otherwise (adjustsFontSizeToWidth, minimumScaleFactor, and adjustsLetterSpacingToFitWidth). If you care about how your user interface looks, you should strive to never use these options. But sometimes localization in different languages poses challenges that are hard to solve differently. Just try a language like German as your phone's system language, and you'll find all kinds of ugly, shrunk-down text in Apple's apps. It's not pretty, but sometimes useful.
If you use those options to let UIKit shrink your text to fit, you can use the baselineAdjustment property to define if the text stays put on the same baseline when it shrinks, or if it should be aligned to the upper-left corner. However, this option only works for single line labels.
UITextField
Like labels, text fields can handle either plain or attributed strings. But where labels can only display plain or attributed strings, text fields can also handle user input. However, text fields are limited to a single line of text. Therefore, UITextField is a UIControl subclass to hook into the responder chain and to deliver action messages when the user starts or ends editing. For more control, you can implement the text field's delegate.
Text fields come with a bunch of options to control the way text input works. They implement the UITextInputTraits protocol, which lets you specify all kinds of details regarding how the keyboard should look and work, e.g. what kind of keyboard should be shown and how the return key behaves.
Text fields can also show a placeholder text when no text is entered, show the standard clear button on the right-hand side, and host arbitrary left and right auxiliary views. You can also set a background image, which can be used to apply a custom border style to the text field by using a resizable image.
But whenever you need to input more than a single line of text, you have to switch to UITextField's big brother...
UITextView
Text views are the perfect choice for displaying or editing long texts. UITextView is a subclass of UIScrollView, so it can handle overflowing text by allowing the user to scroll back and forth. As text fields, text views can also handle plain and attributed strings. Text views also implement the UITextInputTraits protocol to control keyboard behavior and appearance.
But apart from text view's ability to edit multiline text, its biggest selling point is that you can access and customize the entire Text Kit stack. You can customize the behavior or swap in your own custom subclasses for the layout manager, the text container, and the text storage. Have a look at Max's Text Kit article in objc.io issue #5.
Unfortunately, UITextView still has some issues in iOS 7. It's at version 1.0. It was reimplemented from scratch based on the OS X Text Kit. Before iOS 7, it was based on Webkit and was a lot less powerful. Have a look at Peter's and Brent's articles on this matter to learn how to work around those issues.
What About the Mac?
Now that we have covered the basics of the text classes in UIKit, let us shortly point out some differences in how these classes are structured in AppKit.
First of all, AppKit doesn't have an equivalent to UILabel. Instead, the most basic class to display text is NSTextField. Setting the text field to be not editable and not selectable is the Mac equivalent to using a UILabel on iOS. And while NSTextField sounds like the equivalent to UITextField, it is not limited to single-line text.
NSTextView, on the other hand, is the equivalent to UITextView in that it exposes the whole stack of the Cocoa Text System. But it also packs a lot of additional functionality. Some of it comes from the fact that the Mac is a computer with a pointing device. Notable additions include the rulers to set and edit tab stops.
Core Text
All classes we discussed above ultimately use Core Text to lay out and draw the actual glyphs. Core Text is a very powerful framework that is beyond the scope of this article. But if you ever need to do draw text in a completely custom way (e.g. along a Bézier path), you should definitely look into it.
Core Text gives you full flexibility over any drawing aspect you could possibly imagine. However, Core Text can be quite unwieldy. It's a complex Core Foundation / C API. It gives you full access to all aspects of typesetting.
Displaying Dynamic Text in a Table View
Perhaps the most common case where everybody interacts with string drawing methods is when you have to draw variable height table view cells. You will find this in all social media apps. The table view's delegate has a method, tableView:heightForRowAtIndexPath:, which is used to calculate the height. Before iOS 7, this used to be rather hard to do in a reliable way.
In our example, we will display a list of quotes in a table view:
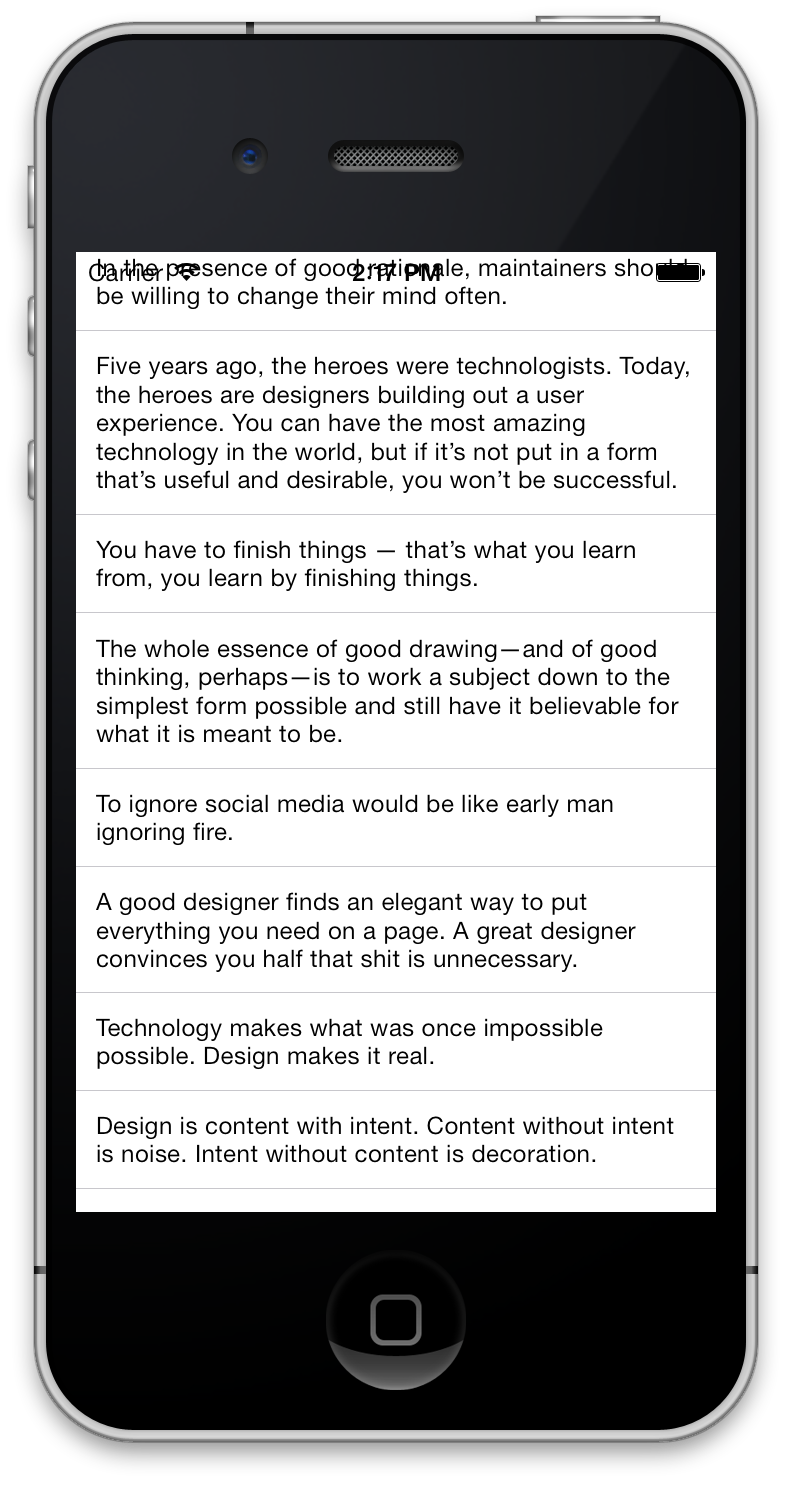
To do this, first we'll make sure we have full control of the UITableViewCell by creating a custom subclass. In that subclass, we'll do the layout of our label ourselves:
								- (void)layoutSubviews
{
    [super layoutSubviews];
    self.textLabel.frame = CGRectInset(self.bounds,
                                       MyTableViewCellInset,
                                       MyTableViewCellInset);
}
The MyTableViewCellInset is defined as a constant, so that we can use it for height calculation in the table view's delegate. The easiest and most reliable way to calculate height is by converting the string into an attributed string, and calculating the height of the attributed string. We take the table view's width and subtract twice the MyTableViewCellInset constant (for leading and trailing space). To calculate the actual height, we use boundingRectWithSize:options:context:.
The first parameter is the size to which the text should be constrained. We only care about constraining the width, hence we pass in CGFLOAT_MAX for the height. The second parameter is very important: if you pass in other values, the bounding rect will almost certainly be wrong. If you want to adjust font scaling and/or tracking, you can use the third parameter. Finally, once we have the boundingRect, we have to add the inset again:
								- (CGFloat)tableView:(UITableView *)tableView heightForRowAtIndexPath:(NSIndexPath *)indexPath
{
    CGFloat labelWidth = self.tableView.bounds.size.width - MyTableViewCellInset*2;
    NSAttributedString *text = [self attributedBodyTextAtIndexPath:indexPath];
    NSStringDrawingOptions options = NSStringDrawingUsesLineFragmentOrigin |
                                     NSStringDrawingUsesFontLeading;
    CGRect boundingRect = [text boundingRectWithSize:CGSizeMake(labelWidth, CGFLOAT_MAX)
                                             options:options
                                             context:nil];

    return (CGFloat) (ceil(boundingRect.size.height) + MyTableViewCellInset*2);
}
There are two more subtle things about the resulting bounding rect, which might not be obvious unless you read the documentation: the returned size returns fractional values, and the documentation tells us to round the result up using ceil. Finally, the result may actually still be larger than could be contained in the size argument.
Note that, while our text is a plain NSString, we created the method attributedBodyTextAtIndexPath:, which is also used in the tableView:cellForRowAtIndexPath:. This way, we make sure that both stay in sync.
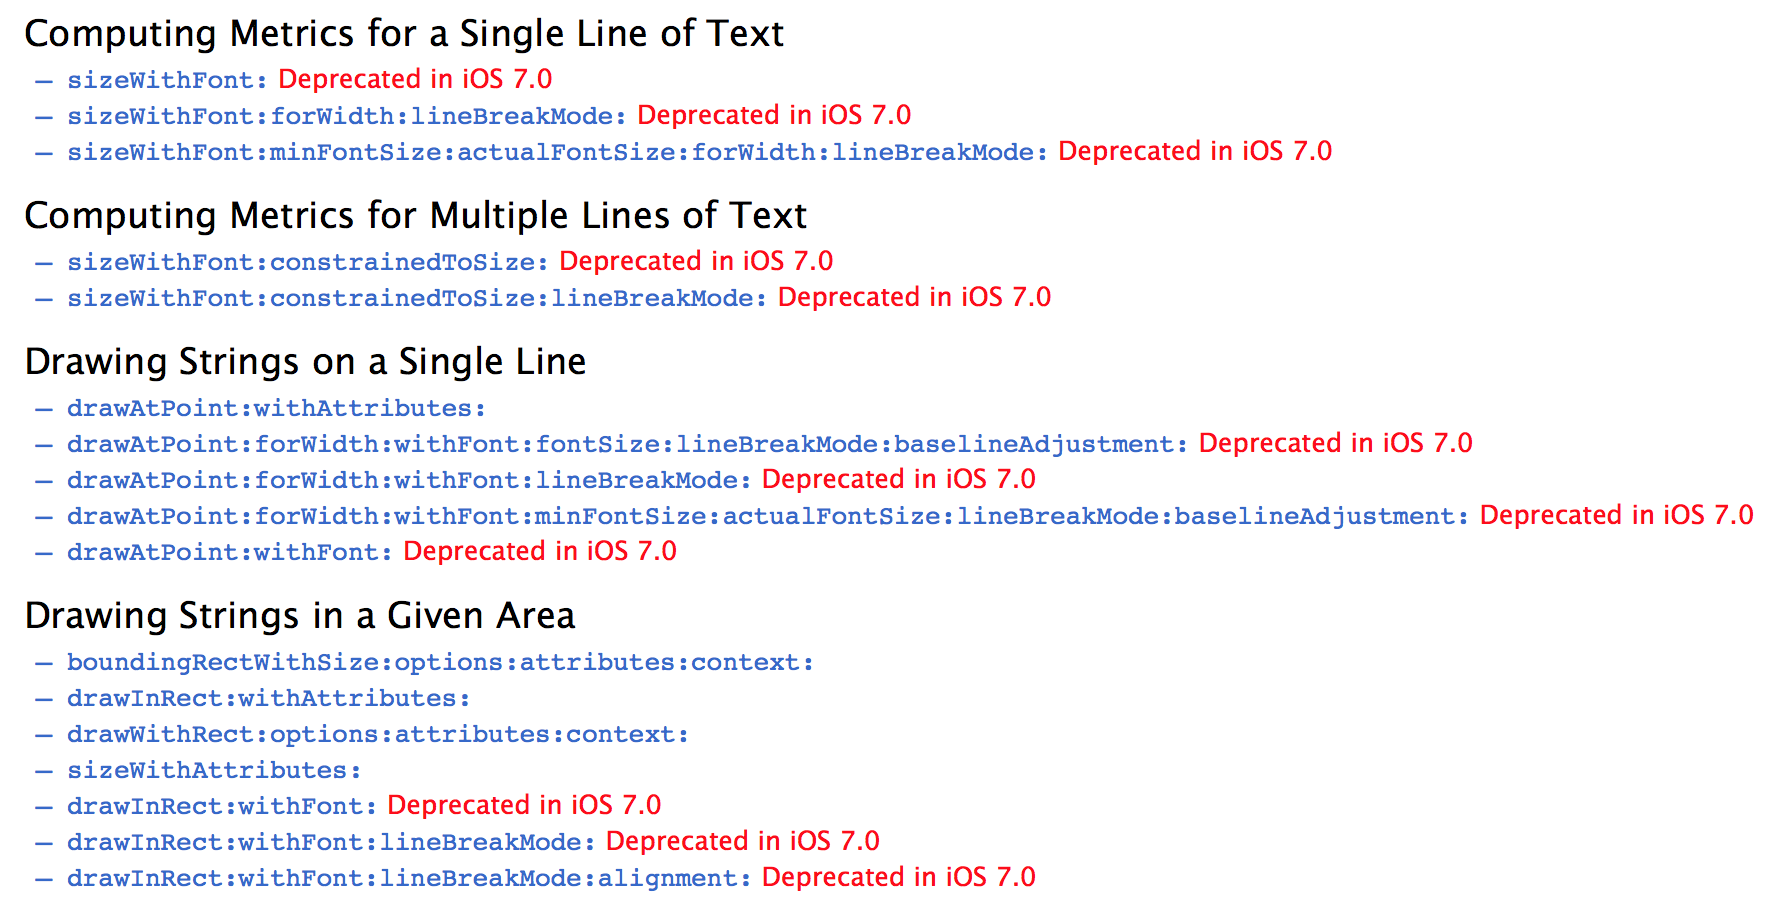
Also, taking a look at the documentation (see the screenshot below), we can see that a lot of methods have been deprecated since iOS 7. If you browse the internet, or StackOverflow, you'll find a lot of answers and workarounds for measuring string sizes. Because the text system received a major overhaul (internally, everything is rendered using TextKit rather than WebKit), please use the new methods.
Another option for dynamically sized table view cells is to use Auto Layout, for example, as explained in this blog post. You can then piggyback on the intrinsicContentSize of the contained labels. However, Auto Layout is currently a lot slower than calculating things manually. For prototyping, however, it is perfect: it allows you to quickly adjust constraints and move things around (this is especially important if you have more than one element on your cell). Once you have finished the design iterations, you can then rewrite it to do the layout manually.
Layout with Text Kit and NSAttributedString
With Text Kit, you have an amazing amount of flexibility to create professional-grade text layout. With this flexibility comes a lot of complexity in figuring out how to combine the multitude of options to get the layout you want.
We want to give a few examples to highlight a few common layout problems, as well as show solutions to them.
Classic Text
First, let's take a look at some classic text. We'll use Histoire des nombres et de la numération mécanique by Jacomy-Régnier and set it in Bodoni. The screenshot of the final result looks like this:
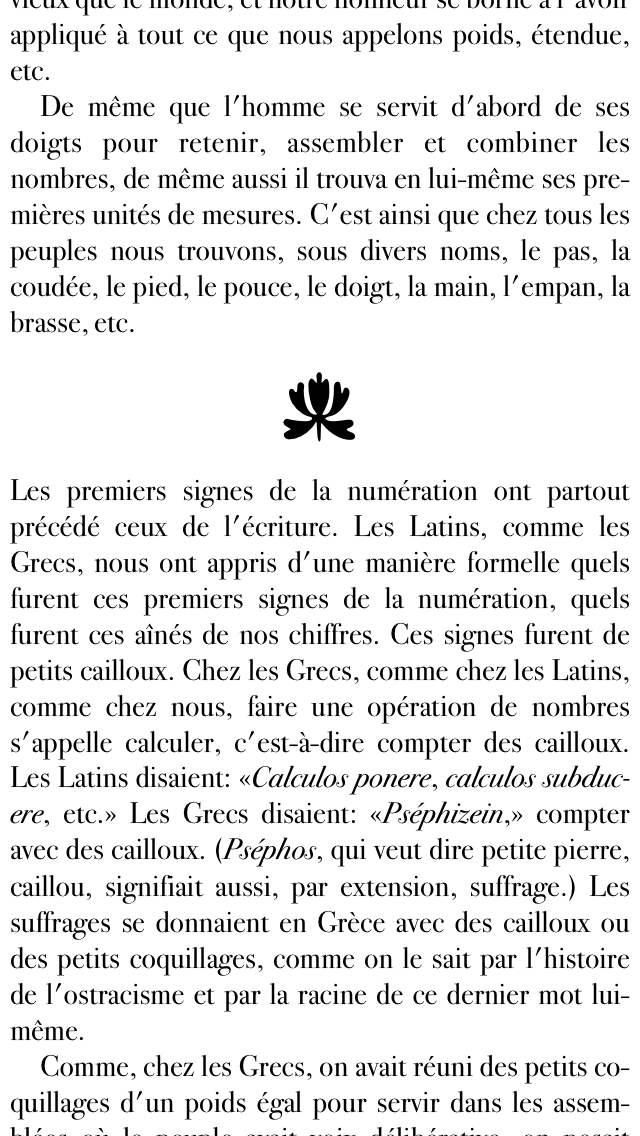
This is all done with Text Kit. The ornament between sections is also text, set in the Bodoni Ornaments font.
We're using justified text for the body style. The first paragraph starts at the very left, and subsequent paragraphs are inset by an em space.
We have three different styles for this: the body style, the variation of it with the indent of the first line, and the style for the ornament.
Let's first set up the body1stAttributes:
								CGFloat const fontSize = 15;

NSMutableDictionary *body1stAttributes = [NSMutableDictionary dictionary];
body1stAttributes[NSFontAttributeName] = [UIFont fontWithName:@"BodoniSvtyTwoITCTT-Book"
                                                         size:fontSize];
NSMutableParagraphStyle *body1stParagraph = [[NSParagraphStyle defaultParagraphStyle] mutableCopy];
body1stParagraph.alignment = NSTextAlignmentJustified;
body1stParagraph.minimumLineHeight = fontSize + 3;
body1stParagraph.maximumLineHeight = body1stParagraph.minimumLineHeight;
body1stParagraph.hyphenationFactor = 0.97;
body1stAttributes[NSParagraphStyleAttributeName] = body1stParagraph;
We're setting the font to BodoniSvtyTwoITCTT. This is the PostScript name of the font. To find the font name, we can use +[UIFont familyNames] to first get the available font families. A font family is also known as a typeface. Each typeface or font family has one or multiple fonts. To get the names of those, we can use +[UIFont fontNamesForFamilyName:]. Note that the UIFontDescriptor class can be very helpful if you're working with multiple fonts, e.g. when you need to find out what the italic version of a given font is.
Many settings live inside the NSParagraphStyle. We're creating a mutable copy of the default style and adjusting it. In our case, we'll use the font size and add 3pt to it.
Next up, we'll make a copy of these attributes and modify them to create bodyAttributes, which are our attributes for paragraphs that are not the first within a section:
								NSMutableDictionary *bodyAttributes = [body1stAttributes mutableCopy];
NSMutableParagraphStyle *bodyParagraph =
  [bodyAttributes[NSParagraphStyleAttributeName] mutableCopy];
bodyParagraph.firstLineHeadIndent = fontSize;
bodyAttributes[NSParagraphStyleAttributeName] = bodyParagraph;
We're simply making a mutable copy of the attributes dictionary, and then making a mutable copy of the paragraph style in order to change it. Setting the firstLineHeadIndent to the same as the font size will give us the desired em space indent.
Next up, the ornament paragraph style:
								NSMutableDictionary *ornamentAttributes = [NSMutableDictionary dictionary];
ornamentAttributes[NSFontAttributeName] = [UIFont fontWithName:@"BodoniOrnamentsITCTT"
                                                          size:36];
NSMutableParagraphStyle *ornamentParagraph = [[NSParagraphStyle defaultParagraphStyle] mutableCopy];
ornamentParagraph.alignment = NSTextAlignmentCenter;
ornamentParagraph.paragraphSpacingBefore = fontSize;
ornamentParagraph.paragraphSpacing = fontSize;
ornamentAttributes[NSParagraphStyleAttributeName] = ornamentParagraph;
This is pretty self-explanatory. We're using the ornaments font and setting the text alignment to center. Additionally, we're adding paragraph space before and after the ornament character.
Tables with Numbers
Next up, a table of numbers. We want to align fractional numbers on their decimal separators, i.e. “.” in English:
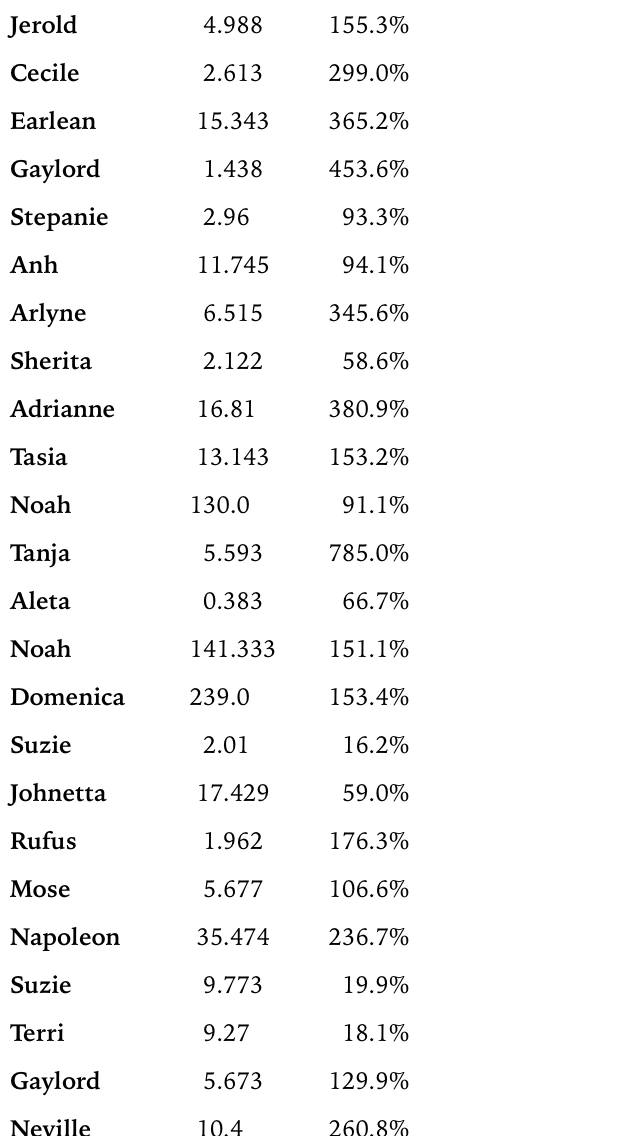
To achieve this, we have to specify tab stops that center on the decimal separator.
For the above example, we're simply doing:
								NSCharacterSet *decimalTerminator = [NSCharacterSet
  characterSetWithCharactersInString:decimalFormatter.decimalSeparator];
NSTextTab *decimalTab = [[NSTextTab alloc]
   initWithTextAlignment:NSTextAlignmentRight
                location:100
                 options:@{NSTabColumnTerminatorsAttributeName:decimalTerminator}];
NSTextTab *percentTab = [[NSTextTab alloc] initWithTextAlignment:NSTextAlignmentRight
                                                        location:200
                                                         options:nil];
NSMutableParagraphStyle *tableParagraphStyle =
  [[NSParagraphStyle defaultParagraphStyle] mutableCopy];
tableParagraphStyle.tabStops = @[decimalTab, percentTab];
Lists
Another common use case is a list like this:
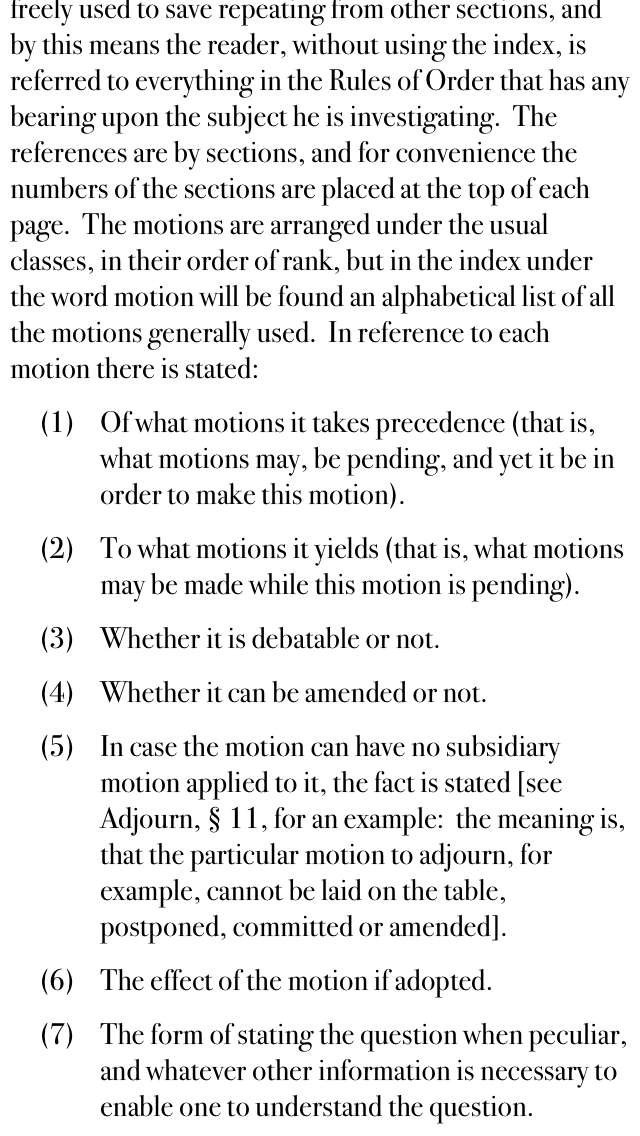
(from Robert's Rules of Order by Henry M. Robert)
The hanging indents are relatively simple to set up. We need to make sure there's a tab character between either the list number “(1)” and text or the bullet and the text. Then we'll adjust the paragraph style like so:
								NSMutableDictionary *listAttributes = [bodyAttributes mutableCopy];
NSMutableParagraphStyle *listParagraph =
  [listAttributes[NSParagraphStyleAttributeName] mutableCopy];
listParagraph.headIndent = fontSize * 3;
listParagraph.firstLineHeadIndent = fontSize;
NSTextTab *listTab = [[NSTextTab alloc] initWithTextAlignment:NSTextAlignmentNatural
                                                     location:fontSize * 3
                                                      options:nil];
listParagraph.tabStops = @[listTab];
listAttributes[NSParagraphStyleAttributeName] = listParagraph;
We're setting the headIndent to the indent of the actual text and the firstLineHeadIndent to the indent (from the left-hand side) that we want the bullet to have. Finally, we need to add a tab stop at the same position as the headIndent. The tab character after the bullet will then make sure the text on that line starts at the correct position.