The release of iOS 7 brings a lot of new tools to the table for developers. One of these is TextKit. TextKit consists of a bunch of new classes in UIKit that, as the name suggests, somehow deal with text. Here, we will cover how TextKit came to be, what it’s all about, and — by means of a couple of examples — how developers can put it to great use.
But let’s have some perspective first: TextKit is probably the most significant recent addition to UIKit. iOS 7’s new interface replaces a lot of icons and bezels with plain-text buttons. Overall, text and text layout play a much more significant role in all visual aspects of the OS. It is perhaps no overstatement to say that iOS 7’s redesign is driven by text — text that is all handled by TextKit.
To give an idea of how big this change really is: in every version of iOS prior to 7, (almost) all text was handled by WebKit. That’s right: WebKit, the web browser engine. All UILabels, UITextFields, and UITextViews were using web views in the background in some way to lay out and render text. For the new interface style, they have all been reengineered to take advantage of TextKit.
A Short History of Text on iOS
These new classes are no replacement for something that was previously available to developers. What TextKit does is absolutely new to the SDK. Before iOS 7, all the things TextKit does now would have to be done manually. It is the missing link between already existing functionalities.
For a long time, there was a framework for bare bones text layout and rendering: CoreText. There also was a way to directly grab a user’s input from the keyboard: the UITextInput protocol. In iOS 6, there even was a way of getting the system’s text selection for almost free: by subclassing UITextView.
(This is probably the point where I should disclose my 10 years of experience in shipping text editors.) There is a huge (read: HUGE) gap between rendering text and grabbing keyboard input. This gap is probably also the reason why there always were so few rich-text or syntax-highlighting editors — getting a text editor right was, without doubt, a couple of months' worth of work.
So here it goes - a short rundown of the (not so) short history of text on iOS:
iOS 2: The first public SDK includes a simple text display component (UILabel), a simple text input component (UITextField), and a simple, scrollable, editable component for larger amounts of text: UITextView. These are all plain text only, have no selection support (just insertion points), and allow almost no customization beyond setting a font and a text color.
iOS 3: New features are copy and paste and — as a requirement for these — also text selection. Data detectors introduce a way to highlight phone numbers and URLs in text views. However, there is still essentially nothing a developer could influence beyond turning these features off or on.
iOS 3.2: The introduction of the iPad brings CoreText, the
aforementioned low-level text layout and rendering engine (which was ported from Mac OS X 10.5), and UITextInput, the also-mentioned keyboard access. Apple demos Pages as the new light tower of text editing on mobile devices
1. However, due to the framework gap I talked about earlier, only very few apps follow suit.
iOS 4: Announced only months after iOS 3.2, there is nothing new to text. (Anecdote: Me at WWDC, I walk up to engineers, tell them I want the fully fledged text layout system on iOS. The answer: “Yeah… File a radar.” Not unexpected…)
iOS 5: No news regarding text. (Anecdote: Me at WWDC, I tell engineers about a text system on iOS. The answer: “We don’t see a lot of requests for that…” Doh!)
iOS 6: Some movement: Attributed text editing comes to UITextView. It is, unfortunately, hardly customizable. The default UI does bold, italic, and underline. Users can set font sizes and colors. While this is great at first sight, there is still no control over layout or a convenient way to customize text attributes. For (text-editing) developers however, there is a big new feature: it’s now possible to subclass UITextView to get, in addition to the keyboard input that was previously available, text selection “for free.” Having to implement a completely custom text selection has probably put most previous attempts of non-plain-text tools to a halt.
(Anecdote: Me, WWDC, engineers. I want a text system on iOS. Answer: “Uhhhm. Ehm. Yes. Maybe? See, it just doesn’t perform…” So there is hope after all, isn’t there?)
iOS 7: Finally. TextKit.
Features
So here we are. iOS 7-land with TextKit. Let’s see what it can do! Before we dive into it I still want to mention that, strictly speaking, most of these things were possible before. If you had plenty of resources and time to build a text engine on top of CoreText, these were all doable. But if you wanted to build a fully fledged rich text editor before, this could mean months of work. Now it’s as easy as opening an interface file in Xcode and dropping a UITextView into your view controller to get all these features:
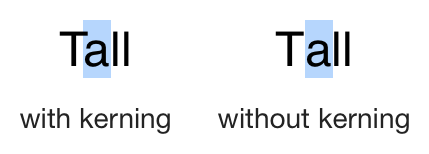
Kerning: Drop the idea that all characters have simple quadratic shapes and that these shapes must be placed exactly adjacent to each other. Modern text layout takes into account that, for example, a capital letter “T” does have a lot of free space under its “wings” and moves the following lowercase letters closer. This results in significantly improved legibility of text, especially in longer pieces of writing.
Ligatures: I consider this mostly an artistic feature, but some texts do look nicer (more artistic) when certain character combinations (like an “f” followed by an “l”) are drawn using combined symbols (so-called glyphs).

Image Attachments: It is now possible to have images inside a text view.
Hyphenation: Not so important for editing text, but for presenting text in a nice and readable way. Hyphenation means splitting longer words at line boundaries, creating a more homogeneous flow and look of the overall text.
Anecdote: Before iOS 7, developers had to employ CoreText directly. Like so: Start by detecting the text language on a per-sentence basis, then get the possible hyphenation point for each word in the sentence, then insert a custom hyphenation placeholder character at each suggested point. After preparation is done, run CoreText’s layout and manually insert a hyphen into wrapped lines. If you want great results, check afterward if the text with the hyphen still fits into the line’s boundaries and if it doesn’t, re-run the lines’s layout without the previously used hyphenation point.
With TextKit, enabling hyphenation is as easy as setting the hyphenationFactor property.
Customizability: For me, even more than the improved typesetting, this is the new feature. Before, developers had the choice between using what was there or rewriting it all from scratch on their own. Now there is a set of classes that have delegate protocols or can be overwritten to change part of their behavior. For example, you can now influence the line break behavior of certain words without having to re-write the complete text component. I consider this a win.
More Rich Text Attributes: It is now possible to set different underline styles (double, thick, dashed, dotted, or a combination thereof). It is very easy to shift the text baseline, for example, for doing superscript numbers. Also, developers no longer have to draw background colors for custom rendered text on their own (CoreText does not have support for these).
Serialization: Previously, there was no built-in way to read strings with text attributes from disk. Or to write it out again. Now there is.
Text Styles: iOS 7’s interface introduces a new concept of globally predefined types of text. These types of text are assigned a globally predefined look. Ideally this will result in headings and continuous text looking the same all over the system. Users can define their reading habits (like text size) from the Preferences app, and apps that use text styles will automatically have the right text size and look.
Text Effects: Last and least. In iOS 7 there is exactly one text effect: Letterpress. Text with this effect will look like it was physically stamped into a sheet of paper. Inner shadows, etcetera. Opinion: Really? What the…? In an OS that completely, radically, and unforgivably kills useless skeuomorphism, who needs the look of text-stamped into paper?
Structure
The best way to get an overview of a system is probably to draw an image. Here is a schematic of UIKit’s text system, TextKit:
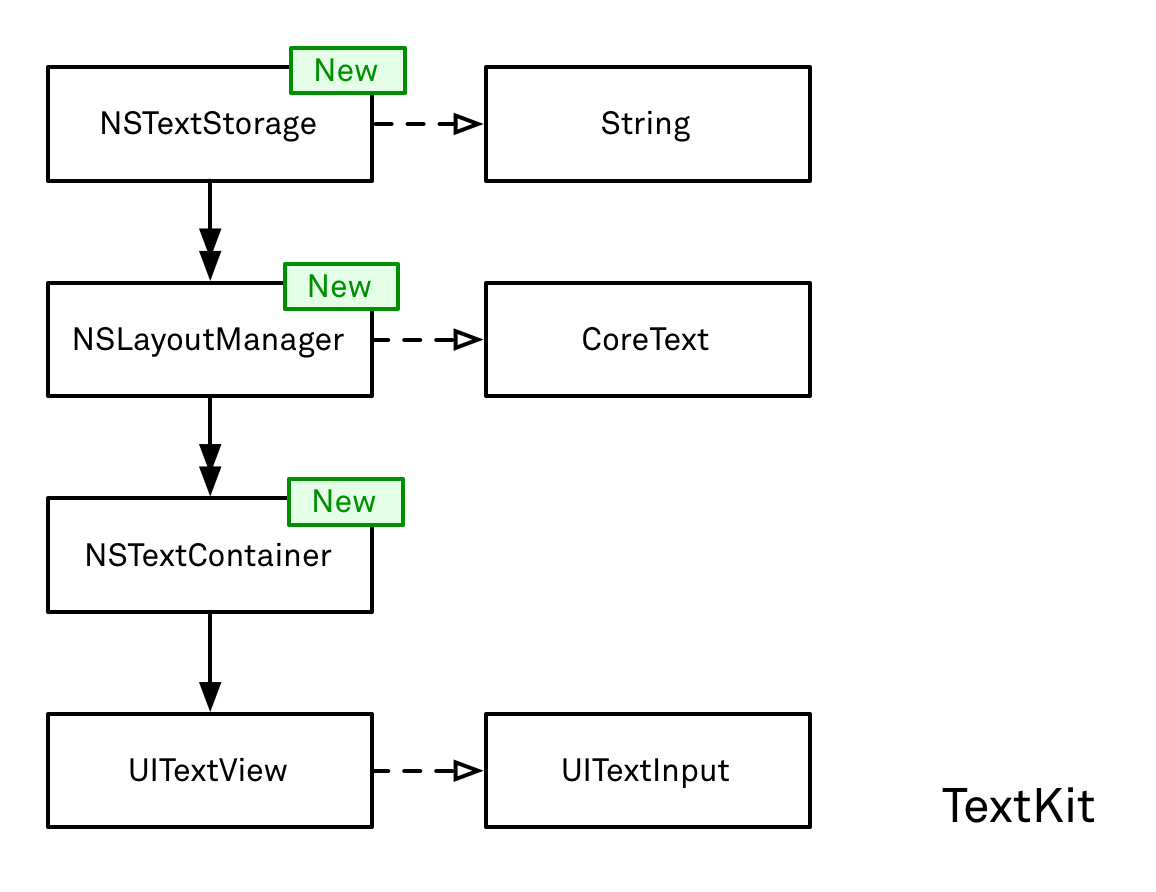
As can be seen from the picture, putting a text engine to work requires a couple of actors. We will cover them starting from outside:
String: Where there is text to be drawn, there must somewhere be a string to hold it. In the default configuration, the string is contained within and managed by the NSTextStorage, and in these cases, it may be left out from the drawing.
But that need not necessarily be the case. With TextKit, the text can originate from whatever source suits the use case. For a code editor, for example, the string could actually be an annotated syntax tree (AST) that contains all information about the structure of the displayed code. With a custom-built text storage, this text is then only later and dynamically enriched with text attributes like font or color highlights. For the first time, developers are able to directly use their own model for a text component. All that is needed is a specially engineered text storage. Which leads us to:
NSTextStorage: If you see the text system as model-view-controller (MVC) architecture, this class represents the model. A text storage is the central object that knows everything about the text and its attributes. It provides access to them through a mere two accessor methods and allows changing text and attributes through just two more methods. We will give them a closer look below.
For now, it’s important to understand that NSTextStorage inherits these methods from its superclass, NSAttributedString. This makes it clear that a text storage — as seen by the text system – is just a string with attributes, albeit with a few extensions. The only significant difference between the two is that a text storage contains a way to post notifications about all changes made to its contents. We will also cover that in a moment.
UITextView: On the opposite end of the stack is the actual view. In TextKit, the text view serves two purposes: For one, it is the view that is drawn into by the text system. The text view itself does not do any drawing on its own; it just provides a region that others draw to.
As the only component that is contained in the view hierarchy, the second purpose is to deal with all user interaction. Specifically, the text view implements the UITextInput protocol to handle keyboard events, and it provides a way for the user to set an insertion point or select text. It does not do any actual change to the text but merely forwards these changes to the just-discussed text storage.
NSTextContainer: Every text view defines a region that text can be drawn to. For this, each text view has a text container that precisely describes the area available. In simple cases, this is a vertical infinitely sizable rectangular area. Text is then filled into the region and the text view enables the user to scroll through it.
In more advanced cases however, this region may be an finitely large rectangle. For example, when rendering a book, each page has a maximum height and width. The text container would then define this size and not accept any text beyond. In the same case, an image might cover parts of the page and text should re-flow around its edges. This is also handled by the text container, as we will see in a example a little later.
NSLayoutManager: The layout manager is the central component that brings it all together:
-
The manager listens to text or attribute change notifications in the text storage and, upon reception, triggers the layout process.
-
Starting with the text provided by the text storage, it translates all characters into glyphs 2.
-
Once the glyphs have been generated, the manager consults its text container(s) for the available regions for text.
-
These regions are then filled stepwise with lines, which again are filled stepwise with glyphs. Once a line has been filled, the next one is started.
-
For each line, the layout manager must consider line-breaking behavior (the word not fitting must be moved to the next line), hyphenation, inline image attachments, and so forth.
-
When layout is finished, the text view’s current display state is invalidated and the layout manager draws the previously set text into the text view.
CoreText: Not directly contained within TextKit, CoreText is the library that does the actual typesetting. For each of the layout manager’s steps, CoreText is consulted in one way or another. It provides the translation from characters to glyphs, fills line segments with them, and suggest hyphenation points.
Cocoa Text System
Building a system as big and as complex as TextKit is certainly nothing done easily or quickly and definitely requires a lot of experience and expertise to be successful. The fact that a “real” text component has been missing from iOS for six subsequent major releases is also quite telling. Apple is definitely correct in selling it as a big new feature. But is it really new?
Here’s a number: out of the 131 public classes in UIKit, all but nine have the UI prefix in their name. These nine classes carry the legacy, old-world (read: Mac OS) prefix NS. And out of these nine classes, seven deal with text. Coincidence? Well…
Here’s a schematic of the Cocoa Text System. Feel free to compare it to the one for TextKit above.
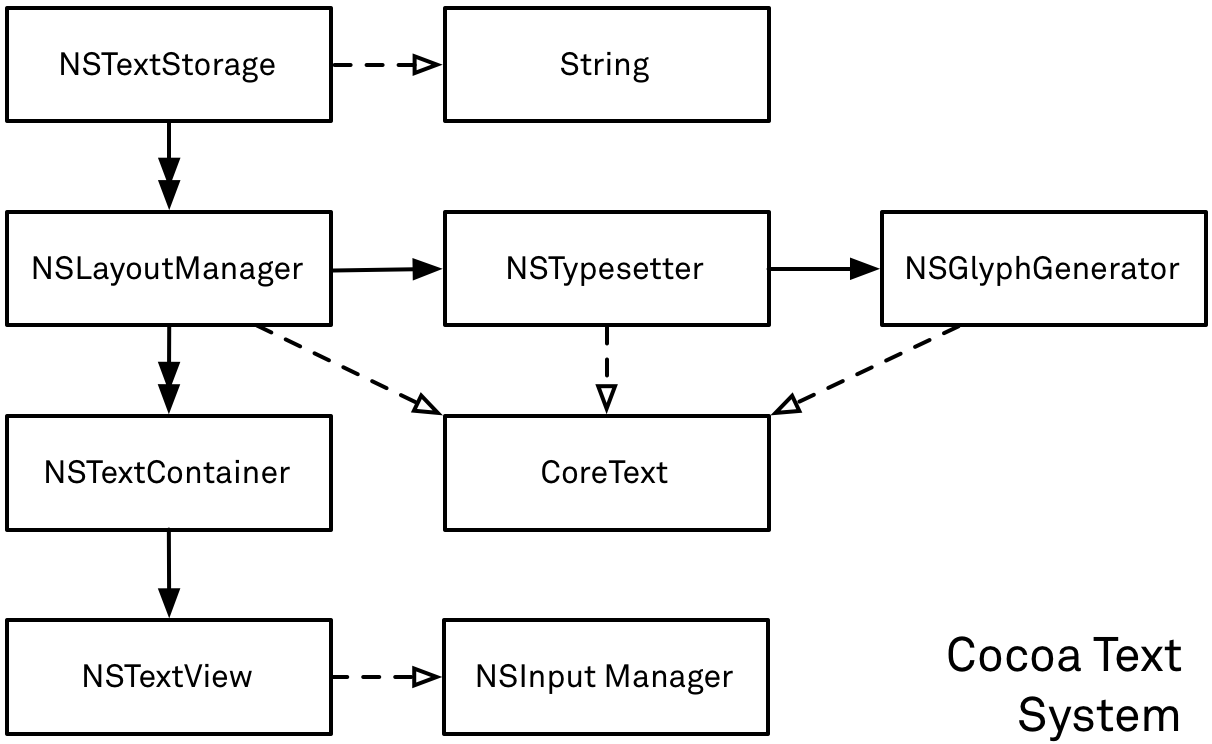
The similarity is staggering. It’s clear that, at least in huge parts, the two are the same. Obviously – with the exception of the right side with NSTextView and UITextView — the primary classes are all the same. TextKit is (at least a partial) port of Cocoa’s text system to iOS. (The one I asked for in my anecdotes, yay!)
When giving it a closer look, there are some differences. Most notable of these are:
-
There are no
NSTypesetterand noNSGlyphGeneratorclasses on iOS. While on Mac OS there is every imaginable way of customizing typesetting, these possibilities have been dramatically simplified. This allowed for the ridding of some abstractions and allowed the whole process to be merged intoNSLayoutManager. What remains is a handful of delegate methods to alter text layout and line break behavior. -
There are a couple of new, nice conveniences in the iOS variants of the classes. Excluding certain regions from a text container (see above) must be done by hand in Cocoa. The UIKit class, however, provides a simple
exclusionPathsproperty. -
Some examples of left-out functionality are support for inline tables and different attachments than images.
All-in-all the system is still the same, though. NSTextStorage is exactly the same class on both platforms and NSLayoutManagerand NSTextContainer do not differ so significantly. The changes that were made seem to (in some cases dramatically) ease the use of the text system while not cutting too many special cases. I consider this a good thing.
Reviewing the answers I got from Apple engineers regarding porting the Cocoa Text System to iOS in hindsight reveals quite a bit of background information. The reason for the delay and the reduction in functionality is simple: performance, performance, performance. Text layout can be an extremely expensive task — memory-wise, power-wise, and time-wise — especially on a mobile device. Apple had to opt for a simpler solution and to wait for more processing power to be able to at least partially support a fully fledged text layout engine.
Examples
To illustrate what is possible with TextKit, I created a little demo project that can be found on GitHub. In this demo I did only things that were not easily possible before. I must admit that coding it up took only a Sunday morning; something similar would probably have taken me days or weeks before.
TextKit consists of well over 100 methods, and is just to big to be covered exhaustively in one article. Besides the fact that, most of the time, all you need is just the one right method, TextKit’s usage and customizability are also still to be explored. So instead of doing one big demonstration that covers it all, I decided to do four smaller ones. In each one, I tried to show a different aspect and a different class for customization.
Demo 1: Configurations
Let’s get started with an easy one: configuring the text system. As you may have seen from the TextKit figure above, the arrows between NSTextStorage, NSLayoutManager, and NSTextContainer are double-headed. With that, I tried to indicate these relationships are 1-to-N. That’s right: a text storage can hold multiple layout managers, and a layout manager can hold multiple text containers. These multiplicities enable great features:
-
Adding multiple layout managers on a single text storage results in two (or more) visual representations of the same text that can be shown side by side. Each of these representations can be placed and sized independently. If the corresponding text views are editable, all changes performed in either view are then immediately mapped to the other.
-
Adding multiple text containers to a single layout manager results in one representation of the text being spread across multiple views. One example where this is useful is a page-based layout: each page would contain a separate text view. The text containers of those views would, however, be referenced with a single layout manager which then spreads text across them.
When instantiating a UITextView from a storyboard or an interface file, it will come with a text system preconfigured: one text storage, referencing one layout manager, referencing one text container. In the same way, a text system stack can be built directly from code:
								NSTextStorage *textStorage = [NSTextStorage new];

NSLayoutManager *layoutManager = [NSLayoutManager new];
[textStorage addLayoutManager: layoutManager];

NSTextContainer *textContainer = [NSTextContainer new];
[layoutManager addTextContainer: textContainer];

UITextView *textView = [[UITextView alloc] initWithFrame:someFrame
                                           textContainer:textContainer];
This is as straightforward as it can be. The only thing to remember when building a text system by hand is that your view controller must retain the text storage. The text view being at the end of the stack only weakly references the text storage and the layout manager. When the text storage is released, the layout manager is as well, leaving the text view with a disconnected container.
There is one exception to this rule. Only when instantiating a text view from an interface or a storyboard, the text view does retain the text storage. The framework applies some black magic to ensure all objects are retained without forming a retain cycle.
With that in mind, creating a more advanced setup is also pretty straightforward. Assume in a view that there is already a text view as instantiated from the nib, called originalTextView. Adding a second text view for the same text essentially means just copying the above code and reusing the text storage from the original view:
								NSTextStorage *sharedTextStorage = originalTextView.textStorage;

NSLayoutManager *otherLayoutManager = [NSLayoutManager new];
[sharedTextStorage addLayoutManager: otherLayoutManager];

NSTextContainer *otherTextContainer = [NSTextContainer new];
[otherLayoutManager addTextContainer: otherTextContainer];

UITextView *otherTextView = [[UITextView alloc] initWithFrame:someFrame
                                                textContainer:otherTextContainer];
Adding a second text container to a layout manager works almost the same. Let’s say we wanted the text in the above example to fill two text views instead of just one. Easy:
								NSTextContainer *thirdTextContainer = [NSTextContainer new];
[otherLayoutManager addTextContainer: thirdTextContainer];

UITextView *thirdTextView = [[UITextView alloc] initWithFrame:someFrame
                                                textContainer:thirdTextContainer];
But there is one caveat: Since the text container in the other text view resizes infinitely, the third one will never get any text. We must thus indicate that instead of resizing and scrolling, the text should reflow from one view to the other:
otherTextView.scrollEnabled = NO;
Unfortunately, as it seems, adding multiple text containers to a single layout manager disables editing. If text should remain editable, only a single text container may be used per layout manager.
For a working example of this configuration see the “Configuration” tab in the aforementioned TextKitDemo.
Demo 2: Syntax Highlighting
While configuring text views is not that exciting, here comes something much more interesting: syntax highlighting!
Looking at the distribution of responsiveness across the TextKit components, it’s clear syntax highlighting should be implemented in the text storage. Since NSTextStorage is a class cluster
3, subclassing requires a little bit of work. The idea here is to build a composite object: Implement all methods by just forwarding them to a concrete instance, modifying inout parameters or results as wished.
NSTextStorage inherits from NSMutableAttributedString and must implement the following four methods — two getters and two setters:
								- (NSString *)string;
- (NSDictionary *)attributesAtIndex:(NSUInteger)location
                     effectiveRange:(NSRangePointer)range;
- (void)replaceCharactersInRange:(NSRange)range withString:(NSString *)str;
- (void)setAttributes:(NSDictionary *)attrs range:(NSRange)range;
The implementation of a composite object of a class cluster subclass is also pretty straightforward. First, find the simplest class that fulfills all requirements. In our case this is NSMutableAttributedString, which we use as implementation of the custom storage:
								@implementation TKDHighlightingTextStorage
{
    NSMutableAttributedString *_imp;
}

- (id)init
{
    self = [super init];
    if (self) {
        _imp = [NSMutableAttributedString new];
    }
    return self;
}
With the object in place, responding to the getters requires just a one-liner:
								- (NSString *)string
{
    return _imp.string;
}

- (NSDictionary *)attributesAtIndex:(NSUInteger)location effectiveRange:(NSRangePointer)range
{
    return [_imp attributesAtIndex:location effectiveRange:range];
}
Responding to the setters is also almost as simple. There is one catch, though: The text storage needs to notify its layout managers that a change happened. The setters must thus also invoke -edited:range:changeInLegth: and pass along a change description. Sounds worse that it turns out to be:
								- (void)replaceCharactersInRange:(NSRange)range withString:(NSString *)str
{
    [_imp replaceCharactersInRange:range withString:str];
    [self edited:NSTextStorageEditedCharacters range:range
                                      changeInLength:(NSInteger)str.length - (NSInteger)range.length];
}

- (void)setAttributes:(NSDictionary *)attrs range:(NSRange)range
{
    [_imp setAttributes:attrs range:range];
    [self edited:NSTextStorageEditedAttributes range:range changeInLength:0];
}
With that, we have a fully functional replacement for the text storage in the text system stack. Plugging it into a text view as loaded from a interface file goes like this — but remember to reference the text storage from an instance variable:
								_textStorage = [TKDHighlightingTextStorage new];
[_textStorage addLayoutManager: self.textView.layoutManager];
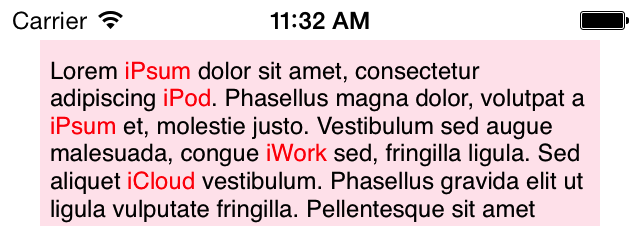
So far so good. We managed to plug in a custom text storage, and next we need to actually highlight some parts of the text. For now, a simple highlighting should suffice: We want to color all iWords red — words that start with a lowercase “i” followed by an uppercase letter.
A convenient place to implement highlighting is to overwrite -processEditing. This method is automatically called after every change to the text storage. NSTextStorage uses this method to sanitize the string after an edit. When, for example, some characters would be invisible with the chosen font, the storage replaces them with a font that is capable of showing them.
As with everything else, adding the simple highlighting of iWords is straightforward. We override -processEditing, call super’s implementation, and set up a regular expression for finding words:
								- (void)processEditing
{
    [super processEditing];

    static NSRegularExpression *iExpression;
    NSString *pattern = @"i[\\p{Alphabetic}&&\\p{Uppercase}][\\p{Alphabetic}]+";
    iExpression = iExpression ?: [NSRegularExpression regularExpressionWithPattern:pattern
                                                                           options:0
                                                                             error:NULL];
Then first, clean all previously assigned highlights:
								    NSRange paragaphRange = [self.string paragraphRangeForRange: self.editedRange];
    [self removeAttribute:NSForegroundColorAttributeName range:paragaphRange];
And second, iterate all pattern matches and assign new highlights:
								    [iExpression enumerateMatchesInString:self.string
                                  options:0 range:paragaphRange
                               usingBlock:^(NSTextCheckingResult *result, NSMatchingFlags flags, BOOL *stop)
    {
        [self addAttribute:NSForegroundColorAttributeName value:[UIColor redColor] range:result.range];
    }];
}
That’s it. We built a dynamic text view with syntax highlighting. The highlighting will be applied live as the user types. And it only took a couple lines of code. How cool is that?
Please note that just using the edited range will not be sufficient. For example, when manually typing in iWords, the regexp would only match after the third character of a word has been entered. But then the editedRange covers just the third character and thus all processing would inspect this character only. By re-processing the complete paragraph, we’re on the safe side without giving up too much performance.
For a working example, see the “Highlighting” tab in the aforementioned TextKitDemo.
Demo 3: Layout Modifications
As previously mentioned, the layout manager is the central layout workhorse. What is highly customizable in NSTypesetter on Mac OS has been merged into NSLayoutManager on iOS. While the complete customizability of the Cocoa Text System is not available in TextKit, a bunch of delegate methods allow some adjustments. As mentioned, TextKit is more tightly integrated with CoreText mostly due to performance reasons. But the philosophy is to some extent different between the two text systems:
Cocoa Text System: On Mac OS, where performance is not a problem, the design is all about flexibility. Probably so: “This is the thing that does it. You can override if you want. You can adjust about everything. Performance does not matter. You may also supply your completely own character to glyph translation, just go ahead…”
TextKit: Here is where performance seems to be a real issue. The philosophy (at least for now) is more in along the lines of: “We did it in a simple but performant way. Here is the result, but we give you the chance to alter some of it. You’re asked only at points that don’t hurt performance too hard, though.”
Enough philosophy, let’s customize something. For example, how about adjusting line heights? Sounds crazy, but adjusting line heights has been at least hacky or required using private API on previous releases of iOS. Fortunately, this is — again — now a no-brainer. Set the layout manager’s delegate and implement a single method:
								- (CGFloat)      layoutManager:(NSLayoutManager *)layoutManager
  lineSpacingAfterGlyphAtIndex:(NSUInteger)glyphIndex
  withProposedLineFragmentRect:(CGRect)rect
{
    return floorf(glyphIndex / 100);
}
In the above code, I changed the line spacing to increase with the text length. This results in lines on top being closer together than those at the bottom. Not particularly useful I admit, but it’s possible (and there surely are more practical use cases).
OK, let’s have a more realistic scenario. Say you have links in a text and do not want these to be wrapped around lines. If possible, a URL should always appear as a whole in a single piece of text. Nothing could be simpler that that.
We start by using a custom text storage just like the one previously discussed. But instead of detecting iWords, it finds links and marks them as such:
								static NSDataDetector *linkDetector;
linkDetector = linkDetector ?: [[NSDataDetector alloc] initWithTypes:NSTextCheckingTypeLink error:NULL];

NSRange paragaphRange = [self.string paragraphRangeForRange: NSMakeRange(range.location, str.length)];
[self removeAttribute:NSLinkAttributeName range:paragaphRange];

[linkDetector enumerateMatchesInString:self.string
                               options:0
                                 range:paragaphRange
                            usingBlock:^(NSTextCheckingResult *result, NSMatchingFlags flags, BOOL *stop)
{
    [self addAttribute:NSLinkAttributeName value:result.URL range:result.range];
}];
With this at hand, changing the line break behavior is as easy as implementing a single layout manager delegate method:
								- (BOOL)layoutManager:(NSLayoutManager *)layoutManager shouldBreakLineByWordBeforeCharacterAtIndex:(NSUInteger)charIndex
{
    NSRange range;
    NSURL *linkURL = [layoutManager.textStorage attribute:NSLinkAttributeName
                                                  atIndex:charIndex
                                           effectiveRange:&range];

    return !(linkURL && charIndex > range.location && charIndex <= NSMaxRange(range));
}
For a working example, see the “Layout” tab in the aforementioned TextKitDemo. Here’s a screenshot:
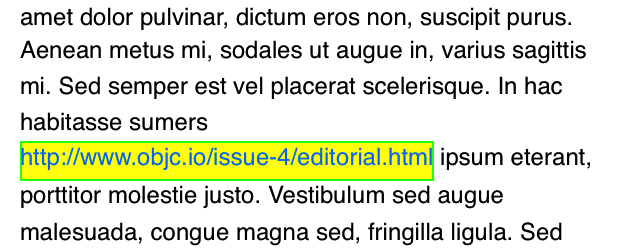
By the way, the green outline in the shot above is something usually not possible with TextKit. In the same demo, I’ve added a little trick for drawing an outline around text right from within a layout manager subclass. Extending TextKit’s drawing in special ways is also done quite easily. Be sure to check it out!
Demo 4: Text Interaction
Having covered NSTextStorage and NSLayoutManager, the last demo will play a little with NSTextContainer. This class is not very complex and it doesn’t do anything other than specifying where text may or may not be placed.
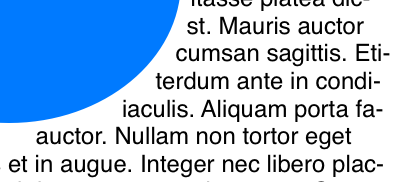
Not placing text in some regions of a view is a common requirement, for example, in magazine apps. For this case, NSTextContainer on iOS provides a property Mac developers have long sought after: exclusionPaths allows developers to set an array of NSBezierPaths that should not be filled with text. To get an idea of what this is, take a look at the following screenshot:

As you can see, all text is placed outside the blue shape. Getting this behavior into a text view is simple, but it has a small catch: The coordinates of the bezier path must be specified in container coordinates. Here is the conversion:
								- (void)updateExclusionPaths
{
    CGRect ovalFrame = [self.textView convertRect:self.circleView.bounds
                                         fromView:self.circleView];

    ovalFrame.origin.x -= self.textView.textContainerInset.left;
    ovalFrame.origin.y -= self.textView.textContainerInset.top;

    UIBezierPath *ovalPath = [UIBezierPath bezierPathWithOvalInRect:ovalFrame];
    self.textView.textContainer.exclusionPaths = @[ovalPath];
}
In this example, I am using a user-positionable view that can then be moved around freely while the text reflows live around the shape. We start by converting its bounds (self.circleView.bounds) to the coordinate system of the text view.
Because without an inset, text would glitch too close to the view borders, UITextView insets its text container by a few points. Thus, to get the exclusion path in container coordinates, the text container inset must be subtracted from the origin.
After that, getting the exclusion to be applied is as easy as setting a bezier path on the text container. Everything else is transparently and automatically handled by TextKit for you.
For a working example, see the “Interaction” tab in the TextKitDemo. As a little gimmick, it also includes a view that follows the current text selection. Because, you know, what would a good text editor demo be without a little ugly annoying paper clip getting in your way?
-
Pages did — according to Apple — use absolutely no private API. *cough*
My theory: it either used an extremely early version of TextKit or copied half of UIKit’s private sources. Or a mix thereof. ↩ -
Glyphs: While characters are the “semantical” representation of a letter, glyphs are the visual representation thereof. Depending on the font used, glyphs are either bezier paths or bitmap images defining the shape that should be drawn. See also the excellent Wikipedia article about glyphs. ↩
-
In a class cluster, only an abstract superclass is public. Allocating an instance actually creates an object of a private subclass. As such, subclassing always happens on an abstract class and requires all methods to be implemented. See also the class cluster documentation. ↩