Custom Core Data migrations are somewhat of an obscure topic. Apple provides little documentation on the subject, and it can be a frightening experience when first ventured into. Given the nature of client side programs, there’s no way to test all the possible permutations of datasets that your users will have. Moreover, it’s very hard to fix any issues that might occur during migration and rollback isn’t an option since you most likely have code that depends on the latest data model.
In this article we’ll go through the process of setting up custom Core Data migrations, with a focus on refactoring the data model. We’ll look into extracting data from the previous model and using that data to populate the destination model with new entities and relationships. In addition, there’s an example project including unit tests that demonstrate two custom migrations.
Note that for simple changes to the data model, like adding an entity or optional attribute, lightweight migrations are great. They're extremely easy to set up which is why the topic won’t be brought up in this article. To find out what kind of changes are supported by lightweight migrations and which are not, take a look at the official documentation.
That said, if you work fast and need to make relatively complex changes to your data model, custom migrations are for you.
Mapping Models
When you add a new version of your data model, you are asked to select the model on which it should be based. For lightweight migrations, the persistent store will infer a mapping model automatically for you. However, if you want to make a change to the new model that’s not supported by lightweight migrations, you need to create a mapping model. A mapping model needs a source and a destination data model. NSMigrationManager can infer the mapping model between two models. This makes it tempting to create a mapping model between each previous model all the way up to your latest one, but this quickly gets messy. For each new model version, the amount of mapping models you need to create increases linearly. This may not seem like a big deal, but along with it comes the added complexity of testing each mapping model.
Imagine that you just shipped an update containing version 3 of your data model. One of your users hasn’t updated your app in some time. This user is currently on version 1 of your data model. Now you’d need a mapping model from version 1 to version 3. You also need a mapping model from version 2 to version 3. As you add version 4, you need to create three new mapping models. Clearly this doesn’t scale very well. Enter progressive migrations.
Progressive Migrations
Rather than creating one mapping model between each previous data model to your new one, you create one mapping model for each consecutive data model. Given the previous example, you would need one mapping model between version 1 and version 2, and one mapping model between version 2 and version 3. This way you migrate from versions 1 > 2 > 3. Granted, this kind of migration will be slower for users on an older data model, but it will save development time and ensure robustness, since you only need to make sure that the migration from your previous model to your new model works, as the previous mapping models have already been tested.
The general idea is to manually figure out the mapping model between the current version v and v+1, migrate between those, and continue recursively until the persistent store is compatible with the current data model.
This looks something like this (the full version can be found in the example project):
								- (BOOL)progressivelyMigrateURL:(NSURL *)sourceStoreURL
                         ofType:(NSString *)type
                        toModel:(NSManagedObjectModel *)finalModel
                          error:(NSError **)error
{
    NSDictionary *sourceMetadata = [NSPersistentStoreCoordinator metadataForPersistentStoreOfType:type
                                                                                              URL:sourceStoreURL
                                                                                            error:error];
    if (!sourceMetadata) {
        return NO;
    }
    if ([finalModel isConfiguration:nil
        compatibleWithStoreMetadata:sourceMetadata]) {
        if (NULL != error) {
            *error = nil;
        }
        return YES;
    }
    NSManagedObjectModel *sourceModel = [self sourceModelForSourceMetadata:sourceMetadata];
    NSManagedObjectModel *destinationModel = nil;
    NSMappingModel *mappingModel = nil;
    NSString *modelName = nil;
    if (![self getDestinationModel:&destinationModel
                      mappingModel:&mappingModel
                         modelName:&modelName
                    forSourceModel:sourceModel
                             error:error]) {
        return NO;
    }
    // We have a mapping model, time to migrate
    NSURL *destinationStoreURL = [self destinationStoreURLWithSourceStoreURL:sourceStoreURL
                                                                   modelName:modelName];
    NSMigrationManager *manager = [[NSMigrationManager alloc] initWithSourceModel:sourceModel
                                                                 destinationModel:destinationModel];
    if (![manager migrateStoreFromURL:sourceStoreURL
                                 type:type
                              options:nil
                     withMappingModel:mappingModel
                     toDestinationURL:destinationStoreURL
                      destinationType:type
                   destinationOptions:nil
                                error:error]) {
        return NO;
    }
    // Migration was successful, move the files around to preserve the source in case things go bad
    if (![self backupSourceStoreAtURL:sourceStoreURL
          movingDestinationStoreAtURL:destinationStoreURL
                                error:error]) {
        return NO;
    }
    // We may not be at the "current" model yet, so recurse
    return [self progressivelyMigrateURL:sourceStoreURL
                                  ofType:type
                                 toModel:finalModel
                                   error:error];
}
Credit for the major chunk of this code goes to Marcus Zarra, who wrote a great book on Core Data. Check it out here.
Since iOS 7 and OS X Mavericks, Apple changed the journaling mode for SQLite stores to Write-Ahead Logging (WAL), which means transactions are appended to a -wal file. This causes copies of the store to likely result in data loss and inconsistencies. To safely back up our store, we’ll change the journaling mode to rollback mode. This is easily done by passing a dictionary to -addPersistentStoreWithType:configuration:URL:options:error: if we are about to migrate (and subsequently back up the store).
@{ NSSQLitePragmasOption: @{ @"journal_mode": @"DELETE” } }
The relevant code to create the NSPersistentStoreCoordinator can be found here.
Migration Policies
NSEntityMigrationPolicy is the essence of the custom migration process. From the documentation:
Instances of
NSEntityMigrationPolicycustomize the migration process for an entity mapping. Simply put, this class allows us not only to modify the attributes and relationships of an entity, but do any other processing we might need as each instance of that entity is migrated.
A Migration Example
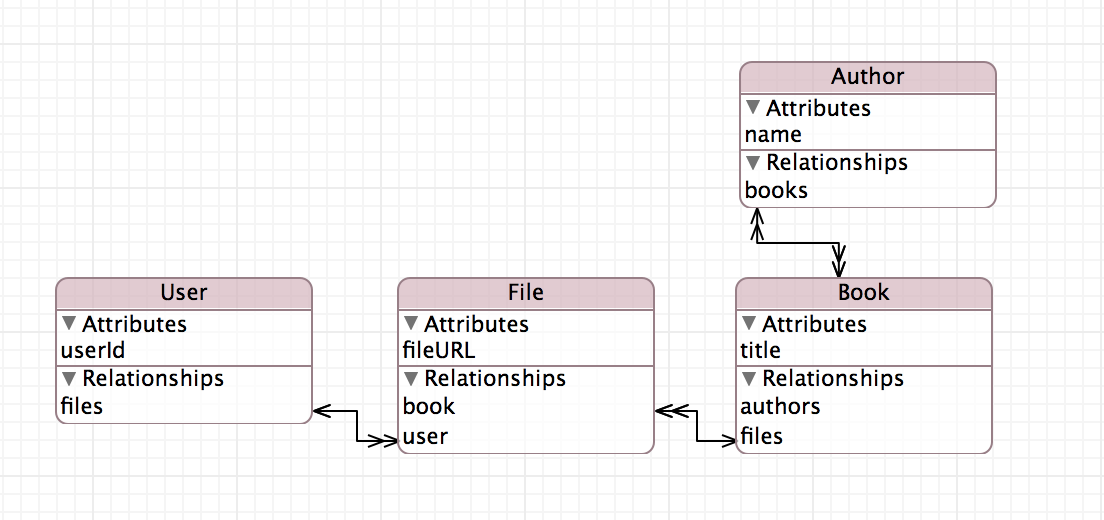
Let’s say we have a book app with a simple data model. There are two entities: User and Book. The Book entity has an attribute called authorName. We want to improve this model and add a new entity: Author. We also want to create a many-to-many relationship between Book and Author, as a book can have multiple authors, and an author can write multiple books. We will extract the authorName from the Book object, and use that to populate a new entity and establish the relationship.
The very first thing we need to do is to add a new model version based on the first data model. For this example, we added an Author entity with a many-to-many relationship with Book.

Now the data model suits our purposes, but we’ll need to migrate any existing data. This is where NSEntityMigrationPolicy comes in. We create a subclass of NSEntityMigrationPolicy called MHWBookToBookPolicy. In the mapping model, we select the Book entity and set it as the custom policy in the Utilities section.
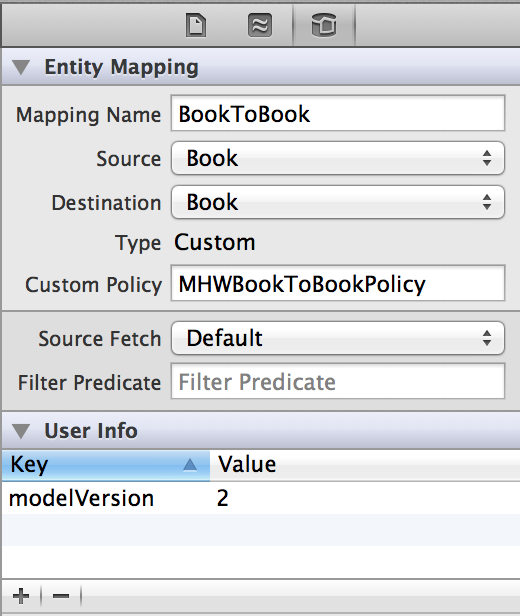
We also use the user info dictionary to set a modelVersion which will come in handy in future migrations.
In MHWBookToBookPolicy we’ll override -createDestinationInstancesForSourceInstance:entityMapping:manager:error: which lets us customize how to migrate each Book instance. If the value of modelVersion isn’t 2, we’ll just call the super implementation, otherwise we need to do a custom migration. We’ll start off by inserting a new NSManagedObject based on the mapping’s destination entity into the destination context. Then we iterate through the attribute keys of the destination instance and populate them with the values from the source instance. This ensures that we preserve the existing data and avoid setting any values that have been removed in the destination instance:
								NSNumber *modelVersion = [mapping.userInfo valueForKey:@"modelVersion"];
if (modelVersion.integerValue == 2) {
    NSMutableArray *sourceKeys = [sourceInstance.entity.attributesByName.allKeys mutableCopy];
    NSDictionary *sourceValues = [sourceInstance dictionaryWithValuesForKeys:sourceKeys];
    NSManagedObject *destinationInstance = [NSEntityDescription insertNewObjectForEntityForName:mapping.destinationEntityName
                                                                         inManagedObjectContext:manager.destinationContext];
    NSArray *destinationKeys = destinationInstance.entity.attributesByName.allKeys;
    for (NSString *key in destinationKeys) {
        id value = [sourceValues valueForKey:key];
        // Avoid NULL values
        if (value && ![value isEqual:[NSNull null]]) {
            [destinationInstance setValue:value forKey:key];
        }
    }
}
Then we’ll create the Author entity, based on the values from the source instance. But what happens now if there are multiple books with the same author? We’ll make use of a category method on NSMigrationManager to create a lookup dictionary, making sure we only create one Author entity for each unique Author name:
								NSMutableDictionary *authorLookup = [manager lookupWithKey:@"authors"];
// Check if we’ve already created this author
NSString *authorName = [sourceInstance valueForKey:@"author"];
NSManagedObject *author = [authorLookup valueForKey:authorName];
if (!author) {
    // Create the author
    // Populate lookup for reuse
    [authorLookup setValue:author forKey:authorName];
}
[destinationInstance performSelector:@selector(addAuthorsObject:) withObject:author];
Finally, we need to tell the migration manager to associate data between the source and destination stores:
								[manager associateSourceInstance:sourceInstance
         withDestinationInstance:destinationInstance
                forEntityMapping:mapping];
return YES;
In a category on NSMigrationManager:
								@implementation NSMigrationManager (Lookup)

- (NSMutableDictionary *)lookupWithKey:(NSString *)lookupKey
{
    NSMutableDictionary *userInfo = (NSMutableDictionary *)self.userInfo;
    // Check if we’ve already created a userInfo dictionary
    if (!userInfo) {
        userInfo = [@{} mutableCopy];
        self.userInfo = userInfo;
    }
    NSMutableDictionary *lookup = [userInfo valueForKey:lookupKey];
    if (!lookup) {
        lookup = [@{} mutableCopy];
        [userInfo setValue:lookup forKey:lookupKey];
    }
    return lookup;
}

@end
A More Complex Migration
Later on, we want to move the fileURL from the Book entity into a new entity called File.
We want to rearrange the relationships so that a User has a one-to-many relationship with File, which in turn has a many-to-one relationship with Book.
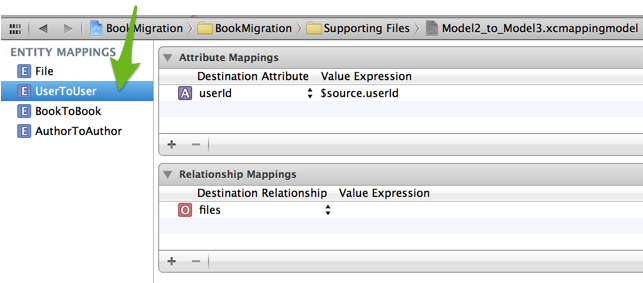
In the previous migration, we were only migrating one entity. When we add File, things become a bit more tricky. We can’t simply insert a File entity when migrating a Book and set its relationship with User, because the User entity hasn’t yet been migrated and has no files-relationship. We have to think about the order in which the migration is executed. In the mapping model, it’s possible to rearrange the order of the entity mappings. For this case, we want to put the UserToUser mapping above the BookToBook mapping. This guarantees that the User entity will be migrated before the Book entity.
The approach for adding a File entity is similar to when we created the Author entity. We’ll create File objects when we migrate the Book entity in MHWBookToBookPolicy. We’ll look at the source instance’s users, create a new File object for each user, and establish the relationship:
								NSArray *users = [sourceInstance valueForKey:@"users"];
for (NSManagedObject *user in users) {

    NSManagedObject *file = [NSEntityDescription insertNewObjectForEntityForName:@"File"
                                                          inManagedObjectContext:manager.destinationContext];
    [file setValue:[sourceInstance valueForKey:@"fileURL"] forKey:@"fileURL"];
    [file setValue:destinationInstance forKey:@"book"];

    NSInteger userId = [[user valueForKey:@"userId"] integerValue];
    NSFetchRequest *request = [NSFetchRequest fetchRequestWithEntityName:@"User"];
    request.predicate = [NSPredicate predicateWithFormat:@"userId = %d", userId];
    NSManagedObject *user = [[manager.destinationContext executeFetchRequest:request error:nil] lastObject];
    [file setValue:user forKey:@"user"];
}
Large Datasets
If your store contains a lot of data, to a point where the migration will consume too much memory, Core Data provides a way to migrate in chunks. Apple briefly mentions it here. The approach is to separate your migration using multiple mapping models and migrating once with each of the mapping models. This requires that you have an object graph in which migration can be divided into two or more parts. The code we need to add to support this is actually very little.
First, let’s update our migration method to support migrating using multiple mapping models. Since the order of mapping models is important, we’ll ask for them in a delegate method:
								NSArray *mappingModels = @[mappingModel]; // The one we found previously
if ([self.delegate respondsToSelector:@selector(migrationManager:mappingModelsForSourceModel:)]) {
    NSArray *explicitMappingModels = [self.delegate migrationManager:self
                                         mappingModelsForSourceModel:sourceModel];
    if (0 < explicitMappingModels.count) {
        mappingModels = explicitMappingModels;
    }
}
for (NSMappingModel *mappingModel in mappingModels) {
    didMigrate = [manager migrateStoreFromURL:sourceStoreURL
                                         type:type
                                      options:nil
                             withMappingModel:mappingModel
                             toDestinationURL:destinationStoreURL
                              destinationType:type
                           destinationOptions:nil
                                        error:error];
}
Now, how do we know which mapping models to use for a particular source model? The API here makes this a bit clumsy but the following solution does the job. In the delegate method, we figure out the name of the source model and return the relevant mapping models:
								- (NSArray *)migrationManager:(MHWMigrationManager *)migrationManager
  mappingModelsForSourceModel:(NSManagedObjectModel *)sourceModel
{
    NSMutableArray *mappingModels = [@[] mutableCopy];
    NSString *modelName = [sourceModel mhw_modelName];
    if ([modelName isEqual:@"Model2"]) {
        // Add mapping models to mappingModels
    }
    return mappingModels;
}
We’ll add a category on NSManagedObjectModel that helps us figure out its filename:
								- (NSString *)mhw_modelName
{
    NSString *modelName = nil;
    NSArray *modelPaths = // get paths to all the mom files in the bundle
    for (NSString *modelPath in modelPaths) {
        NSURL *modelURL = [NSURL fileURLWithPath:modelPath];
        NSManagedObjectModel *model = [[NSManagedObjectModel alloc] initWithContentsOfURL:modelURL];
        if ([model isEqual:self]) {
            modelName = modelURL.lastPathComponent.stringByDeletingPathExtension;
            break;
        }
    }
    return modelName;
}
Since the User was isolated from the rest of the object graph in the previous example (no source relationship mapping), we could take advantage of this approach and migrate User by itself. We’ll remove the UserToUser mapping from our first mapping model, and create another mapping model with only a UserToUser mapping. Remember to return the new User mapping model in the list of mapping models, since we’re setting the new relationship in the other mapping.
Unit Tests
Setting up unit tests for this is surprisingly simple:
-
Populate your old store with relevant data*.
-
Copy the resulting persistent store file to your test target.
-
Write tests that assert compliance with your latest data model.
-
Run tests that migrate data to your new data model.
*This can easily be done by running the latest production version of your app in the simulator
Steps 1 and 2 are simple. Step 3 is left to the reader as an exercise, and I will guide you through step 4.
When the persistent store file has been added to the unit testing target, we need to tell the migration manager to migrate from that store to our destination store. This is demonstrated in the example project like this:
								- (void)setUpCoreDataStackMigratingFromStoreWithName:(NSString *)name
{
    NSURL *storeURL = [self temporaryRandomURL];
    [self copyStoreWithName:name toURL:storeURL];

    NSURL *momURL = [[NSBundle mainBundle] URLForResource:@"Model" withExtension:@"momd"];
    self.managedObjectModel = [[NSManagedObjectModel alloc] initWithContentsOfURL:momURL];

    NSString *storeType = NSSQLiteStoreType;

    MHWMigrationManager *migrationManager = [MHWMigrationManager new];
    [migrationManager progressivelyMigrateURL:storeURL
                                       ofType:storeType
                                      toModel:self.managedObjectModel
                                        error:nil];

    self.persistentStoreCoordinator = [[NSPersistentStoreCoordinator alloc] initWithManagedObjectModel:self.managedObjectModel];
    [self.persistentStoreCoordinator addPersistentStoreWithType:storeType
                                                  configuration:nil
                                                            URL:storeURL
                                                        options:nil
                                                          error:nil];

    self.managedObjectContext = [[NSManagedObjectContext alloc] init];
    self.managedObjectContext.persistentStoreCoordinator = self.persistentStoreCoordinator;
}

- (NSURL *)temporaryRandomURL
{
    NSString *uniqueName = [NSProcessInfo processInfo].globallyUniqueString;
    return [NSURL fileURLWithPath:[NSTemporaryDirectory() stringByAppendingString:uniqueName]];
}

- (void)copyStoreWithName:(NSString *)name toURL:(NSURL *)url
{
    // Create a unique url every test so migration always runs
    NSBundle *bundle = [NSBundle bundleForClass:[self class]];
    NSFileManager *fileManager = [NSFileManager new];
    NSString *path = [bundle pathForResource:[name stringByDeletingPathExtension] ofType:name.pathExtension];
    [fileManager copyItemAtPath:path
                         toPath:url.path error:nil];
}
Put this code in a superclass, and reuse it in test classes that test migration:
								- (void)setUp
{
    [super setUp];
    [self setUpCoreDataStackMigratingFromStoreWithName:@"Model1.sqlite"];
}
Conclusion
When doing lightweight migrations, the migration occurs directly inside the SQLite store. This is very fast and efficient compared to custom migrations, where the source objects need to be fetched into memory, their values copied onto the destination objects, their relationships re-established, and finally inserted into the new store. Not only is this much slower, it can also impose problems when migrating larger datasets due to memory constraints.
Add More Data Than You Think You Might Need
One of the most important things when working with any type of data persisting is to think through your model carefully. You’ll want it to be sustainable. Put more things into your data model than you think you might need. Empty attributes or entities is better than having to migrate and create them later on. Migrations are prone to mistakes. Unused data is not.
Debugging Migrations
A useful launch argument when testing migrations is -com.apple.CoreData.MigrationDebug. When set to 1, you will receive information in the console about exceptional cases as it migrates data. If you’re used to SQL but new to Core Data, set -com.apple.CoreData.SQLDebug to 1 to see actual SQL commands.