Scene Kit is a Cocoa-style 3D rendering framework that was introduced for OS X back when Apple was still doing cat names (WWDC 2012). It had a good first release as a general 3D renderer, and added powerful features like shader modifiers, constraints, and skeletal animations the year after, when Apple introduced its first non-cat OS X: Mavericks. This year (2014), Scene Kit became even more powerful, with support for particle effects, physics simulation, scripted events, and multi-pass rendering, and (perhaps most important to many people) it was introduced to iOS, and Apple now refers to it as "casual game ready."
From the start, I found Scene Kit's biggest strength and differentiator to be its integration with other graphics frameworks like Core Image, Core Animation, and now also Sprite Kit. These are not the things you would normally look for in a game engine, but if you are a hobbyist or otherwise mainly a Cocoa (or Cocoa Touch) developer, then this means that a lot of things should already feel familiar.
Scene Kit Basics
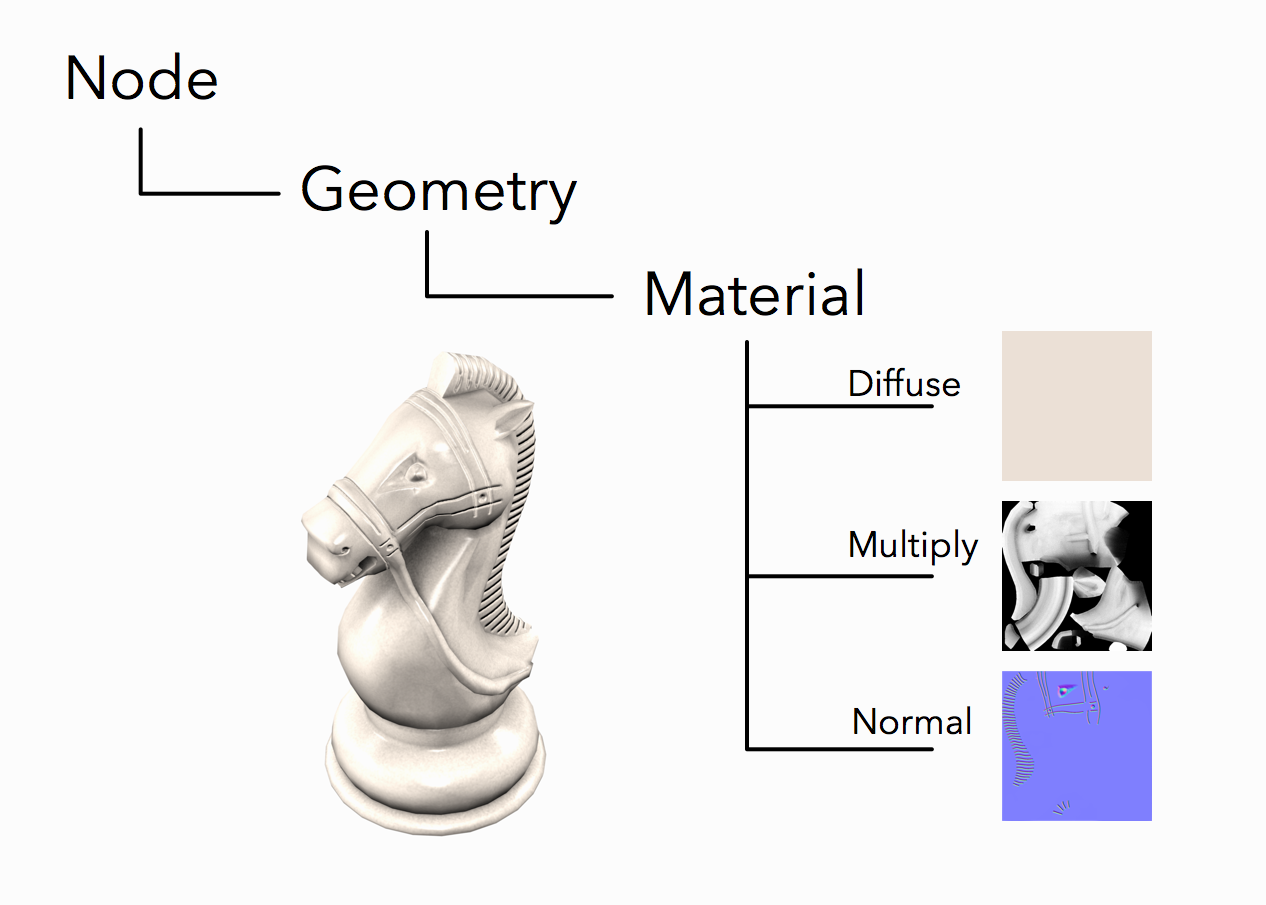
Scene Kit is built on top of OpenGL, as a higher-level framework where lights, geometries, materials, and cameras are objects that you work with in your Objective-C or Swift code. If you've used OpenGL in its earliest releases, before shaders, this terminology might bring back bad memories of a restricted system with limited configurability. Luckily, this is not the case. High-level configuration is enough for most common tasks — even more advanced things like dynamic shadows and depth of field effects.
Where that is not enough, Scene Kit allows you drop down to a lower level and configure the rendering with your own OpenGL shader code (GLSL).
Nodes
In addition to the lights, geometries, materials, and cameras, Scene Kit uses a hierarchy of nodes 1 to organize its content. Each node has a position, rotation, and scale relative to its parent node, which in turn is relative to its parent node, all the way up to the root node. To give one of the other objects a position in the 3D world, it is attached to one of the nodes. The node hierarchy is managed using methods like:
-
addChildNode(_:) -
insertChildNode(_: atIndex:) -
removeFromParentNode()
These mirror some of the methods that are used to manage the view hierarchies and layer hierarchies on iOS and OS X.
Geometry Objects
Scene Kit comes with built-in geometry objects for simple shapes like boxes, spheres, planes, and cones, but for games, you'll mostly be loading 3D models from a file. You can import (and export) COLLADA files by referencing a file by name:
let chessPieces = SCNScene(named: "chess pieces") // SCNScene?
If the scene contained in the file should be displayed as is in its entirety, then it can be used as the scene view's scene. If the scene contains multiple objects, but only some of them should be displayed on the screen, then they can be found, referenced by their names, and added to the scene that's being rendered in the scene view:
								if let knight = chessPieces.rootNode.childNodeWithName("Knight", recursively: true) {
    sceneView.scene?.rootNode.addChildNode(knight)
}
This is a reference to the original node in the imported file and contains any and all child nodes, as well as the geometry objects (with their materials), lights, and cameras that were attached to those nodes. Asking for the child node with the same name again will get you a reference to the same object.
To have multiple copies in a scene, for example, to display two knights on a chess board, you would either copy the node or clone it (for a recursive copy). This makes a copy of the node that references the same geometry object with the same materials. Both copies would still point to the same geometry objects. So to change one piece's material, the geometry object would also have to be copied and have a new material attached to it. Copying a geometry object remains fast and cheap, since the copies still refer to the same vertex data.
Imported nodes with geometry objects that are rigged for skeletal animation have a skinner object, which provides access to the skeletal node hierarchy and manages the relationship between the bones and the geometry object. Individual bones can be moved and rotated; however, a more complex animation modifying multiple bones — for example, a character's walk cycle — would most likely be loaded from a file and added to the object.
Lights
Lights in Scene Kit are completely dynamic. This makes them easy to grasp and generally easy to work with, but it also mean that the lighting they provide is less advanced than that of a fully fledged game engine. There are four different types of lights: ambient, directional, omnidirectional (point lights), and spotlights.
In many cases, specifying a rotation axis and an angle is not the most intuitive way of pointing a light at an object. In these cases, the node that gives the light its position and orientation can be constrained to look at another node. Adding a "look at"-constraint also means that the light will keep pointing at that node, even as it moves:
								let spot = SCNLight()
spot.type = SCNLightTypeSpot
spot.castsShadow = true

let spotNode = SCNNode()
spotNode.light = spot
spotNode.position = SCNVector3(x: 4, y: 7, z: 6)

let lookAt = SCNLookAtConstraint(target: knight)
spotNode.constraints = [lookAt]
Animation
Pretty much any property on any object in Scene Kit is animatable. Just as with Cocoa (or Cocoa Touch), this means that you can create a CAAnimation for that key path (even paths like "position.x") and add it to the object. Similarly, you can change the value in between the "begin" and "commit" of a SCNTransaction. These two approaches should be immediately familiar, but weren't built specifically for animations in games:
								let move = CABasicAnimation(keyPath: "position.x")
move.byValue  = 10
move.duration = 1.0
knight.addAnimation(move, forKey: "slide right")
Scene Kit also supports the action-style animation API from Sprite Kit. This allows you to create sequences of animations and run blocks of code as custom actions together with other animations. Unlike Core Animation, these actions run as part of the game loop and update the model value for every frame, not just the presentation node.
In fact, if you've worked with Sprite Kit before, Scene Kit should look fairly familiar, but in 3D. As of iOS 8 (the first iOS version that supports Scene Kit) and OS X 10.10, the two frameworks (Scene Kit and Sprite Kit) can work together. On the Sprite Kit side of things, 3D models can be mixed with 2D sprites. On the Scene Kit side of things, Sprite Kit scenes and textures can be used as textures in Scene Kit, and a Sprite Kit scene can be used as a 2D overlay on top of a Scene Kit scene 2.
Writing Games in Scene Kit
Actions and textures are not the only things that Scene Kit and Sprite Kit have in common. When it comes to writing a game using Scene Kit, it bears a strong resemblance to its 2D counterpart. In both cases, the game loop goes through the same steps, making callbacks to the delegate:
-
Updating the scene
-
Applying animations / actions
-
Simulating physics
-
Applying constraints
-
Rendering
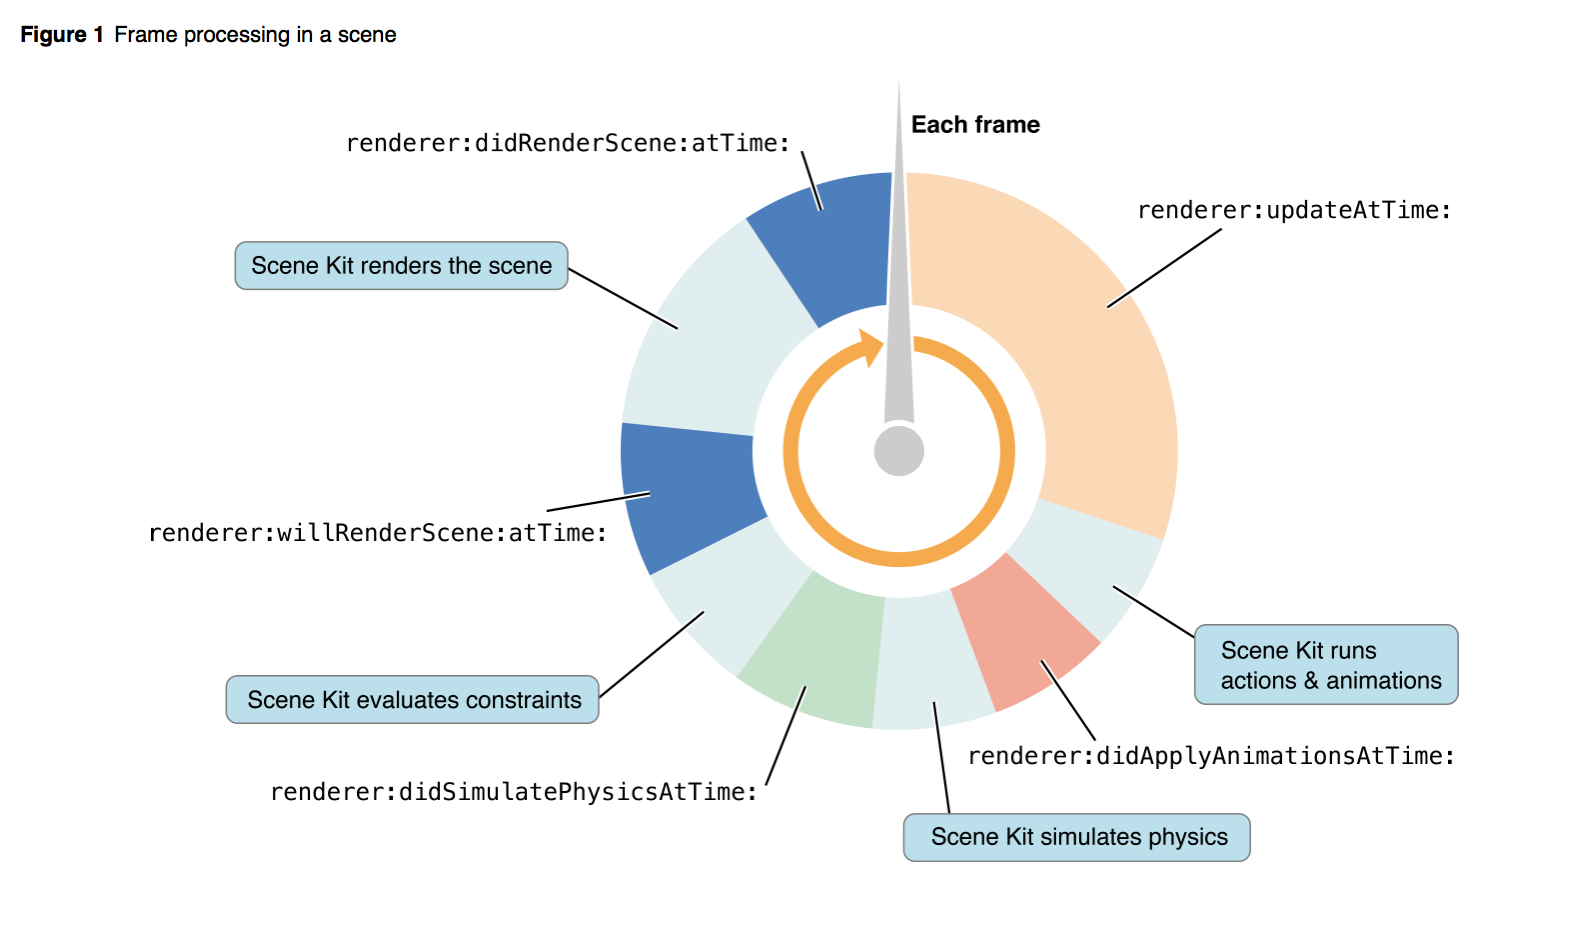
Each callback is sent exactly once per frame and is used to perform gameplay-related logic like input handling, artificial intelligence, and game scripting.
Input Handling
Scene Kit uses the same input mechanisms for keyboard events, mouse events, touch events, and gesture recognition as regular Cocoa and Cocoa Touch apps, the main difference being that there is only one view, the scene view. For keyboard events, or gestures like pinch, swipe, and rotate, it may be fine just knowing that they happened, but events like clicks, and gestures like taps or pans, are likely to require more information about the event.
For these cases, the scene view can be hit tested using -hitTest(_: options:). Unlike regular views and layers that only return the subview or sublayer that was hit, Scene Kit returns an array of hit test results for each intersection with a geometry object and a ray from the camera through the specified point. Each hit test result contains basic information about what node the hit geometry object belongs to, as well as detailed information about the intersection (the coordinate of the hit, the surface normal at that point, and the texture coordinates at that point). For many cases, it's enough just knowing what the first node that was hit was:
								if let firstHit = sceneView.hitTest(tapLocation, options: nil)?.first as? SCNHitTestResult {
    let hitNode = firstHit.node
    // do something with the node that was hit...
}
Extending the Default Rendering
Light and material configurations, while easy to work with, can only get you so far. If you already have existing OpenGL shaders, you can configure a material to use those for rendering, in order to do something completely custom. However, if you only want to modify the default rendering, Scene Kit exposes four points where snippets of shader code (GLSL) can be injected into the default rendering. At the different entry points, Scene Kit provides access to data like transform matrices, geometry data, sampled textures, and the rendered output color.
For example, these lines of GLSL in the geometry entry points can be used to twist all points in a geometry object around the x-axis. This is done by defining a function to create a rotation transform and applying such a transform to the positions and normals of the geometry object. This also defines a custom "uniform" variable that determines how much the object is twisted:
								// a function that creates a rotation transform matrix around X
mat4 rotationAroundX(float angle)
{
    return mat4(1.0,    0.0,         0.0,        0.0,
                0.0,    cos(angle), -sin(angle), 0.0,
                0.0,    sin(angle),  cos(angle), 0.0,
                0.0,    0.0,         0.0,        1.0);
}

#pragma body

uniform float twistFactor = 1.0;
float rotationAngle = _geometry.position.x * twistFactor;
mat4 rotationMatrix = rotationAroundX(rotationAngle);

// position is a vec4
_geometry.position *= rotationMatrix;

// normal is a vec3
vec4 twistedNormal = vec4(_geometry.normal, 1.0) * rotationMatrix;
_geometry.normal   = twistedNormal.xyz;
Shader modifiers can be attached to either a geometry object or to one of its materials. Both classes are fully key-value coding compliant, which means that you can set values for arbitrary keys. Having declared the "twistFactor" uniform in the shader modifier makes Scene Kit observe that key and re-bind the uniform variable whenever the value changes. This means that it can be altered using key-value coding:
torus.setValue(5.0, forKey: "twistFactor")
It can also be animated by creating a CAAnimation for that key path:
								let twist = CABasicAnimation(keyPath: "twistFactor")
twist.fromValue = 5
twist.toValue   = 0
twist.duration  = 2.0

torus.addAnimation(twist, forKey: "Twist the torus")
Deferred Shading
There are some graphic effects that can't be achieved in a single render pass, even in pure OpenGL. Instead, different shaders operate in a sequence to perform post-processing or deferred shading. Scene Kit represents such rendering techniques using the SCNTechnique class. It is created with a dictionary that defines the drawing passes, their inputs and outputs, shader files, symbols, etc.
The first pass is always Scene Kit's default rendering, which outputs both the color and the depth of the scene. If you don't want the colors to be shaded, the materials can be configured to have the "constant" lighting model, or all lights in the scene can be replaced with a single ambient light.
For example, by getting the depth from Scene Kit's initial pass and the normals from a second pass, and performing edge detection on both of them in a third pass, you can draw strong contours both along the outline and along edges:
Further Reading
If you want to learn more about making games using Scene Kit, I recommend watching the "Building a Game with Scene Kit" video from this year's WWDC and looking at the Bananas sample code.
Additionally, if you want to learn about Scene Kit in general, I recommend watching this year's and last year's "What's New in Scene Kit" videos. If you still want to learn more, you can check out my upcoming book on the topic.