It's well known in the field of architecture that we shape our buildings, and afterward our buildings shape us. As all programmers eventually learn, this applies just as well to building software.
It's important to design our code so that each piece is easily identifiable, has a specific and obvious purpose, and fits together with other pieces in a logical fashion. This is what we call software architecture. Good architecture is not what makes a product successful, but it does make a product maintainable and helps preserve the sanity of the people maintaining it!
In this article, we will introduce an approach to iOS application architecture called VIPER. VIPER has been used to build many large projects, but for the purposes of this article we will be showing you VIPER by building a to-do list app. You can follow along with the example project here on GitHub:
What is VIPER?
Testing was not always a major part of building iOS apps. As we embarked on a quest to improve our testing practices at Mutual Mobile, we found that writing tests for iOS apps was difficult. We decided that if we were going to improve the way we test our software, we would first need to come up with a better way to architect our apps. We call that method VIPER.
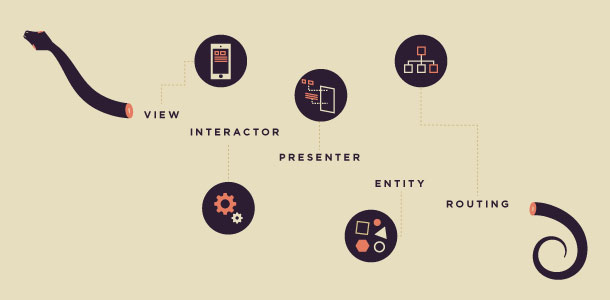
VIPER is an application of Clean Architecture to iOS apps. The word VIPER is a backronym for View, Interactor, Presenter, Entity, and Routing. Clean Architecture divides an app’s logical structure into distinct layers of responsibility. This makes it easier to isolate dependencies (e.g. your database) and to test the interactions at the boundaries between layers:
Most iOS apps are architected using MVC (model–view–controller). Using MVC as an application architecture can guide you to thinking every class is either a model, a view, or a controller. Since much of the application logic does not belong in a model or view, it usually ends up in the controller. This leads to an issue known as a Massive View Controller, where the view controllers end up doing too much. Slimming down these massive view controllers is not the only challenge faced by iOS developers seeking to improve the quality of their code, but it is a great place to start.
VIPER's distinct layers help deal with this challenge by providing clear locations for application logic and navigation-related code. With VIPER applied, you'll notice that the view controllers in our to-do list example are lean, mean, view controlling machines. You'll also find that the code in the view controllers and all of the other classes is easy to understand, easier to test, and as a result, also easier to maintain.
Application Design Based on Use Cases
Apps are often implemented as a set of use cases. Use cases are also known as acceptance criteria, or behaviors, and describe what an app is meant to do. Maybe a list needs to be sortable by date, type, or name. That's a use case. A use case is the layer of an application that is responsible for business logic. Use cases should be independent from the user interface implementation of them. They should also be small and well-defined. Deciding how to break down a complex app into smaller use cases is challenging and requires practice, but it's a helpful way to limit the scope of each problem you are solving and each class that you are writing.
Building an app with VIPER involves implementing a set of components to fulfill each use case. Application logic is a major part of implementing a use case, but it's not the only part. The use case also affects the user interface. Additionally, it's important to consider how the use case fits together with other core components of an application, such as networking and data persistence. Components act like plugins to the use cases, and VIPER is a way of describing what the role of each of these components is and how they can interact with one another.
One of the use cases or requirements for our to-do list app was to group the to-dos in different ways based on a user's selection. By separating the logic that organizes that data into a use case, we are able to keep the user interface code clean and easily wrap the use case in tests to make sure it continues to work the way we expect it to.
Main Parts of VIPER
The main parts of VIPER are:
-
View: displays what it is told to by the Presenter and relays user input back to the Presenter.
-
Interactor: contains the business logic as specified by a use case.
-
Presenter: contains view logic for preparing content for display (as received from the Interactor) and for reacting to user inputs (by requesting new data from the Interactor).
-
Entity: contains basic model objects used by the Interactor.
-
Routing: contains navigation logic for describing which screens are shown in which order.
This separation also conforms to the Single Responsibility Principle. The Interactor is responsible to the business analyst, the Presenter represents the interaction designer, and the View is responsible to the visual designer.
Below is a diagram of the different components and how they are connected:

While the components of VIPER can be implemented in an application in any order, we've chosen to introduce the components in the order that we recommend implementing them. You'll notice that this order is roughly consistent with the process of building an entire application, which starts with discussing what the product needs to do, followed by how a user will interact with it.
Interactor
An Interactor represents a single use case in the app. It contains the business logic to manipulate model objects (Entities) to carry out a specific task. The work done in an Interactor should be independent of any UI. The same Interactor could be used in an iOS app or an OS X app.
Because the Interactor is a PONSO (Plain Old NSObject) that primarily contains logic, it is easy to develop using TDD.
The primary use case for the sample app is to show the user any upcoming to-do items (i.e. anything due by the end of next week). The business logic for this use case is to find any to-do items due between today and the end of next week and assign a relative due date: today, tomorrow, later this week, or next week.
Below is the corresponding method from VTDListInteractor:
								- (void)findUpcomingItems
{
    __weak typeof(self) welf = self;
    NSDate* today = [self.clock today];
    NSDate* endOfNextWeek = [[NSCalendar currentCalendar] dateForEndOfFollowingWeekWithDate:today];
    [self.dataManager todoItemsBetweenStartDate:today endDate:endOfNextWeek completionBlock:^(NSArray* todoItems) {
        [welf.output foundUpcomingItems:[welf upcomingItemsFromToDoItems:todoItems]];
    }];
}
Entity
Entities are the model objects manipulated by an Interactor. Entities are only manipulated by the Interactor. The Interactor never passes entities to the presentation layer (i.e. Presenter).
Entities also tend to be PONSOs. If you are using Core Data, you will want your managed objects to remain behind your data layer. Interactors should not work with NSManagedObjects.
Here is the Entity for our to-do item:
								@interface VTDTodoItem : NSObject

@property (nonatomic, strong)   NSDate*     dueDate;
@property (nonatomic, copy)     NSString*   name;

+ (instancetype)todoItemWithDueDate:(NSDate*)dueDate name:(NSString*)name;

@end
Don’t be surprised if your entities are just data structures. Any application-dependent logic will most likely be in an Interactor.
Presenter
The Presenter is a PONSO that mainly consists of logic to drive the UI. It knows when to present the user interface. It gathers input from user interactions so it can update the UI and send requests to an Interactor.
When the user taps the + button to add a new to-do item, addNewEntry gets called. For this action, the Presenter asks the wireframe to present the UI for adding a new item:
								- (void)addNewEntry
{
    [self.listWireframe presentAddInterface];
}
The Presenter also receives results from an Interactor and converts the results into a form that is efficient to display in a View.
Below is the method that receives upcoming items from the Interactor. It will process the data and determine what to show to the user:
								- (void)foundUpcomingItems:(NSArray*)upcomingItems
{
    if ([upcomingItems count] == 0)
    {
        [self.userInterface showNoContentMessage];
    }
    else
    {
        [self updateUserInterfaceWithUpcomingItems:upcomingItems];
    }
}
Entities are never passed from the Interactor to the Presenter. Instead, simple data structures that have no behavior are passed from the Interactor to the Presenter. This prevents any 'real work' from being done in the Presenter. The Presenter can only prepare the data for display in the View.
View
The View is passive. It waits for the Presenter to give it content to display; it never asks the Presenter for data. Methods defined for a View (e.g. LoginView for a login screen) should allow a Presenter to communicate at a higher level of abstraction, expressed in terms of its content, and not how that content is to be displayed. The Presenter does not know about the existence of UILabel, UIButton, etc. The Presenter only knows about the content it maintains and when it should be displayed. It is up to the View to determine how the content is displayed.
The View is an abstract interface, defined in Objective-C with a protocol. A UIViewController or one of its subclasses will implement the View protocol. For example, the 'add' screen from our example has the following interface:
								@protocol VTDAddViewInterface <NSObject>

- (void)setEntryName:(NSString *)name;
- (void)setEntryDueDate:(NSDate *)date;

@end
Views and view controllers also handle user interaction and input. It's easy to understand why view controllers usually become so large, since they are the easiest place to handle this input to perform some action. To keep our view controllers lean, we need to give them a way to inform interested parties when a user takes certain actions. The view controller shouldn't be making decisions based on these actions, but it should pass these events along to something that can.
In our example, Add View Controller has an event handler property that conforms to the following interface:
								@protocol VTDAddModuleInterface <NSObject>

- (void)cancelAddAction;
- (void)saveAddActionWithName:(NSString *)name dueDate:(NSDate *)dueDate

@end
When the user taps on the cancel button, the view controller tells this event handler that the user has indicated that it should cancel the add action. That way, the event handler can take care of dismissing the add view controller and telling the list view to update.
The boundary between the View and the Presenter is also a great place for ReactiveCocoa. In this example, the view controller could also provide methods to return signals that represent button actions. This would allow the Presenter to easily respond to those signals without breaking separation of responsibilities.
Routing
Routes from one screen to another are defined in the wireframes created by an interaction designer. In VIPER, the responsibility for Routing is shared between two objects: the Presenter, and the wireframe. A wireframe object owns the UIWindow, UINavigationController, UIViewController, etc. It is responsible for creating a View/ViewController and installing it in the window.
Since the Presenter contains the logic to react to user inputs, it is the Presenter that knows when to navigate to another screen, and which screen to navigate to. Meanwhile, the wireframe knows how to navigate. So, the Presenter will use the wireframe to perform the navigation. Together, they describe a route from one screen to the next.
The wireframe is also an obvious place to handle navigation transition animations. Take a look at this example from the add wireframe:
								@implementation VTDAddWireframe

- (void)presentAddInterfaceFromViewController:(UIViewController *)viewController
{
    VTDAddViewController *addViewController = [self addViewController];
    addViewController.eventHandler = self.addPresenter;
    addViewController.modalPresentationStyle = UIModalPresentationCustom;
    addViewController.transitioningDelegate = self;

    [viewController presentViewController:addViewController animated:YES completion:nil];

    self.presentedViewController = viewController;
}

#pragma mark - UIViewControllerTransitioningDelegate Methods

- (id<UIViewControllerAnimatedTransitioning>)animationControllerForDismissedController:(UIViewController *)dismissed
{
    return [[VTDAddDismissalTransition alloc] init];
}

- (id<UIViewControllerAnimatedTransitioning>)animationControllerForPresentedController:(UIViewController *)presented
                                                                  presentingController:(UIViewController *)presenting
                                                                      sourceController:(UIViewController *)source
{
    return [[VTDAddPresentationTransition alloc] init];
}

@end
The app is using a custom view controller transition to present the add view controller. Since the wireframe is responsible for performing the transition, it becomes the transitioning delegate for the add view controller and can return the appropriate transition animations.
Application Components Fitting in with VIPER
An iOS application architecture needs to be considerate of the fact that UIKit and Cocoa Touch are the main tools that apps are built on top of. Architecture needs to coexist peacefully with all the components of the application, but it also needs to provide guidelines for how some parts of the frameworks are used and where they live.
The workhorse of an iOS app is UIViewController. It would be easy to assume that a contender to replace MVC would shy away from making heavy use of view controllers. But view controllers are central to the platform: they handle orientation change, respond to input from the user, integrate well with system components like navigation controllers, and now with iOS 7, allow customizable transitions between screens. They are extremely useful.
With VIPER, a view controller does exactly what it was meant to do: it controls the view. Our to-do list app has two view controllers, one for the list screen, and one for the add screen. The add view controller implementation is extremely basic because all it has to do is control the view:
								@implementation VTDAddViewController

- (void)viewDidAppear:(BOOL)animated
{
    [super viewDidAppear:animated];

    UITapGestureRecognizer *gestureRecognizer = [[UITapGestureRecognizer alloc] initWithTarget:self
                                                                                        action:@selector(dismiss)];
    [self.transitioningBackgroundView addGestureRecognizer:gestureRecognizer];
    self.transitioningBackgroundView.userInteractionEnabled = YES;
}

- (void)dismiss
{
    [self.eventHandler cancelAddAction];
}

- (void)setEntryName:(NSString *)name
{
    self.nameTextField.text = name;
}

- (void)setEntryDueDate:(NSDate *)date
{
    [self.datePicker setDate:date];
}

- (IBAction)save:(id)sender
{
    [self.eventHandler saveAddActionWithName:self.nameTextField.text
                                     dueDate:self.datePicker.date];
}

- (IBAction)cancel:(id)sender
{
    [self.eventHandler cancelAddAction];
}


#pragma mark - UITextFieldDelegate Methods

- (BOOL)textFieldShouldReturn:(UITextField *)textField
{
    [textField resignFirstResponder];

    return YES;
}

@end
Apps are usually much more compelling when they are connected to the network. But where should this networking take place and what should be responsible for initiating it? It's typically up to the Interactor to initiate a network operation, but it won't handle the networking code directly. It will ask a dependency, like a network manager or API client. The Interactor may have to aggregate data from multiple sources to provide the information needed to fulfill a use case. Then it's up to the Presenter to take the data returned by the Interactor and format it for presentation.
A data store is responsible for providing entities to an Interactor. As an Interactor applies its business logic, it will need to retrieve entities from the data store, manipulate the entities, and then put the updated entities back in the data store. The data store manages the persistence of the entities. Entities do not know about the data store, so entities do not know how to persist themselves.
The Interactor should not know how to persist the entities either. Sometimes the Interactor may want to use a type of object called a data manager to facilitate its interaction with the data store. The data manager handles more of the store-specific types of operations, like creating fetch requests, building queries, etc. This allows the Interactor to focus more on application logic and not have to know anything about how entities are gathered or persisted. One example of when it makes sense to use a data manager is when you are using Core Data, which is described below.
Here's the interface for the example app's data manager:
								@interface VTDListDataManager : NSObject

@property (nonatomic, strong) VTDCoreDataStore *dataStore;

- (void)todoItemsBetweenStartDate:(NSDate *)startDate endDate:(NSDate *)endDate completionBlock:(void (^)(NSArray *todoItems))completionBlock;

@end
When using TDD to develop an Interactor, it is possible to switch out the production data store with a test double/mock. Not talking to a remote server (for a web service) or touching the disk (for a database) allows your tests to be faster and more repeatable.
One reason to keep the data store as a distinct layer with clear boundaries is that it allows you to delay choosing a specific persistence technology. If your data store is a single class, you can start your app with a basic persistence strategy, and then upgrade to SQLite or Core Data later if and when it makes sense to do so, all without changing anything else in your application's code base.
Using Core Data in an iOS project can often spark more debate than architecture itself. However, using Core Data with VIPER can be the best Core Data experience you've ever had. Core Data is a great tool for persisting data while maintaining fast access and a low-memory footprint. But it has a habit of snaking its NSManagedObjectContext tendrils all throughout an app's implementation files, particularly where they shouldn't be. VIPER keeps Core Data where it should be: at the data store layer.
In the to-do list example, the only two parts of the app that know that Core Data is being used are the data store itself, which sets up the Core Data stack, and the data manager. The data manager performs a fetch request, converts the NSManagedObjects returned by the data store into standard PONSO model objects, and passes those back to the business logic layer. That way, the core of the application is never dependent on Core Data, and as a bonus, you never have to worry about stale or poorly threaded NSManagedObjects gunking up the works.
Here's what it looks like inside the data manager when a request gets made to access the Core Data store:
								@implementation VTDListDataManager

- (void)todoItemsBetweenStartDate:(NSDate *)startDate endDate:(NSDate*)endDate completionBlock:(void (^)(NSArray *todoItems))completionBlock
{
    NSCalendar *calendar = [NSCalendar autoupdatingCurrentCalendar];

    NSPredicate *predicate = [NSPredicate predicateWithFormat:@"(date >= %@) AND (date <= %@)", [calendar dateForBeginningOfDay:startDate], [calendar dateForEndOfDay:endDate]];
    NSArray *sortDescriptors = @[];

    __weak typeof(self) welf = self;
    [self.dataStore
     fetchEntriesWithPredicate:predicate
     sortDescriptors:sortDescriptors
     completionBlock:^(NSArray* entries) {
         if (completionBlock)
         {
             completionBlock([welf todoItemsFromDataStoreEntries:entries]);
         }
     }];
}

- (NSArray*)todoItemsFromDataStoreEntries:(NSArray *)entries
{
    return [entries arrayFromObjectsCollectedWithBlock:^id(VTDManagedTodoItem *todo) {
        return [VTDTodoItem todoItemWithDueDate:todo.date name:todo.name];
    }];
}

@end
Almost as controversial as Core Data are UI Storyboards. Storyboards have many useful features, and ignoring them entirely would be a mistake. However, it is difficult to accomplish all of the goals of VIPER while employing all the features that a storyboard has to offer.
The compromise we tend to make is to choose not to use segues. There may be some cases where using the segue makes sense, but the danger with segues is they make it very difficult to keep the separation between screens -- as well as between UI and application logic -- intact. As a rule of thumb, we try not to use segues if implementing the prepareForSegue method appears necessary.
Otherwise, storyboards are a great way to implement the layout for your user interface, especially while using Auto Layout. We chose to implement both screens for the to-do list example using a storyboard, and use code such as this to perform our own navigation:
								static NSString *ListViewControllerIdentifier = @"VTDListViewController";

@implementation VTDListWireframe

- (void)presentListInterfaceFromWindow:(UIWindow *)window
{
    VTDListViewController *listViewController = [self listViewControllerFromStoryboard];
    listViewController.eventHandler = self.listPresenter;
    self.listPresenter.userInterface = listViewController;
    self.listViewController = listViewController;

    [self.rootWireframe showRootViewController:listViewController
                                      inWindow:window];
}

- (VTDListViewController *)listViewControllerFromStoryboard
{
    UIStoryboard *storyboard = [self mainStoryboard];
    VTDListViewController *viewController = [storyboard instantiateViewControllerWithIdentifier:ListViewControllerIdentifier];
    return viewController;
}

- (UIStoryboard *)mainStoryboard
{
    UIStoryboard *storyboard = [UIStoryboard storyboardWithName:@"Main"
                                                         bundle:[NSBundle mainBundle]];
    return storyboard;
}

@end
Using VIPER to Build Modules
Often when working with VIPER, you will find that a screen or set of screens tends to come together as a module. A module can be described in a few ways, but usually it's best thought of as a feature. In a podcasting app, a module might be the audio player or the subscription browser. In our to-do list app, the list and add screens are each built as separate modules.
There are a few benefits to designing your app as a set of modules. One is that modules can have very clear and well-defined interfaces, as well as be independent of other modules. This makes it much easier to add/remove features, or to change the way your interface presents various modules to the user.
We wanted to make the separation between modules very clear in the to-do list example, so we defined two protocols for the add module. The first is the module interface, which defines what the module can do. The second is the module delegate, which describes what the module did. Example:
								@protocol VTDAddModuleInterface <NSObject>

- (void)cancelAddAction;
- (void)saveAddActionWithName:(NSString *)name dueDate:(NSDate *)dueDate;

@end


@protocol VTDAddModuleDelegate <NSObject>

- (void)addModuleDidCancelAddAction;
- (void)addModuleDidSaveAddAction;

@end
Since a module has to be presented to be of much value to the user, the module's Presenter usually implements the module interface. When another module wants to present this one, its Presenter will implement the module delegate protocol, so that it knows what the module did while it was presented.
A module might include a common application logic layer of entities, interactors, and managers that can be used for multiple screens. This, of course, depends on the interaction between these screens and how similar they are. A module could just as easily represent only a single screen, as is shown in the to-do list example. In this case, the application logic layer can be very specific to the behavior of its particular module.
Modules are also just a good simple way to organize code. Keeping all of the code for a module tucked away in its own folder and group in Xcode makes it easy to find when you need to change something. It's a great feeling when you find a class exactly where you expected to look for it.
Another benefit to building modules with VIPER is they become easier to extend to multiple form factors. Having the application logic for all of your use cases isolated at the Interactor layer allows you to focus on building the new user interface for tablet, phone, or Mac, while reusing your application layer.
Taking this a step further, the user interface for iPad apps may be able to reuse some of the views, view controllers, and presenters of the iPhone app. In this case, an iPad screen would be represented by 'super' presenters and wireframes, which would compose the screen using existing presenters and wireframes that were written for the iPhone. Building and maintaining an app across multiple platforms can be quite challenging, but good architecture that promotes reuse across the model and application layer helps make this much easier.
Testing with VIPER
Following VIPER encourages a separation of concerns that makes it easier to adopt TDD. The Interactor contains pure logic that is independent of any UI, which makes it easy to drive with tests. The Presenter contains logic to prepare data for display and is independent of any UIKit widgets. Developing this logic is also easy to drive with tests.
Our preferred method is to start with the Interactor. Everything in the UI is there to serve the needs of the use case. By using TDD to test drive the API for the Interactor, you will have a better understanding of the relationship between the UI and the use case.
As an example, we will look at the Interactor responsible for the list of upcoming to-do items. The policy for finding upcoming items is to find all to-do items due by the end of next week and classify each to-do item as being due today, tomorrow, later this week, or next week.
The first test we write is to ensure the Interactor finds all to-do items due by the end of next week:
								- (void)testFindingUpcomingItemsRequestsAllToDoItemsFromTodayThroughEndOfNextWeek
{
    [[self.dataManager expect] todoItemsBetweenStartDate:self.today endDate:self.endOfNextWeek completionBlock:OCMOCK_ANY];
    [self.interactor findUpcomingItems];
}
Once we know that the Interactor asks for the appropriate to-do items, we will write several tests to confirm that it allocates the to-do items to the correct relative date group (e.g. today, tomorrow, etc.):
								- (void)testFindingUpcomingItemsWithOneItemDueTodayReturnsOneUpcomingItemsForToday
{
    NSArray *todoItems = @[[VTDTodoItem todoItemWithDueDate:self.today name:@"Item 1"]];
    [self dataStoreWillReturnToDoItems:todoItems];

    NSArray *upcomingItems = @[[VTDUpcomingItem upcomingItemWithDateRelation:VTDNearTermDateRelationToday dueDate:self.today title:@"Item 1"]];
    [self expectUpcomingItems:upcomingItems];

    [self.interactor findUpcomingItems];
}
Now that we know what the API for the Interactor looks like, we can develop the Presenter. When the Presenter receives upcoming to-do items from the Interactor, we will want to test that we properly format the data and display it in the UI:
								- (void)testFoundZeroUpcomingItemsDisplaysNoContentMessage
{
    [[self.ui expect] showNoContentMessage];

    [self.presenter foundUpcomingItems:@[]];
}

- (void)testFoundUpcomingItemForTodayDisplaysUpcomingDataWithNoDay
{
    VTDUpcomingDisplayData *displayData = [self displayDataWithSectionName:@"Today"
                                                          sectionImageName:@"check"
                                                                 itemTitle:@"Get a haircut"
                                                                itemDueDay:@""];
    [[self.ui expect] showUpcomingDisplayData:displayData];

    NSCalendar *calendar = [NSCalendar gregorianCalendar];
    NSDate *dueDate = [calendar dateWithYear:2014 month:5 day:29];
    VTDUpcomingItem *haircut = [VTDUpcomingItem upcomingItemWithDateRelation:VTDNearTermDateRelationToday dueDate:dueDate title:@"Get a haircut"];

    [self.presenter foundUpcomingItems:@[haircut]];
}

- (void)testFoundUpcomingItemForTomorrowDisplaysUpcomingDataWithDay
{
    VTDUpcomingDisplayData *displayData = [self displayDataWithSectionName:@"Tomorrow"
                                                          sectionImageName:@"alarm"
                                                                 itemTitle:@"Buy groceries"
                                                                itemDueDay:@"Thursday"];
    [[self.ui expect] showUpcomingDisplayData:displayData];

    NSCalendar *calendar = [NSCalendar gregorianCalendar];
    NSDate *dueDate = [calendar dateWithYear:2014 month:5 day:29];
    VTDUpcomingItem *groceries = [VTDUpcomingItem upcomingItemWithDateRelation:VTDNearTermDateRelationTomorrow dueDate:dueDate title:@"Buy groceries"];

    [self.presenter foundUpcomingItems:@[groceries]];
}
We also want to test that the app will start the appropriate action when the user wants to add a new to-do item:
								- (void)testAddNewToDoItemActionPresentsAddToDoUI
{
    [[self.wireframe expect] presentAddInterface];

    [self.presenter addNewEntry];
}
We can now develop the View. When there are no upcoming to-do items, we want to show a special message:
								- (void)testShowingNoContentMessageShowsNoContentView
{
    [self.view showNoContentMessage];

    XCTAssertEqualObjects(self.view.view, self.view.noContentView, @"the no content view should be the view");
}
When there are upcoming to-do items to display, we want to make sure the table is showing:
								- (void)testShowingUpcomingItemsShowsTableView
{
    [self.view showUpcomingDisplayData:nil];

    XCTAssertEqualObjects(self.view.view, self.view.tableView, @"the table view should be the view");
}
Building the Interactor first is a natural fit with TDD. If you develop the Interactor first, followed by the Presenter, you get to build out a suite of tests around those layers first and lay the foundation for implementing those use cases. You can iterate quickly on those classes, because you won't have to interact with the UI in order to test them. Then, when you go to develop the View, you'll have a working and tested logic and presentation layer to connect to it. By the time you finish developing the View, you might find that the first time you run the app everything just works, because all your passing tests tell you it will work.
Conclusion
We hope you have enjoyed this introduction to VIPER. Many of you may now be wondering where to go next. If you wanted to architect your next app using VIPER, where would you start?
This article and our example implementation of an app using VIPER are as specific and well-defined as we could make them. Our to-do list app is rather straightforward, but it should also accurately explain how to build an app using VIPER. In a real-world project, how closely you follow this example will depend on your own set of challenges and constraints. In our experience, each of our projects have varied the approach taken to using VIPER slightly, but all of them have benefited greatly from using it to guide their approaches.
There may be cases where you wish to deviate from the path laid out by VIPER for various reasons. Maybe you have run into a warren of 'bunny' objects, or your app would benefit from using segues in Storyboards. That's OK. In these cases, consider the spirit of what VIPER represents when making your decision. At its core, VIPER is an architecture based on the Single Responsibility Principle. If you are having trouble, think about this principle when deciding how to move forward.
You may also be wondering if it's possible to use VIPER in your existing app. In this scenario, consider building a new feature with VIPER. Many of our existing projects have taken this route. This allows you to build a module using VIPER, and also helps you spot any existing issues that might make it harder to adopt an architecture based on the Single Responsibility Principle.
One of the great things about developing software is that every app is different, and there are also different ways of architecting any app. To us, this means that every app is a new opportunity to learn and try new things. If you decide to try VIPER, we think you'll learn a few new things as well. Thanks for reading.
Swift Addendum
Last week at WWDC Apple introduced the Swift programming language as the future of Cocoa and Cocoa Touch development. It's too early to have formed complex opinions about the Swift language, but we do know that languages have a major influence on how we design and build software. We decided to rewrite our VIPER TODO example app using Swift to help us learn what this means for VIPER. So far, we like what we see. Here are a few features of Swift that we feel will improve the experience of building apps using VIPER.
Structs
In VIPER we use small, lightweight, model classes to pass data between layers, such as from the Presenter to the View. These PONSOs are usually intended to simply carry small amounts of data, and are usually not intended to be subclassed. Swift structs are a perfect fit for these situations. Here's an example of a struct used in the VIPER Swift example. Notice that this struct needs to be equatable, and so we have overloaded the == operator to compare two instances of its type:
								struct UpcomingDisplayItem : Equatable, Printable {
    let title : String = ""
    let dueDate : String = ""

    var description : String { get {
        return "\(title) -- \(dueDate)"
    }}

    init(title: String, dueDate: String) {
        self.title = title
        self.dueDate = dueDate
    }
}

func == (leftSide: UpcomingDisplayItem, rightSide: UpcomingDisplayItem) -> Bool {
    var hasEqualSections = false
    hasEqualSections = rightSide.title == leftSide.title

    if hasEqualSections == false {
        return false
    }

    hasEqualSections = rightSide.dueDate == rightSide.dueDate

    return hasEqualSections
}
Type Safety
Perhaps the biggest difference between Objective-C and Swift is how the two deal with types. Objective-C is dynamically typed and Swift is very intentionally strict with how it implements type checking at compile time. For an architecture like VIPER, where an app is composed of multiple distinct layers, type safety can be a huge win for programmer efficiency and for architectural structure. The compiler is helping you make sure containers and objects are of the correct type when they are being passed between layer boundaries. This is a great place to use structs as shown above. If a struct is meant to live at the boundary between two layers, then you can guarantee that it will never be able to escape from between those layers thanks to type safety.