Introduction
Perhaps a very distinctive thing about Android is the ability for applications to launch other apps or easily share content. Back in the days of iOS 1.0, it quickly became obvious that applications couldn't really talk to each other (at least non-Apple applications), even after the first iOS SDK was released.
Before iOS 6, attaching a photo or a video to an email you were already composing was definitely a chore. It was not until Apple added the ability in iOS 6 that this was really possible. Android, on the other hand, was designed to support this behavior since day one.
There are other simple examples where it really becomes clear how different both platforms behave. Imagine the following scenario: you take a picture and want to retouch it with some image editing app, and later share it on Instagram.
Please note: this is just a example to illustrate a point.
This is how you do it on iOS:
-
Open Camera App, and take the picture.
-
Go to the Home Screen, find your EditPhoto app, launch it, open existing photo, find it in the Camera Roll, make your edits.
-
If EditPhoto supports sharing and Instagram is on the list, you're good to go!
-
Otherwise, you will have to Save the image in the Photo Library.
-
Go to the Home Screen again, find Instagram, launch it…
-
Import the recently saved photo, and then share it on Instagram with your hipster friends. ;)
On Android, things are a lot easier:
-
Open Camera App, and take the picture.
-
Swipe Right to see the 'Gallery,' and click the Share button. Pick your EditPhoto app and make your edits.
-
If EditPhoto supports sharing (I haven't seen a photo editing app that doesn't), tap it and select Instagram. If it doesn't, remove EditPhoto app and get a decent photo editor or use the built-in editor, which has gotten really good in KitKat.
Notice that if iOS apps support sharing between them, the flow is similar. The biggest difference is that if the app is not supported, you just can't do it directly. Instagram is an easy and popular one, just like Facebook or Twitter, but there are dozens of other not-so-supported apps out there.
Let's say you have a picture in Instagram and you want to share it to Path (I know, not a lot of people use Path, but still…). In Android, you would likely find Path in the chooser dialog. As simple as that.
Let's get back on topic. Intents.
What is an Android Intent?
The English dictionary defines an Intent as:
								noun
intention or purpose
According to the official Android documentation, an Intent is a messaging object you can use to request an action from another app component. In truth, an Intent is an abstract description of an operation to be performed.
This sounds interesting, but there's more than meets the eye. Intents are used everywhere, no matter how simple your app is; even your Hello World app will use an Intent. That's because the most common case for an Intent is to start an Activity.
1
Activities and Fragments, What are You Talking About?
The closest thing to an Activity in iOS would be a UIViewController. Don't go around looking for an Android equivalent of an ApplicationDelegate; there is none. Perhaps the closest thing would be the Application class in Android, but there are a lot architecture differences between them.
As screens in devices grew bigger, the Android team added the concept of Fragments.
2 The typical example is the News Reader app. On a phone with a small screen, you only see the list of articles. When the user selects one, the article opens in fullscreen.
Before Fragments, you would have had to create two activities (one for the list, and one for the fullscreen article) and switch between them.
This worked well, until tablets with big screens came. Since you can only have one activity visible at a time (by design), the Android team invented the concept of Fragments, where a hosting Activity can display more than one Fragment at the same time.
Now, instead of having two different Activities, you can have one that will display two Fragments -- one for the list of articles and one that is capable of showing the selected article fullscreen. In phones or devices with small screens, you would simply swap the Fragment when the user selected an article, but on tablets, the same activity would host both at the same time. To visualize this, think of the Mail app on an iPad, where you see the inbox on the left and the mail list on the right.
Starting Activities
Intents are commonly used to start activities (and to pass data between them). An Intent will glue the two activities by defining an operation to be performed: launch an Activity.
Since starting an Activity is not a simple thing, Android has a system component called ActivityManager that is responsible for creating, destroying, and managing activities. I won't go into much more detail about the ActivityManager, but it's important to understand that it keeps track of all the open activities and delivers broadcasts across the system; for example, it notifies the rest of the Android system once the booting process is finished.
It's an important piece of the Android system and it relies on Intents to do much of its work.
So how does Android use an Intent to start an Activity?
If you dig through the Activity class hierarchy, you will find that it extends from a Context, which, in turn, contains a method called startActivity(), defined as:
public abstract void startActivity(Intent intent, Bundle options);
This abstract method is implemented in Activity. This means you can start activities from any activity, but you need to pass an Intent to do so. How?
Let's imagine we want to launch an Activity called ImageActivity.
The Intent constructor is defined as:
public Intent(Context packageContext, Class<?> cls)
So we need a Context (remember, any Activity is a valid Context) and a Class type.
With that in mind:
								Intent i = new Intent(this, ImageActivity.class);
startActivity(i);
This triggers a lot of code behind the scenes, but the end result is that if everything went well, your Activity will start its lifecycle and the current one will likely be paused and stopped.
Since Intents can also be used to pass certain data between activities, we could use them to pass Extras. For example:
								Intent i = new Intent(this, ImageActivity.class);
i.putExtra("A_BOOLEAN_EXTRA", true); //boolean extra
i.putExtra("AN_INTEGER_EXTRA", 3); //integer extra
i.putExtra("A_STRING_EXTRA", "three"); //string extra
startActivity(i);
Behind the scenes, the extras are stored in an Android Bundle,
3 which is pretty much a glorified serializable container.
The nice thing is that our ImageActivity will receive these values in the Intent and can easily do:
int value = getIntent().getIntExtra("AN_INTEGER_EXTRA", 0); //name, default value
This is how you pass data between activities. If you can serialize it, you can pass it.
Imagine you have an object that implements Serializable. You could then do this:
								YourComplexObject obj = new YourComplexObject();
Intent i = new Intent(this, ImageActivity.class);
i.putSerializable("SOME_FANCY_NAME", obj); //using the serializable constructor here
startActivity(i);
And it would work the same way on the other Activity:
YourComplexObject obj = (YourComplexObject) getIntent().getSerializableExtra("SOME_FANCY_NAME");
As a side note, always check for null when retrieving the Intent:
								if (getIntent() != null ) {
         // you have an intent, so go ahead and get the extras…
}
This is Java, and Java doesn't like null references. Get used to it. ;)
When you start an activity with this method (startActivity()), your current activity is paused, stopped (in that order) and put in the task stack, so if the user presses the back button, it can be restored. This is usually OK, but there are certain Flags you can pass to the Intent to indicate the ActivityManager that you'd like to change this behavior.
Although I will not go into detail because it's a rather extensive subject, you should take a look at the Tasks and Back Stack official docs to understand what else Intent Flags can do for you.
So far, we've only used Intents to open other activities in our application, but what else can an Intent do?
There are two more things that are possible thanks to Intents:
-
Start (or send a command to) a
Service. 4 -
Deliver a
Broadcast.
Starting a Service
Since Activities cannot be put in the background (because they would be paused, stopped, and maybe destroyed), the alternative -- if you need to run a background process while there's no visible UI -- is to use a Service. Services are also a big subject, but the short version is they can perform tasks in the background, regardless of whether or not the UI is visible.
They are prone to be destroyed if memory is needed and they run on the UI thread, so any long-time running operation should spawn a thread, usually through an AsyncTask. If a Service needs to do something like media playback, it can request a Foreground status, which forces the application to show a permanent notification in the Notification Bar to indicate to the user that something is happening in the background. The app can cancel the foreground status (and therefore dismiss the notification), but by doing so, the Service loses its higher-priority status.
Services are very powerful mechanisms that allow Android applications to perform the 'real multitasking' that so controversially affected battery life in the past. Back when iOS had virtually no multitasking, Android was already dancing with the stars. When correctly used, Services are an integral part of the platform.
In the past, the biggest problem was that there were ways to request a Service foreground status without showing a notification. This behavior was abused by developers who left tasks running in the background without the user knowing about it. In Android 4.0 (Ice Cream Sandwich), Google finally fixed the 'hidden' notification, and now if your app is doing something in the background, the user will see the notification alongside your app's name and icon. You can even access the application information directly from the notification bar (and kill it!). Yes, Android's battery life is nowhere near as good as with iOS, but it's no longer because of hidden Services. ;)
How are Intents and Services related?
In order to start a service, you need to use an Intent. Once a Service is started, you can keep sending commands to the service, until it's stopped (in which case it will restart).
The easiest way to understand it is to see some code:
In some Activity, you could do:
								Intent i = new Intent(this, YourService.class);
i.setAction("SOME_COMMAND");
startService(i);
What happens next will depend on whether or not this was the first time you did that. If so, the service will be started (it's constructor, and onCreate() methods will be executed first). If it was already running, the onStartCommand() method will be directly called.
The signature is: public int onStartCommand(Intent intent, int flags, int startId);
Let's ignore the flags and startId, as they have nothing to do with the topic at hand, and concentrate on the Intent.
We set an Action earlier with setAction("SOME_COMMAND"). This action is passed to the Service and we can retrieve it from the onStartCommand(). For example, in our Service, we could do:
								@Override
public int onStartCommand(Intent intent, int flags, int startId) {
    String action = intent.getAction();
    if (action.equals("SOME_COMMAND")) {
        // Do SOME COMMAND ;)
    }
    return START_NOT_STICKY; // Don't restart the Service if it's killed.
}
If you are wondering what that START_NOT_STICKY thing is, the Android docs are an excellent source of information.
TL;DR: if this Service gets killed, don't attempt to restart it. The opposite is START_STICKY, which means restart the Service should its process die.
As you can see from the snippet above, you can retrieve the Action from the Intent. This is how you usually communicate with Services.
Let's imagine we are developing an application that can reproduce YouTube videos and stream them to a Chromecast (the stock YouTube app already does this, but this is Android, so we want to make our own).
The streaming would be implemented in a Service so the streaming doesn't stop if the user goes to another application while he or she is playing a video. You could have different actions defined, like:
ACTION_PLAY, ACTION_PAUSE, ACTION_SKIP.
You could also have a switch or if statement in the onStartCommand() to deal with each case.
The names can be anything you want, but you will usually want to use constants (as we will see later) and better names to avoid conflicts with other apps, usually full package names like: 'com.yourapp.somepackage.yourservice.SOME_ACTION_NAME'. This can also be made private if you only want your own app to be able to communicate with your service, but it can be public, meaning you could let other apps use your Service.
Sending and Receiving Broadcasts
Part of the strength of the Android platform is that any application can broadcast an Intent and anyone can define a BroadcastReceiver to receive one. In fact, Android itself makes use of this mechanism to inform apps and the system about events. For example, if the network goes down, an Android component will broadcast an Intent. If you were interested in this, you could create a BroadcastReceiver with the right filter to intercept that and act accordingly.
Think of this as a global channel you can subscribe to, add the filters you care for, and receive notifications when those broadcasts occur. You can define them privately if you want, meaning only your app will be able to receive them.
To continue with the previous example of our YouTube streaming service, if there were a problem with video playback, the service could broadcast an Intent saying, "Hey, there was a problem and I will now stop playback."
Your application could register a BroadcastReceiver to listen to your Service so it can react to that.
Let's see some code to illustrate.
You have an Activity that is displaying the currently playing music track alongside with the media buttons (play, pause, stop, etc.). You are interested in knowing what your service is doing; if there's an error, you want to know (so you can show an error message, etc.).
In your activity (or in its own .java file) you would create your broadcast receiver:
								private final class ServiceReceiver extends BroadcastReceiver {
    public IntentFilter intentFilter;
    public ServiceReceiver() {
        super();
        intentFilter = new IntentFilter();
        intentFilter.addAction("ACTION_PLAY");
        intentFilter.addAction("ACTION_STOP");
        intentFilter.addAction("ACTION_ERROR");
    }
    @Override
    public void onReceive(final Context context, final Intent intent) {
        if (intent.getAction().equals("ACTION_ERROR")) {
           // THERE HAS BEEN AN ERROR, PLAYBACK HAS STOPPED
        } else if (intent.getAction().equals("ACTION_PLAY")){
           // Playback has started
        }
        // etc…
    }
 }
That's your basic receiver. Notice how we added an IntentFilter with the Actions that we're interested in. We called them ACTION_PLAY, ACTION_STOP, and ACTION_ERROR.
Since we use Java and Android has some conventions, we'd call this:
private ServiceReceiver mServiceReceiver; as a field member of our Activity. In our onCreate() method we instantiate it with: mServiceReceiver = new ServiceReceiver();
But creating this object is not enough. We also need to register it somewhere. Initially, you may think that a good place to do it would be the onStart() method of our Activity. When the onStart() method is executed, that means our Activity is visible to the user.
The signature for the method is (in Context):
public abstract Intent registerReceiver(BroadcastReceiver receiver, IntentFilter filter);
Activities and Services are also Contexts, so both implement this method. This means that either can register one or more BroadcastReceivers.
The method needs a BroadcastReceiver and an IntentFilter. We've created both, so we pass them:
								@Override
public void onStart() {
    onStart();
      registerReceiver(mServiceReceiver, mServiceReceiver.intentFilter);
}
In order to be good Java/Android citizens, we want to unregister if our Activity is stopping:
								@Override
public void onStop() {
    super.onStop();
    unregisterReceiver(mServiceReceiver);
}
This approach is not incorrect, but you have to keep in mind that if the user navigates outside of your application, you will never receive the broadcast. This is because your Activity will be stopped, and because you are unregistering during onStop(). When designing BroadcastReceivers, you have to keep in mind whether or not this makes sense. There are other ways to implement them (outside an Activity) to act as independent objects.
When the Service detects an error, it can dispatch a broadcast that our BroadcastReceiver will receive in its onReceive() method.
Broadcast receivers are very powerful mechanisms and are core mechanisms in Android.
Astute readers may be wondering how global these broadcasts are and how to make them private or restricted to their own apps.
There are two types of Intents: explicit and implicit.
The former will specify the component to start by the fully qualified name, something that you will always know for your own application. The latter declares a general action to perform, which allows a component from another app to handle it. And here is where things start to get interesting.
Let's focus on implicit Intents, since we have already seen explicit Intents in action with our example above.
The best way to see the power of implicit intents is by using a simple example. There are two ways to use a filter. The first approach is more iOS friendly, because iOS can define a custom URI scheme, for example: yourapp://some.example.com
If you have to support the same URI from both iOS and Android, then this will be your only choice. On the other hand, if you are able to use a regular URL (http://your.domain.com/yourparams) then you should try to do it this way on Android. This raises the big argument of whether using a custom URI is good or bad, and I'm not going to dive into that at this point, suffice to say that (and I quote):
This goes against the web standards for URI schemes, which attempts to rigidly control those names for good reason -- to avoid name conflicts between different entities. Once you put a link to your scheme on a web site, you have put that little name into the entire Internet's namespace, and should be following those standards.
Source: StackOverflow
Arguments aside, let's take a look at two examples, one for YouTube using a regular URL, and then define our own custom URI scheme for our own app.
It's simpler than it looks because Android has a configuration file called AndroidManifest.xml, where it stores metadata about your Activities, Services, BroadcastReceivers, versions, Intent filters, and more. Every application has this file -- you can read more about it here.
The idea behind an Intent filter is that the system will check for installed apps to see if there's one (or more) that can handle a particular URI.
If your app matches and it's the only one, it will be automatically open. Otherwise, you will see a dialog like this:
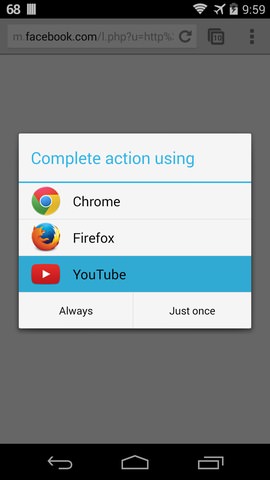
So how did the official YouTube app end up in that list?
I tapped on a YouTube link in the Facebook App. How did Android know that it was YouTube? What kind of sorcery is this?
If we had access to YouTube's AndroidManifest.xml, we would likely see something like this:
								1 <activity android:name=".YouTubeActivity">
2     <intent-filter>
3        <action android:name="android.intent.action.VIEW" />
4       <category android:name="android.intent.category.DEFAULT" />
5         <category android:name="android.intent.category.BROWSABLE" />
6       <data
7        android:scheme="http"
8        android:host="www.youtube.com"
9        android:pathPrefix="/" />
10   </intent-filter>
11 </activity>
Let's examine this simple XML line by line.
Line 1 declares the activity (you must declare each Activity in Android, regardless of the Intent filters).
Line 3 declares the action. In this case, VIEW is the most common action, indicating that data will be displayed to the user. Some actions can only be sent by the system because they are protected.
Lines 4-5 declare the categories. Implicit Intents require at least one action and one category. Categories provide additional detail about the action the Intent performs. When resolving an Intent, only activities that provide all of the requested categories will be used. android.intent.category.DEFAULT is applied to every Activity by Android when you use startActivity(), so if you want your activity to receive implicit Intents, it must include it.
android.intent.category.BROWSABLE is a different beast:
Activities that can be safely invoked from a browser must support this category. For example, if the user is viewing a web page or an e-mail and clicks on a link in the text, the Intent generated execute that link will require the BROWSABLE category, so that only activities supporting this category will be considered as possible actions. By supporting this category, you are promising that there is nothing damaging (without user intervention) that can happen by invoking any matching Intent.
Source: Android Documentation
This is an interesting point, and this gives Android a very powerful mechanism for apps to respond to any link. You could create your own web browser and it will respond to any URL; the user could set it as default if he or she wishes.
Lines 6-9 declare the data to operate on. This is part of the type. In this simple example, we're filtering by scheme and host, so any http://www.youtube.com/ link will work, even if tapped on a WebBrowser.
By adding these lines to YouTube's AndroidManifest.xml, when it's time to perform an Intent resolution, Android performs a matching of an Intent against all of the <intent-filter> descriptions in the installed application packages (or BroadcastReceivers registered via code, like our example above).
The Android PackageManager
5 will be queried using the Intent information (the action, type, and category), for a component that can handle it. If there's one, it will be automatically invoked, otherwise the above dialog will be presented to the user, so he or she can chose (and maybe set as default) a particular app or package to handle the type of Intent.
This works well for many apps, but sometimes you need to use the same iOS link (where your only choice is to use a custom URI). In Android, you could support both, since you can add more filters to the same activity. To continue with the YouTubeActivity, let's add now an imaginary YouTube URI scheme:
								<activity android:name=".YouTubeActivity">
  <intent-filter>
    <action android:name="android.intent.action.VIEW" />
    <category android:name="android.intent.category.DEFAULT" />
      <category android:name="android.intent.category.BROWSABLE" />
    <data
     android:scheme="http"
     android:host="www.youtube.com"
     android:pathPrefix="/" />
    <data android:scheme="youtube" android:host="path" />
  </intent-filter>
</activity>
The filter is almost the same, except we added a new line 10, specifying our own scheme.
The app can now open links like: youtube://path.to.video. and normal HTTP links. You can add as many filters and types to an Activity as you wish.
How Bad is it to Use my Custom URI Scheme?
The problem is that it doesn't follow the standard rules for URIs defined by the W3C, at least according to purists. The truth is that this is not entirely true or a real problem. You are OK to use custom URI schemes, as long as you restrict them to your own internal packages. The biggest problem with a custom (public) URI scheme is name conflict. If I define a myapp://, nothing stops the next app from doing the same, and we have a problem. Domains, on the other hand, are never going to clash, unless I'm trying to create my own YouTube player, in which case, it's fine for Android to give me the choice to use my own YouTube player or the official Android app.
Meanwhile, a custom URL like yourapp://some.data may not be understood by a web browser and it can lead to 404 errors. You're bending the rules and standard conventions.
Sharing Data
Intents are used when you have something you want to share with other apps, such as a post in a social network, sending a picture to an image editor, or sending an email, an SMS, or something via any other instant messaging service. So far, we have seen how to create intent filters and register our app to be notified when we are capable of handling certain types of data. In this final section, we'll see how to tell Android that we have something to share. Remember what an Intent is: an abstract description of an operation to be performed.
Posting to Social Networks
In the following example, we're going to share a text and let the user make the final decision:
								1  Intent shareIntent = new Intent(Intent.ACTION_SEND);
2  shareIntent.setType("text/plain");
3  shareIntent.putExtra(Intent.EXTRA_TEXT, "Super Awesome Text!");
4  startActivity(Intent.createChooser(shareIntent, "Share this text using…"));
Line 1 creates an Intent and passes an action using the constructor: public Intent(String action);
ACTION_SEND is used when you want to deliver some data to someone else. In this case, the data is our "Super Awesome Text!" But we don't know who that 'someone else' is yet. It will be up to the user to decide that.
Line 2 sets an explicit MIME data type of text/plain.
Line 3 adds the data (the text) to this Intent using an extra.
Line 4 is where the magic happens. Intent.createChooser is a convenience function that wraps your original Intent in a new one with an action, ACTION_CHOOSER.
There's no rocket science going on here. The action is designed so an activity chooser is displayed, allowing the user to pick what he or she wants before proceeding. Sometimes you want to be explicit (so if the user is sending an email, you may want to use the default email client directly), but in this case, we want the user to select any app to handle this text.
This is what I see when I use it (the list is longer -- it's a scrollable list):
I have decided to send it to Google Translate. Here's the result:
![]()
The results attempting to do it in Google Translate speak in Italian.
An Extra Example
Before wrapping up, let's see another example. This time, we'll see how to share and receive an image. We want the app to appear in the chooser when the user shares an image.
We need to do something like this in our AndroidManifest:
								1 <activity android:name="ImageActivity">
2   <intent-filter>
3     <action android:name="android.intent.action.SEND"/>
4     <category android:name="android.intent.category.DEFAULT"/>
5     <data android:mimeType="image/*"/>
6   </intent-filter>
7 </activity>
Remember, we need at least one action and one category.
Line 3 sets the action as SEND, so we will match SEND actions.
Line 4 declares the DEFAULT category. This category gets added by default when you use startActivity().
Line 5 is they key that sets the MIME type as any type of image.
Now, in our ImageActivity, we handle the Intent like this:
								1    @Override
2    protected void onCreate(Bundle savedInstanceState) {
3        super.onCreate(savedInstanceState);
4        setContentView(R.layout.main);
5
6        // Deal with the intent (if any)
7        Intent intent = getIntent();
8        if ( intent != null ) {
9            if (intent.getType().indexOf("image/") != -1) {
10                 Uri data = intent.getData();
11                 // handle the image…
12            }
13        }
14    }
The relevant code is in line 9, where we're actually checking if the Intent contains image data.
Now, let's do the opposite. This is how we share an image:
								1    Uri imageUri = Uri.parse("/path/to/image.png");
2    Intent intent = new Intent(Intent.ACTION_SEND);
3    intent.setType("image/png");
4    intent.putExtra(Intent.EXTRA_STREAM, imageUri);
5    startActivity(Intent.createChooser(intent , "Share"));
The interesting code is in line 3, where we define the MIME type (so only IntentFilters capable of dealing with this type will be shown), and in line 4, where we actually place the data that will be shared.
Finally, line 5 creates the chooser dialog we've seen before, but only containing apps that can handle image/png.
Summary
We have scratched the surface regarding what Intents can do and how information can be shared in Android, but there's a lot more to see. It's a very powerful mechanism and one aspect that makes Android users frown when they use iOS devices. They (myself included) find the process of always going home and/or using the Task Switcher in iOS very inefficient.
This doesn't really mean Android is technically better or that the Android method is superior when it comes to sharing data between applications. In the end, everything is a matter of preference, just like the back button some iOS users loathe when they grab an Android device. On the other hand, Android users love that button. It's standard and efficient and it's always in the same place, next to the home button.
When I lived in Spain, I remember they had a very good saying: "Colors were created so we can all have different tastes" (or something like that). ;)
Further Reading
-
Activities are the components that provide a user interface for a single screen in your application. ↩
-
A fragment represents a behavior or a portion of user interface in an activity. ↩
-
A mapping from string values to various Parcelable types. ↩
-
A service is an application component representing an application's desire to either perform a longer-running operation while not interacting with the user, or to supply functionality for other applications to use. ↩
-
PackageManager: class for retrieving various kinds of information related to the application packages that are currently installed on the device. ↩