We are kind of spoiled these days — we just hit a single button in Xcode which looks like it's supposed to play some music, and a few seconds later, our app is running. It's magical. Until something goes wrong.
In this article, we're going to take a high-level tour through the build process and discover how all this ties in with the project settings Xcode exposes in its interface. For a deeper look at how each step along the way actually works, I will refer you to the other articles in this issue.
Deciphering the Build Log
Our first point of attack to learn about the inner workings of the Xcode build process is to have a look at the complete log file. Open the Log Navigator, select a build from the list, and Xcode will show you the log file in a prettified format.
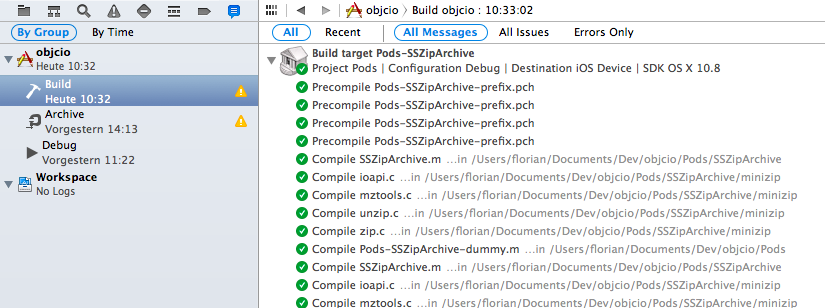
By default, this view hides a lot of information, but you can reveal the details of each task by selecting it and clicking on the expand button at the right side. Another option is to select one or more tasks from the list and hit Cmd-C. This will copy the full plain text to the clipboard. Last but not least, you also can dump the complete log into the clipboard by selecting "Copy transcript for shown results" from the Editor menu.
In our example, the log is just shy of 10,000 lines long (admittedly, the biggest chunk originates from compiling OpenSSL, not from our own code). So let's get started!
The first thing you'll notice is that the log output is split into several big chunks corresponding to the targets in your project:
								Build target Pods-SSZipArchive
...
Build target Makefile-openssl
...
Build target Pods-AFNetworking
...
Build target crypto
...
Build target Pods
...
Build target ssl
...
Build target objcio
Our project has several dependencies: AFNetworking and SSZipArchive, which are included as Pods, as well as OpenSSL, which is included as subproject.
For each of these targets, Xcode goes through a series of steps to actually translate the source code into machine-readable binaries for the selected platform(s). Let's take a closer look at the first target, SSZipArchive.
Within the log output for this target we see the details for each task performed along the way. For example, the first one is for processing a precompiled header file (in order to make it more readable, I have stripped out a lot of details):
								(1) ProcessPCH /.../Pods-SSZipArchive-prefix.pch.pch Pods-SSZipArchive-prefix.pch normal armv7 objective-c com.apple.compilers.llvm.clang.1_0.compiler
    (2) cd /.../Dev/objcio/Pods
        setenv LANG en_US.US-ASCII
        setenv PATH "..."
    (3) /.../Xcode.app/.../clang
            (4) -x objective-c-header
            (5) -arch armv7
            ... configuration and warning flags ...
            (6) -DDEBUG=1 -DCOCOAPODS=1
            ... include paths and more ...
            (7) -c
            (8) /.../Pods-SSZipArchive-prefix.pch
            (9) -o /.../Pods-SSZipArchive-prefix.pch.pch
These blocks appear for each task in the build process, so let's go through this one in some more detail.
-
Each of these blocks starts with a line which describes the task.
-
The following indented lines list the statements which are executed for this task. In this case, the working directory is changed, and the
LANGandPATHenvironment variables are set. -
This is where all the fun happens. In order to process a
.pchfile, clang gets called with a ton of options. This line shows the complete call with all arguments. Let's look at a few of them... -
The
-xflag specifies the language, which is, in this case,objective-c-header. -
The destination architecture is specified as
armv7. -
Implicit
#defines are added. -
The
-cflag tells clang what it actually should do.-cmeans run the preprocessor, parser, type-checking, LLVM generation and optimization, and target specific assembly code generation stages. Finally, it means to run the assembler itself to produce a.oobject file. -
The input file.
-
The output file.
There is quite a lot going on, and we will not go through each of the possible tasks in great detail. The point is that you have complete insight into what tools get called and with which arguments behind the scenes during the build process.
For this target, there are actually two tasks to process objective-c-header files, although only one .pch file exists. A closer look at these tasks tells us what's going on:
								ProcessPCH /.../Pods-SSZipArchive-prefix.pch.pch Pods-SSZipArchive-prefix.pch normal armv7 objective-c ...
ProcessPCH /.../Pods-SSZipArchive-prefix.pch.pch Pods-SSZipArchive-prefix.pch normal armv7s objective-c ...
The target builds for two architectures — armv7 and armv7s — and therefore clang has to process files twice, once for each architecture.
Following the tasks of processing the precompiled header files, we find a couple of other task types for the SSZipArchive target:
								CompileC ...
Libtool ...
CreateUniversalBinary ...
These names are almost self-explanatory: CompileC compiles .m and .c files, Libtool creates a library from object files, and the CreateUniversalBinary task finally combines the two .a files from the previous stage (one for each architecture) into a universal binary file that runs on both armv7 and armv7s.
Subsequently, similar steps happen for all the other dependencies in our project. AFNetworking gets compiled and linked together with SSZipArchive as pod library. OpenSSL gets built, processing the crypto and ssl targets.
After all these dependencies have been prepared, we finally arrive at the target for our app. The log output for this target includes some other interesting tasks next to the ones we already saw during the compilation of libraries above:
								PhaseScriptExecution ...
DataModelVersionCompile ...
Ld ...
GenerateDSYMFile ...
CopyStringsFile ...
CpResource ...
CopyPNGFile ...
CompileAssetCatalog ...
ProcessInfoPlistFile ...
ProcessProductPackaging /.../some-hash.mobileprovision ...
ProcessProductPackaging objcio/objcio.entitlements ...
CodeSign ...
The only task that doesn't have a self-explanatory name in this list is probably Ld, which is the name of the linker tool. It is very similar to libtool. In fact, libtool simply calls into ld and lipo. ld is used to create executables, libtool for libraries. Check out Daniel's and Chris's articles for more details about how compilation and linking works.
Each of these steps will, in turn, call command line tools to do the actual work, just like we saw for the ProcessPCH step above. But instead of torturing you any longer with going through log files, we will explore these tasks from a different angle: How does Xcode know which tasks have to be performed?
Controlling the Build Process
When you select a project in Xcode 5, the project editor is presented to you with six tabs at the top: General, Capabilities, Info, Build Settings, Build Phases, and Build Rules.

For our purpose of understanding the build process, the last three are the most relevant.
Build Phases
Build phases represent the high-level plan of how to get from your code to an executable binary. They describe the different kind of tasks that have to be performed along the way.
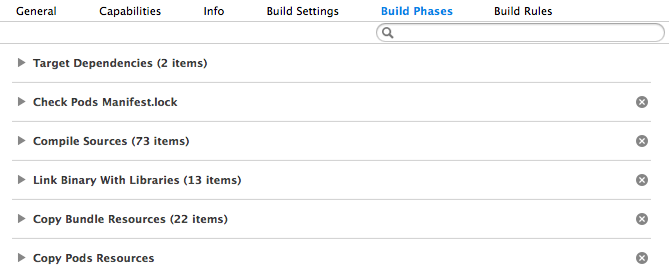
First, the target dependencies are established. These tell the build system which targets have to be built before the build of the current target can commence. This is not a "real" build phase. Xcode just presents the GUI together with the build phases.
After a CocoaPods specific script execution build phase — see Michele's article for more information about CocoaPods and the build process — the "Compile Sources" section specifies all the files that have to be compiled. Note that this doesn't say anything about how these files have to be compiled. We will learn more about this aspect when looking at build rules and build settings. Files that are in this section will be processed according to those rules and settings.
When compilation is complete, the next step is to link everything together. And, lo and behold, that's what we find as the next build phase listed in Xcode: "Link Binary with Libraries." This section lists all static and dynamic libraries that are to be linked with the object files generated by compilation in the previous step. There are important differences between how static and dynamic libraries get handled, but I'll refer you to Daniel's article about Mach-O executables for more details.
When linking is done, the last build phase is copying static resources, like images and fonts, into the app bundle. PNG images are actually not only copied to their destination, but also optimized along the way (if you have PNG optimization turned on in build settings).
Although copying static resources is the last build phase, the build process is not complete yet. For example, code signing still has to happen, but that's not considered to be a build phase; it belongs to the final build step, "Packaging."
Custom Build Phases
You have full control over these build phases if the default settings don't do what you need. For example, you can add build phases that run custom scripts, which CocoaPods uses to do extra work. You can also add additional build phases to copy resources. This can be useful if you want to copy certain resources into specific target directories.
Another nice use of a custom build phase is to watermark your app icon with the version number and commit hash. To do this, you add a "Run Script" build phase where you retrieve the version number and commit hash with the following commands:
								version=`/usr/libexec/PlistBuddy -c "Print CFBundleVersion" "${INFOPLIST_FILE}"`
commit=`git rev-parse --short HEAD`
After that, you can modify the app icon using ImageMagick. For a complete example of how to do this, check out this GitHub project.
If you'd like to encourage yourself or your coworkers to keep your source files concise, you can add a "Run Script" build phase that spits out a warning if a source file exceeds a certain size, in this example 200 lines.
find "${SRCROOT}" \( -name "*.h" -or -name "*.m" \) -print0 | xargs -0 wc -l | awk '$1 > 200 && $2 != "total" { print $2 ":1: warning: file more than 200 lines" }'
Build Rules
Build rules specify how different file types should be compiled. Normally you don't have to change anything here, but if you want to add custom processing for a certain file type, you can simply add a new build rule.
A build rule specifies which file type it applies to, how the file should be processed, and where the output should go. Let's say we have created a preprocessor that takes basic Objective-C implementation files as input, parses comments within this file for a language we've created to generate layout constraints, and outputs a .m file which includes the generated code. Since we cannot have a build rule which takes a .m file as input and output, we're going to use the extension .mal and add a custom build rule for that:
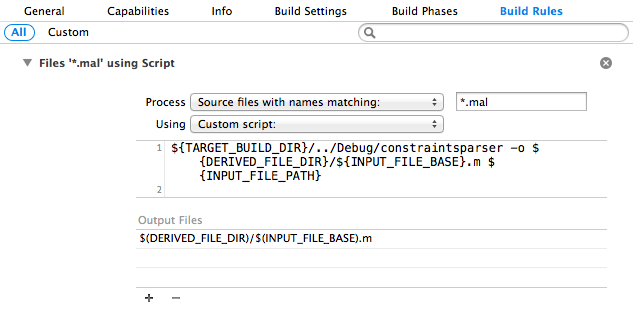
This rule specifies that it applies to all files matching *.mal and that those files should be processed using a custom script (which calls our preprocessor with the input and output paths as arguments). Finally, the rule tells the build system where it can find the output of this build rule.
Since the output is just a plain .m file in this case, it will get picked up by the build rule for compiling .m files and everything will proceed as if we had written the result of the preprocessing step manually as .m file to start with.
In the script we use a few variables to specify the correct paths and file names. You can find a list of all the variables available in Apple's Build Setting Reference. To see the values of all the existing environment variables during a build, you can add a "Run Script" build phase and check the "Show environment variables in build log" option.
Build Settings
So far, we have seen how build phases are used to define the steps in the build process and how build rules specify how each file type should be processed during compilation. In build settings, you can configure the details of how each of the tasks we saw before in the build log output are performed.
You will find a ton of options for each stage of the build process, from compilation over linking to code signing and packaging. Note how the settings are divided into sections, which roughly correlate to the build phases and, sometimes, specific file types for compilation.
Many of these options have reasonably good documentation, which you can see in the quick help inspector on the right-hand side or in the Build Setting Reference.
The Project File
All the settings we have discussed above are saved to the project file (.pbxproj), in addition to other project-related information (e.g. file groups). You will rarely get in touch with the internals of this file until you have a merge conflict on it.
I would encourage you to open a project file in your favorite text editor and to go through it from top to bottom. It is surprisingly readable, and you will recognize the meaning of most sections without many problems. Reading and understanding a complete project file like this will make merge conflicts on it much less scary.
First, we look for an entry called rootObject. In our project file, this reveals the following line:
rootObject = 1793817C17A9421F0078255E /* Project object */;
From there, we just follow the ID of this object (1793817C17A9421F0078255E) and find our main project definition:
								/* Begin PBXProject section */
    1793817C17A9421F0078255E /* Project object */ = {
        isa = PBXProject;
...
This section contains several keys which we can follow further to understand how this file is constructed. For example, mainGroup points to the root file group. If you follow this reference you will quickly see how the project structure is represented in the .pbxproj file. But let's have a look at something which is related to the build process. The target key points to the build target definitions:
								targets = (
    1793818317A9421F0078255E /* objcio */,
    170E83CE17ABF256006E716E /* objcio Tests */,
);
Following the first reference we find the target definition:
								1793818317A9421F0078255E /* objcio */ = {
    isa = PBXNativeTarget;
    buildConfigurationList = 179381B617A9421F0078255E /* Build configuration list for PBXNativeTarget "objcio" */;
    buildPhases = (
        F3EB8576A1C24900A8F9CBB6 /* Check Pods Manifest.lock */,
        1793818017A9421F0078255E /* Sources */,
        1793818117A9421F0078255E /* Frameworks */,
        1793818217A9421F0078255E /* Resources */,
        FF25BB7F4B7D4F87AC7A4265 /* Copy Pods Resources */,
    );
    buildRules = (
    );
    dependencies = (
        1769BED917CA8239008B6F5D /* PBXTargetDependency */,
        1769BED717CA8236008B6F5D /* PBXTargetDependency */,
    );
    name = objcio;
    productName = objcio;
    productReference = 1793818417A9421F0078255E /* objcio.app */;
    productType = "com.apple.product-type.application";
};
The buildConfigurationList points to the available configurations, usually "Debug" and "Release." Following the debug reference, we finally end up where all the options from the build settings tab are stored:
								179381B717A9421F0078255E /* Debug */ = {
    isa = XCBuildConfiguration;
    baseConfigurationReference = 05D234D6F5E146E9937E8997 /* Pods.xcconfig */;
    buildSettings = {
        ALWAYS_SEARCH_USER_PATHS = YES;
        ASSETCATALOG_COMPILER_LAUNCHIMAGE_NAME = LaunchImage;
        CODE_SIGN_ENTITLEMENTS = objcio/objcio.entitlements;
...
The buildPhases attribute simply lists all the build phases we have defined in Xcode. It's easy to identify them because, luckily, Xcode augments the IDs of the objects with their real names in a C-style comment. The buildRules attribute is empty because we have not defined any custom build rules in this project. dependencies lists the target dependencies defined in Xcode's build phase tab.
Not so scary, is it? I'll leave it as an exercise for you to go through the remaining parts of the project file. Just follow the object IDs. Once you get the hang of it and understand how all the different sections relate to the project settings in Xcode, figuring out what went wrong in case of more complicated merge conflicts becomes pretty easy. You can even start to read project files on GitHub without cloning the project and opening it in Xcode.
Conclusion
Modern software is built on a complex stack of other software, like libraries and build tools. Those, in turn, are themselves built on top of a lower-level stack. It's like peeling an onion layer for layer. While the whole stack all the way down to the silicon is probably too complex for any one person to comprehend, the realization that you actually can peel off the next layer and understand what's going on there is very empowering. There is no magic; it's just large pile of layers stacked on top of each other, and each layer has fundamentally the same building blocks.
Looking under the hood of the build system is peeling off one of these layers. We don't need to understand the whole stack below to gain some insight into what's going on when we hit the run button. We just take a look one level deeper and find a well-organized and controllable sequence of calls to other tools, which we can investigate further if we'd like to do so. I encourage you to read the other articles in this issue to take on the next layer of the onion!