Advanced Swift
A deep dive into Swift’s features, from low-level programming to high-level abstractions.
by Chris Eidhof, Ole Begemann, Florian Kugler, and Ben Cohen
Introduction
Advanced Swift is quite a bold title for a book, so perhaps we should start with what we mean by it.
Swift is a complex language — most programming languages are. But it hides that complexity well. You can get up and running developing apps in Swift without needing to know about generics or overloading or how copy-on-write works under the hood. You can certainly use Swift without ever calling into a C library or writing your own collection type. But after a while, we think you’ll find it necessary to know about these things — whether to improve your code’s performance, or to make it more elegant or expressive, or just to get certain things done.
Learning more about these features is what this book is about. We intend to answer many of the “How do I do this?” or “Why does Swift behave like that?” questions we’ve seen come up again and again. Hopefully, once you’ve read our book, you’ll have gone from being aware of the basics of the language to knowing about many advanced features and having a much better understanding of how Swift works. Being familiar with the material presented is probably necessary, if not sufficient, for calling yourself an advanced Swift programmer.
Who Is This Book For?
This book targets experienced (though not necessarily expert) programmers, such as existing Apple-platform developers. It’s also for those coming from other languages such as Java or C++ who want to bring their knowledge of Swift to the same level as that of their “go-to” language. Additionally, it’s suitable for new programmers who started on Swift, have grown familiar with the basics, and are looking to take things to the next level.
The book isn’t meant to be an introduction to Swift; it assumes you’re familiar with the syntax and structure of the language. If you want some good, compact coverage of the basics of Swift, the best source is the official Swift book (available on docs.swift.org). If you’re already a confident programmer, you could try reading our book and the official book in parallel.
This is also not a book about programming for macOS or iOS devices. Of course, since Swift is used a lot for development on Apple platforms, we’ve tried to include examples of practical use, but we think this book will be useful for non-Apple-platform programmers as well. The vast majority of the examples in the book should run unchanged on other operating systems. The ones that don’t are either fundamentally tied to Apple’s platforms (because they use iOS frameworks or rely on the Objective-C runtime) or only require minimal changes. We can say from personal experience that Swift is a great language for writing server apps running on Linux, and the ecosystem and community have evolved over the past few years to make this a viable option.
Themes
This book is organized in such a way that each chapter covers one specific concept. There are in-depth chapters on some fundamental basic concepts like optionals and strings, along with some deeper dives into topics like C interoperability. But throughout the book, hopefully a few themes regarding Swift emerge:
Swift bridges multiple levels of abstraction. Swift is a high-level language — it allows you to write code similarly to Ruby and Python, with map and reduce, and to write your own higher-order functions easily. Swift also allows you to write fast code that compiles directly to native binaries with performance similar to code written in C.
What’s exciting to us, and what’s possibly the aspect of Swift we most admire, is that you’re able to do both these things at the same time. Mapping a closure expression over an array compiles to the same assembly code as looping over a contiguous block of memory does.
However, there are some things you need to know about to make the most of this feature. For example, it will benefit you to have a strong grasp on how structs and classes differ, or an understanding of the difference between dynamic and static method dispatch (we’ll cover these topics in depth later on). And if you ever need to drop to a lower level of abstraction and manipulate pointers directly, Swift lets you to do this as well.
Swift is a multi-paradigm language. To someone coming from another language, Swift can resemble everything they like about their language of choice. You can use Swift to write object-oriented code or pure functional code using immutable values, or you can write imperative C-like code using pointer arithmetic.
This is both a blessing and a curse. It’s great in that you have a lot of tools available to you, and you aren’t forced into writing code one way. But it also exposes you to the risk of mindlessly porting familiar Java or C or Objective-C patterns to Swift without looking for more idiomatic alternatives. Swift’s type system offers many capabilities not available in those older languages, enabling (and often encouraging) new solutions for common tasks.
Erik Meijer, a well-known programming language expert, tweeted the following in October 2015:
At this point, @SwiftLang is probably a better, and more valuable, vehicle for learning functional programming than Haskell.
Swift is a good introduction to a more functional style of programming through its use of generics, protocols, value types, and closures. It’s even possible to use it to write operators that compose functions together. That said, most people in the Swift community seem to prefer a more imperative style while incorporating patterns that originated in functional programming. Swift’s novel mutability model for value types, as well as its error handling model, are examples of the language “hiding” functional concepts behind a friendly imperative syntax.
Swift is very flexible. In the introduction to the book On Lisp, Paul Graham writes that:
Experienced Lisp programmers divide up their programs differently. As well as top-down design, they follow a principle which could be called bottom-up design—changing the language to suit the problem. In Lisp, you don’t just write your program down toward the language, you also build the language up toward your program. As you’re writing a program you may think “I wish Lisp had such-and-such an operator.” So you go and write it. Afterward you realize that using the new operator would simplify the design of another part of the program, and so on. Language and program evolve together.
Swift is very different from Lisp. But still, we feel like Swift also has this characteristic of encouraging “bottom-up” programming — of making it easy to write very general reusable building blocks that you then combine into larger features, which you then use to solve your actual problem. Swift is particularly good at making these building blocks feel like primitives — like part of the language. A good demonstration of this is that the many features you might think of as fundamental building blocks, like optionals or basic operators, are actually defined in a library — the Swift standard library — rather than directly in the language. Trailing closures enable you to extend the language with features that feel like they’re built in.
Swift code can be compact and concise while still being clear. Swift lends itself to relatively terse code. There’s an underlying goal here, and it isn’t to save on typing. The idea is to get to the point quicker and to make code readable by dropping a lot of the “ceremonial” boilerplate you often see in other languages that obscures rather than clarifies the meaning of the code.
For example, type inference removes the clutter of type declarations that are obvious from the context. Semicolons and parentheses that add little or no value are gone. Generics and protocol extensions encourage you to avoid repeating yourself by packaging common operations into reusable functions. The goal is to write code that’s readable at a glance.
At first, this can be off-putting. If you’ve never before used functions like map, filter, and reduce, they might come across as more difficult to read than a simple for loop. But our hope is that this is a short learning curve and that the reward is code that is more “obviously correct” at first glance.
Swift tries to be as safe as is practical, until you tell it not to be. This is unlike languages such as C and C++ (where you can be unsafe easily just by forgetting to do something), or like Haskell or Java (which are sometimes safe whether or not you like it).
Eric Lippert, one of the principal designers of C#, wrote about his 10 regrets of C#, including the lesson that:
sometimes you need to implement features that are only for experts who are building infrastructure; those features should be clearly marked as dangerous—not invitingly similar to features from other languages.
Eric was specifically referring to C#’s finalizers, which are similar to C++ destructors. But unlike destructors, they run at a nondeterministic time (perhaps never) at the behest of the garbage collector (and on the garbage collector’s thread). Swift, being reference counted, does execute a class’s deinit deterministically (though the exact point when an object is freed may differ depending on compiler optimizations).
Swift embodies this sentiment in other ways. Undefined and unsafe behavior is avoided by default. For example, a variable can’t be used until it’s been initialized, and using out-of-bounds subscripts on an array will trap, as opposed to continuing with possibly garbage values.
There are a number of “unsafe” options available (such as the unsafeBitCast function, or the UnsafeMutablePointer type) for when you really need them. But with great power comes great undefined behavior. For example, you can write the following:
var someArray = [1, 2, 3]
let uhOh = someArray.withUnsafeBufferPointer { ptr in
    return ptr
}
// Later...
print(uhOh[10])
It’ll compile, but who knows what it’ll do. The ptr variable is only valid within the closure expression, and returning it to the caller is illegal. But there’s nothing stopping you from letting it escape into the wild. However, you can’t say nobody warned you.
Swift is an opinionated language. We as authors have strong opinions about the “right” way to write Swift. You’ll see many of them in this book, sometimes expressed as if they’re facts. But they’re just our opinions — feel free to disagree! Regardless of what you’re reading, the most important thing is to try things out for yourself, check how they behave, and decide how you feel about them.
Swift continues to evolve. Swift 1.0 was released in 2014. The early period of major yearly syntax changes is over, and Swift feels more and more “complete” with every version. But important areas of the language are still unfinished (concurrency, string APIs, the generics system) or haven’t been tackled yet (reflection, ownership).
Terminology
‘When I use a word,’ Humpty Dumpty said, in rather a scornful tone, ‘it means just what I choose it to mean — neither more nor less.’
— Through the Looking Glass, by Lewis Carroll
Programmers throw around terms of art a lot. To avoid confusion, what follows are some definitions of terms we use throughout this book. Where possible, we’re trying to adhere to the same usage as the official documentation, or sometimes a definition that’s been widely adopted by the Swift community. Many of these definitions are covered in more detail in later chapters, so don’t worry if not everything makes sense right away. If you’re already familiar with all of these terms, it’s still best to skim through to make sure your accepted meanings don’t differ from ours.
In Swift, we make the distinction between values, variables, references, and constants.
A value is immutable and forever — it never changes. For example, 1, true, and [1,2,3] are all values. These are examples of literals, but values can also be generated at runtime. The number you get when you square the number five is a value.
When we assign a value to a name using var x = [1,2], we’re creating a variable named x that holds the value [1,2]. By changing x, e.g. by performing x.append(3), we didn’t change the original value. Rather, we replaced the value that x holds with the new value, [1,2,3] — at least logically, if not in the actual implementation (which might actually just tack a new entry onto the back of some existing memory). We refer to this as mutating the variable.
We can declare constant variables (constants, for short) with let instead of var. Once a constant has been assigned a value, it can never be assigned a new value.
We also don’t need to give a variable a value immediately. We can declare the variable first (let x: Int) and then later assign a value to it (x = 1). Swift, with its emphasis on safety, will check that all possible code paths lead to a variable being assigned a value before its value can be read. There’s no concept of a variable having an as-yet-undefined value. Of course, if the variable was declared with let, it can only be assigned to once.
Structs and enums are value types. When you assign one struct variable to another, the two variables will then contain the same value. You can think of the contents as being copied, but it’s more accurate to say that one variable was changed to contain the same value as the other.
A reference is a special kind of value: it’s a value that “points to” some other location in memory. Because two references can refer to the same location, this introduces the possibility of the value stored at that location being mutated by two different parts of the program at once.
Classes and actors are reference types. You can’t hold an instance of a class (which we might occasionally call an object — a term fraught with troublesome overloading!) directly in a variable. Instead, the variable holds a reference to the object and accesses it via that reference.
Reference types have identity — you can check if two variables are referring to the exact same object by using ===. You can also check if two objects are equal, assuming == is implemented for the relevant type. Two objects with different identities can still be equal.
Value types don’t have identity. You can’t check if a particular variable holds the “same” number 2 as another. You can only check if they both contain the value 2. === is really asking: “Do both these variables hold the same reference as their value?” In programming language literature, == is sometimes called structural equality, and === is called pointer equality or reference equality.
Class and actor references aren’t the only kind of reference in Swift. For example, there are also pointers, accessed through withUnsafeMutablePointer functions and the like. But classes and actors are the simplest reference types to use, in part because their reference-like nature is partially hidden from you by syntactic sugar, meaning you don’t need to do any explicit “dereferencing” like you do with pointers in some other languages. (We’ll cover the other kind of references in more detail in the Interoperability chapter.)
A variable that holds a reference can be declared with let — that is, the reference is constant. This means that the variable can never be changed to refer to something else. But — and this is important — it doesn’t mean that the object it refers to can’t be changed. So when referring to a variable as a constant, be careful — it’s only constant in what it points to; it doesn’t mean what it points to is constant. (Note: If those last few sentences sound like doublespeak, don’t worry, as we’ll cover this again in the Structs and Classes chapter.) Unfortunately, this means that when looking at a declaration of a variable with let, you can’t tell at a glance whether or not what’s being declared is completely immutable. Instead, you have to know whether it’s holding a value type or a reference type.
When a value type is copied, it generally performs a deep copy, i.e. all values it contains are also copied recursively. This copy can occur eagerly (whenever a new variable is introduced) or lazily (whenever a variable gets mutated). Types that perform deep copies are said to have value semantics.
Here we hit another complication. If a struct contains reference types, the referenced objects won’t automatically get copied upon assigning the struct to a new variable. Instead, only the references themselves get copied. These are called shallow copies.
For example, the Data struct in Foundation is a wrapper around a class that stores the actual bytes. This means the bytes themselves won’t get copied when passing the array around. However, to preserve value semantics, the authors of the Data struct took extra steps to also perform a deep copy of the class instance whenever the Data struct is mutated. They do this efficiently using a technique called copy-on-write, which we’ll explain in the Structs and Classes chapter. For now, it’s important to know that this behavior isn’t automatic. If you want your own types to use copy-on-write, you have to implement it yourself.
The collections in the standard library also wrap reference types and use copy-on-write to efficiently provide value semantics. However, if the elements in a collection are references (for example, an array containing objects), the objects won’t get copied. Instead, only the references get copied. This means a Swift array only has value semantics if its elements have value semantics too.
Some classes are completely immutable — that is, they provide no methods for changing their internal state after they’re created. This means that even though they’re classes, they also have value semantics (because even if they’re shared, they can never change). Be careful though — only final classes can be guaranteed not to be subclassed with added mutable state.
In Swift, functions are also values you can pass around. You can assign a function to a variable, have an array of functions, and call the function held in a variable. Functions that take other functions as arguments (such as map, which takes a function to transform every element of a sequence) or return functions are referred to as higher-order functions.
Functions don’t have to be declared at the top level — you can declare a function within another function or in a do or other scope. Functions defined within an outer scope but passed out from it (say, as the returned value of a function), can “capture” local variables, in which case those local variables aren’t destroyed when the local scope ends, and the function can hold state through them. This behavior is called “closing over” variables, and functions that do this are called closures.
Functions can be declared either with the func keyword or by using a shorthand { } syntax called a closure expression. Sometimes this gets shortened to “closures,” but don’t let it give you the impression that only closure expressions can be closures. Functions declared with the func keyword are also closures when they close over external variables.
Functions are held by reference. This means assigning a function that has captured state to another variable doesn’t copy that state; it shares it, similar to object references. What’s more is that when two closures close over the same local variable, they both share that variable, so they share state. This can be quite surprising, and we’ll discuss this more in the Functions chapter.
Functions defined inside a class or protocol are methods, and they have an implicit self parameter. Sometimes we call functions that aren’t methods free functions. This is to distinguish them from methods.
Similarly, variables or constants that are members of a type are called properties. Properties/variables that define a memory location for a value are also called stored properties/variables. In contrast, a computed property/variable has no storage. It’s essentially another way to write a method/function that takes no arguments. Computed properties can be read-only or allow getting and setting a value.
A fully qualified function name in Swift includes not just the function’s base name (the part before the parentheses), but also the argument labels. For example, the full name of the method for moving a collection index by a number of steps is index(_:offsetBy:), indicating that this function takes two arguments (represented by the two colons), the first one of which has no label (represented by the underscore). We often omit the labels in the book if it’s clear from the context what function we’re referring to; the compiler allows you to do the same.
Free functions, along with methods called on structs and enums, are statically dispatched. This means the function that’ll be called is known at compile time. It also means the compiler might be able to inline the function, i.e. not call the function at all, but instead replace it with the code the function would execute. The optimizer can also discard or simplify code that it can prove at compile time won’t actually run.
Methods on classes or protocols might be dynamically dispatched. This means the compiler doesn’t necessarily know at compile time which function will run. This dynamic behavior is done either by using vtables (similar to how Java and C++ dynamic dispatch work), or in the case of some @objc classes and protocols, by using selectors and objc_msgSend in the Objective-C runtime.
Subtyping and method overriding is one way of getting polymorphic behavior, i.e. behavior that varies depending on the types involved. A second way is function overloading, where a function is written multiple times for different types. (It’s important not to mix up overriding and overloading, as they behave very differently.) A third way is via generics, where a function or method is written once to take any type that provides certain functions or methods, but the implementations of those functions can vary. Unlike method overriding, the results of function overloading and generics are known statically at compile time. We’ll cover this more in the Generics chapter.
Swift code is organized into modules. To access a declaration from another module, you need to import that module. The standard library is a module named Swift, and it gets imported automatically into every source file. The compiler builds all source files in the same module together as a single unit (when whole module optimization is enabled). This unlocks some important optimizations — such as generics specialization and inlining — for code that calls other code in the same module. Cross-module calls are generally less optimizable.
The Swift Package Manager uses the term target instead of module. Targets define modules, but they have a slightly broader meaning: a target can also consist of C/C++/Objective-C code and/or have non-code resources. A product is a unit of functionality the author wants to vend to external clients. Usually, a product contains a single target, but you can also group multiple targets in one product, and internal targets aren’t part of any product. A package groups one or more products that are versioned together. Users of a package declare a package dependency on that package and then add one or more products of that package to their own targets as target dependencies.
Swift Style Guide
When writing this book, and when writing Swift code for our own projects, we try to stick to the following rules:
For naming, clarity at the point of use is the most important consideration. Since APIs are used many more times than they’re declared, their names should be optimized for how well they work at the call site. Familiarize yourself with the Swift API Design Guidelines and try to adhere to them in your own code.
Clarity is often helped by conciseness, but brevity should never be a goal in and of itself.
Design your APIs in a way that actively steers the user toward doing the “right thing” (Xiaodi Wu). Make it hard for programmers to shoot themselves in the foot.
Always add documentation comments to functions — especially generic ones.
Types start with
UpperCaseLetters. Functions, variables, and enum cases start withlowerCaseLetters.Use type inference. Explicit but obvious types get in the way of readability.
Don’t use type inference in cases of ambiguity or when defining contracts (which is why, for example,
funcs have an explicit return type).Default to structs unless you actually need a class-only feature or reference semantics.
Mark classes as
finalunless you’ve explicitly designed them to be inheritable. If you want to use inheritance internally but not allow subclassing for external clients, mark a classpublicbut notopen.Use the trailing closure syntax, except when the closure is immediately followed by another opening brace (e.g. in an
ifcondition).Use
guardto exit functions early.Eschew force-unwraps and implicitly unwrapped optionals. They’re occasionally useful, but needing them constantly is usually a sign something is wrong.
Don’t repeat yourself. If you find you’ve written a very similar piece of code more than a couple of times, extract it into a function. Consider making that function a protocol extension.
Favor
mapandfilter. But don’t force it: use aforloop when it makes sense. The purpose of higher-order functions is to make code more readable. An obfuscated use ofreducewhen a simpleforloop would be clearer defeats this purpose.Favor immutable variables: default to
letunless you know you need mutation. But use mutation when it makes the code clearer or more efficient. Again, don’t force it: amutatingmethod on a struct is often more idiomatic and efficient than returning a brand-new struct.Struct properties can generally be mutable because clients control mutability by way of making the struct variable
letorvar.Leave off
self.when you don’t need it. In closure expressions, the presence ofself.is a clear signal thatselfis being captured by the closure.Instead of writing a free function, write an extension on a type or protocol (whenever you can). This helps with readability and discoverability through code completion.
Don’t hesitate to extend existing (standard library) types when it makes sense.
One final note about our code samples throughout the book: to save space and focus on the essentials, we usually omit import statements that would be required to make the code compile. If you try out the code yourself and the compiler tells you it doesn’t recognize a particular symbol, try adding an import Foundation or import UIKit statement.
Revision History
Fifth Edition (March 2022)
All chapters revised for Swift 5.6.
New chapters:
Properties (was previously part of Functions)
New content:
Significant changes:
Fourth Edition (May 2019)
All chapters revised for Swift 5.
New chapter: Enums
Rewritten chapters:
Significant changes and new content:
Reordered the chapters; Collection Protocols has been moved further back in the book, resulting in a smoother learning curve for readers.
Florian Kugler joined as a co-author.
Third Edition (October 2017)
All chapters revised for Swift 4.
New chapter: Encoding and Decoding
Significant changes and new content:
Full text available as Xcode playgrounds.
Second Edition (September 2016)
All chapters revised for Swift 3.
Split the Collections chapter into Built-In Collections and Collection Protocols.
Significant changes and new content throughout the book, especially in:
Full text available as a Swift playground for iPad.
Ole Begemann joined as a co-author.
First Edition (March 2016)
- Initial release (covering Swift 2.2).
Built-In Collections
Collections of elements are among the most important data types in any programming language. Good language support for different kinds of containers has a big impact on programmer productivity and happiness. Swift places special emphasis on sequences and collections — so much of the standard library is dedicated to this topic that we sometimes have the feeling it deals with little else. The resulting model is more extensible than what you may be used to from other languages, but it’s also quite complex.
In this chapter, we’ll take a look at the major collection types Swift ships with, with a focus on how to work with them effectively and idiomatically. In the Collection Protocols chapter later in the book, we’ll climb up the abstraction ladder and see how the collection protocols in the standard library work.
Arrays
Arrays are the most common collections in Swift. An array is an ordered container of elements that all have the same type, and it provides random access to each element. As an example, to create an array of numbers, we can write the following:
// The Fibonacci numbers
let fibs = [0, 1, 1, 2, 3, 5]
Arrays and Mutability
If we try to modify the array defined above (by using append(_:), for example), we get a compile error. This is because the array is defined as a constant, using let. In many cases, this is exactly the correct thing to do; it prevents us from accidentally changing the array. If we want the array to be a variable, we have to define it using var:
var mutableFibs = [0, 1, 1, 2, 3, 5]
Now we can easily append a single element or a sequence of elements:
mutableFibs.append(8)
mutableFibs.append(contentsOf: [13, 21])
mutableFibs // [0, 1, 1, 2, 3, 5, 8, 13, 21]
There are a couple of benefits that come with making the distinction between var and let. Constants defined with let are easier to reason about because they’re immutable. When you read a declaration like let fibs = ..., you know the value of fibs will never change — the immutability is enforced by the compiler. This helps greatly when reading through code. However, note that this is only true for types that have value semantics. A let variable containing a reference to a class instance guarantees that the reference will never change, i.e. you can’t assign another object to that variable. However, the object the reference points to can change. We’ll go into more detail on these differences in the Structs and Classes chapter.
Arrays, like all collection types in the standard library, have value semantics. When you assign an existing array to another variable, the array contents are copied over. For example, in the following code snippet, x is never modified:
var x = [1,2,3]
var y = x
y.append(4)
y // [1, 2, 3, 4]
x // [1, 2, 3]
The statement var y = x makes a copy of x, so appending 4 to y won’t change x — the value of x will still be [1, 2, 3]. The same thing happens when you pass an array into a function; the function receives a local copy of the array, and any changes it makes don’t affect the caller.
Compare this with the approach to mutability taken in many other languages, such as JavaScript, Java, and Objective-C (using NSArray from Foundation). Arrays in these languages have reference semantics: mutating an array through one variable implicitly changes what all other variables that reference the same array see, because all point to the same storage. Here’s a JavaScript example:
// 'const' makes the *variables* a and b immutable.
const a = [1,2,3];
const b = a;
// But the object they *reference* is still mutable.
b.push(4);
console.log(b); // [ 1, 2, 3, 4 ]
console.log(a); // [ 1, 2, 3, 4 ]
The correct way to write this is to manually create a copy upon assignment:
const c = [1,2,3];
// Make an explicit copy.
const d = c.slice();
d.push(4);
console.log(d); // [ 1, 2, 3, 4 ]
console.log(c); // [ 1, 2, 3 ]
Forgetting this is easy and error-prone. For example, an object that returns an array from its internal state without making a copy may suddenly have its invariants broken when the caller mutates the array. Swift avoids this problem by giving collections value semantics.
Making a copy on every assignment could be a performance problem, but in practice, all collection types in the Swift standard library are implemented using a technique called copy-on-write, which makes sure the data is only copied when necessary. So in our example, x and y shared internal storage up until the point y.append was called. In the Structs and Classes chapter, we’ll take a deeper look at value semantics — including how to implement copy-on-write for your own types:
Array Indexing
Swift arrays provide all the usual operations you’d expect, such as isEmpty and count. Arrays also allow for direct access of elements at a specific index through subscripting, like with fibs[3]. Keep in mind that you need to make sure the index is within bounds before getting an element via subscript. Fetch the element at index 3, and you’d better be sure the array has at least four elements in it. Otherwise, your program will trap, i.e. abort with a fatal error.
Swift has many ways to work with arrays without you ever needing to calculate an index:
Want to iterate over the array?
for x in arrayWant to iterate over all but the first element of an array?
for x in array.dropFirst()Want to iterate over all but the last five elements?
for x in array.dropLast(5)Want to number all the elements in an array?
for (num, element) in array.enumerated()Want to iterate over indices and elements together?
for (index, element) in zip(array.indices, array)Want to find the location of a specific element?
if let idx = array.firstIndex { someMatchingLogic($0) }Want to transform all the elements in an array?
array.map { someTransformation($0) }Want to fetch only the elements matching a specific criterion?
array.filter { someCriteria($0) }
Another sign that Swift wants to discourage you from doing index math is the absence of traditional C-style for loops in the language. Manually fiddling with indices is a rich seam of bugs to mine, so it’s often best avoided.
But sometimes you do have to use an index. And with array indices, the expectation is that when you do, you’ll have thought very carefully about the logic behind the index calculation. So to have to unwrap the value of a subscript operation is probably overkill — it means you don’t trust your code. But chances are you do trust your code, so you’ll probably resort to force-unwrapping the result, because you know the index must be valid. This is (a) annoying, and (b) a bad habit to get into. When force-unwrapping becomes routine, eventually you’re going to slip up and force-unwrap something you don’t mean to. So to prevent this habit from becoming routine, arrays don’t give you the option.
While a subscripting operation that responds to an invalid index with a controlled crash could arguably be called unsafe, that’s only one aspect of safety. Subscripting is totally safe in regard to memory safety — the standard library collections always perform bounds checks to prevent unauthorized memory access with an out-of-bounds index. In Swift, the term “safety” generally means memory safety and avoiding undefined behavior.
Other operations behave differently. The first and last properties return an optional value, which is nil if the array is empty. first is equivalent to isEmpty ? nil : self[0]. Similarly, the removeLast method will trap if you call it on an empty array, whereas popLast will only delete and return the last element if the array isn’t empty, and otherwise it’ll do nothing and return nil. Which one you’d want to use depends on your use case. When you’re using the array as a stack, you’ll probably always want to combine checking for empty and removing the last entry. On the other hand, if you already know whether or not the array is empty, dealing with the optional is fiddly.
We’ll encounter these tradeoffs again later in this chapter when we talk about dictionaries. Additionally, there’s an entire chapter dedicated to Optionals.
Optionals
Sentinel Values
An extremely common pattern in programming is to have an operation that may or may not return a value.
Perhaps not returning a value is an expected outcome when you’ve reached the end of a file you were reading, as in the following C snippet:
int ch;
while ((ch = getchar()) != EOF) {
    printf("Read character %c\n", ch);
}
printf("Reached end-of-file\n");
EOF is just a #define for -1. As long as there are more characters in the file, getchar returns them. But if the end of the file is reached, getchar returns -1.
Or, perhaps returning no value means “not found,” as in this bit of C++:
auto vec = {1, 2, 3};
auto iterator = std::find(vec.begin(), vec.end(), someValue);
if (iterator != vec.end()) {
    std::cout << "vec contains " << *iterator << std::endl;
}
Here, vec.end() is the iterator “one past the end” of the container; it’s a special iterator you can check against the container’s end but that you mustn’t ever actually use to access a value — similar to a collection’s endIndex in Swift. The find function uses it to indicate that no such value is present in the container.
Or, maybe the value can’t be returned because something went wrong during the function’s processing. Probably the most notorious example is that of the null pointer. This innocuous-looking piece of Java code will likely throw a NullPointerException:
int i = Integer.getInteger("123")
It happens that Integer.getInteger doesn’t parse strings into integers, but rather gets the integer value of a system property named “123.” This property probably doesn’t exist, in which case getInteger returns null. When the null then gets unboxed into an int, Java throws an exception.
Or, take this example in Objective-C:
[[NSString alloc] initWithContentsOfURL:url
    encoding:NSUTF8StringEncoding error:&error];
This initializer might return nil, in which case — and only then — the error pointer should be checked. There’s no guarantee the error pointer is valid if the initializer returns non-nil.
In all of the above examples, the function returns a special “magic” value to indicate it hasn’t returned a real value. Magic values like these are called “sentinel values.”
But this approach is problematic. The returned result looks and feels like a real value. An int of -1 is still a valid integer, but you don’t ever want to print it out. vec.end() is an iterator, but the results are undefined if you try to use it. And everyone loves seeing a stack dump when your Java program throws a NullPointerException.
Unlike Java, Objective-C allows sending messages to nil. This is “safe” insofar as the runtime guarantees that the return value from a message to nil will always be the equivalent of zero, i.e. nil for object return types, 0 for numeric types, and so on. If the message returns a struct, it’ll have all its members initialized to zero. With this in mind, consider the following snippet for finding a substring:
NSString *someString = ...
if ([someString rangeOfString:@"Swift"].location != NSNotFound) {
    NSLog(@"Someone mentioned Swift!");
}
If someString is nil, whether accidentally or on purpose, the rangeOfString: message will return a zeroed NSRange. Hence, its .location will be zero, and the inequality comparison against NSNotFound (which is defined as NSIntegerMax) will succeed. Therefore, the body of the if statement will be executed when it shouldn’t be.
Null references cause so many problems that Tony Hoare, credited with their creation in 1965, calls them his “billion-dollar mistake”:
At that time, I was designing the first comprehensive type system for references in an object oriented language (ALGOL W). My goal was to ensure that all use of references should be absolutely safe, with checking performed automatically by the compiler. But I couldn’t resist the temptation to put in a null reference, simply because it was so easy to implement. This has led to innumerable errors, vulnerabilities, and system crashes, which have probably caused a billion dollars of pain and damage in the last forty years.
Another problem with sentinel values is that using them correctly requires prior knowledge. Sometimes there’s an idiom that’s widely followed in a community, as with the C++ end iterator or the error handling conventions in Objective-C. If such rules don’t exist or you’re not aware of them, you have to refer to the documentation. Moreover, there’s no way for the function to indicate it can’t fail. If a call returns a pointer, that pointer might never be nil. But there’s no way to tell except by reading the documentation, and even then, the documentation might be wrong.
Functions
Overview
To open this chapter, let’s recap some main points regarding functions. If you’re already familiar with first-class functions, feel free to skip ahead to the next section. But if you’re even slightly unsure about them, read through what’s below.
To understand functions and closures in Swift, you really need to understand three things, in roughly this order of importance:
Functions can be assigned to variables and passed in and out of other functions as arguments, just as an
Intor aStringcan be.Functions can capture variables that exist outside of their local scope.
There are two ways of creating functions — either with the
funckeyword, or with{ }. Swift calls the latter closure expressions.
Sometimes people new to the topic of closures come at it in reverse order and maybe miss one of these points, or they conflate the terms closure and closure expression — and this can cause a lot of confusion. It’s a three-legged stool, and if you miss one of the three points above, you’ll fall over when you try to sit down.
1. Functions can be assigned to variables and passed in and out of other functions as arguments.
In Swift, as in many modern languages, functions are referred to as “first-class objects.” You can assign functions to variables, and you can pass them in and out of other functions to be called later.
This is the most important thing to understand. “Getting” this for functional programming is akin to “getting” pointers in C. If you don’t quite grasp this part, everything else will just be noise.
Let’s start with a function that just prints an integer:
func printInt(i: Int) {
    print("You passed \(i).")
}
To assign the function to a variable, funVar, we use the function name as the value. Note the absence of parentheses after the function name:
let funVar = printInt
Now we can call the printInt function using the funVar variable. Note the use of parentheses after the variable name:
funVar(2) // You passed 2.
It’s also noteworthy that we must not include an argument label in the funVar call, whereas printInt calls require the argument label, as in printInt(i: 2). Swift only allows argument labels in function declarations; the labels aren’t included in a function’s type. This means you currently can’t assign argument labels to a variable of a function type, though this will likely change in a future Swift version.
We can also write a function that takes a function as an argument:
func useFunction(function: (Int) -> () ) {
    function(3)
}

useFunction(function: printInt) // You passed 3.
useFunction(function: funVar) // You passed 3.
Why is being able to treat functions like this such a big deal? Because it enables us to easily write “higher-order” functions, which take functions as arguments and apply them in useful ways, as we saw in the Built-In Collections chapter.
Functions can also return other functions:
func returnFunc() -> (Int) -> String {
    func innerFunc(i: Int) -> String {
        return "You passed \(i)."
    }
    return innerFunc
}
let myFunc = returnFunc()
myFunc(3) // You passed 3.
2. Functions can capture variables that exist outside of their local scope.
When a function references variables outside its scope, those variables are captured and stick around after they’d otherwise fall out of scope and be destroyed.
To see this, let’s revisit our returnFunc function but add a counter that increases each time we call it:
func makeCounter() -> (Int) -> String {
    var counter = 0
    func innerFunc(i: Int) -> String {
        counter += i   // counter is captured
        return "Running total: \(counter)"
    }
    return innerFunc
}
Normally counter, being a local variable of makeCounter, would go out of scope just after the return statement, and it’d be destroyed. Instead, because it’s captured by innerFunc, the Swift runtime will keep it alive until the function that captured it gets destroyed. We can call the inner function multiple times, and we see that the running total increases:
let f = makeCounter()
f(3) // Running total: 3
f(4) // Running total: 7
If we call makeCounter() again, a fresh counter variable will be created and captured:
let g = makeCounter()
g(2) // Running total: 2
g(2) // Running total: 4
This doesn’t affect our first function, which still has its own captured version of counter:
f(2) // Running total: 9
Think of these functions combined with their captured variables as similar to instances of classes with a single method (the function) and some member variables (the captured variables).
In programming terminology, a combination of a function and an environment of captured variables is called a closure. So f and g above are examples of closures, because they capture and use a non-local variable (counter) that was declared outside of them.
3. Functions can be declared using the { } syntax for closure expressions.
In Swift, you can define functions in two ways. One is with the func keyword. The other way is to use a closure expression. Consider this simple function to double a number:
func doubler(i: Int) -> Int {
    return i * 2
}
[1, 2, 3, 4].map(doubler) // [2, 4, 6, 8]
And here’s the same function written using the closure expression syntax. Just like before, we can pass it to map:
let doublerAlt = { (i: Int) -> Int in return i*2 }
[1, 2, 3, 4].map(doublerAlt) // [2, 4, 6, 8]
Functions declared as closure expressions can be thought of as function literals in the same way that 1 and "hello" are integer and string literals. They’re also anonymous — they aren’t named, unlike with the func keyword. The only way they can be used is to assign them to a variable when they’re created (as we do here with doubler), or to pass them to another function or method.
There’s a third way anonymous functions can be used: you can call a function directly in line as part of the same expression that defines it. This can be useful for defining properties whose initialization requires more than one line. We’ll see an example of this in the Properties chapter.
The doubler declared using the closure expression and the one declared earlier using the func keyword are completely equivalent, apart from the differences in their handling of argument labels that we mentioned above. They even exist in the same “namespace,” unlike in some languages.
Why is the { } syntax useful then? Why not just use func every time? Well, it can be a lot more compact, especially when writing quick functions to pass into other functions, such as map. Here’s our doubler map example written in a much shorter form:
[1, 2, 3].map { $0 * 2 } // [2, 4, 6]
This looks very different because we leveraged several features of Swift to make the code more concise. Here they are, one by one:
If you’re passing the closure in as an argument and that’s all you need it for, there’s no need to store it in a local variable first. Think of this like passing in a numeric expression, such as
5*i, to a function that takes anIntas a parameter.If the compiler can infer a type from the context, you don’t need to specify it. In our example, the function passed to
maptakes anInt(inferred from the type of the array elements) and returns anInt(inferred from the type of the multiplication expression).If the closure expression’s body contains just a single expression, it’ll automatically return the value of the expression, and you can leave off the
return.Swift automatically provides shorthand names for the arguments to the function —
$0for the first,$1for the second, etc.If the last argument to a function is a closure expression, you can move the expression outside the parentheses of the function call. This trailing closure syntax is nice if you have a multi-line closure expression, as it more closely resembles a regular function definition or other block statement, such as
if expr { }. Since Swift 5.3, even multiple trailing closures are supported.Finally, if a function has no arguments other than a closure expression, you can leave off the parentheses after the function name altogether.
Using each of these rules, we can boil down the expression below to the form shown above:
/*_*/ [1, 2, 3].map( { (i: Int) -> Int in return i * 2 } )
/*_*/ [1, 2, 3].map( { i in return i * 2 } )
/*_*/ [1, 2, 3].map( { i in i * 2 } )
/*_*/ [1, 2, 3].map( { $0 * 2 } )
/*_*/ [1, 2, 3].map() { $0 * 2 }
/*_*/ [1, 2, 3].map { $0 * 2 }
If you’re new to Swift’s syntax, and to functional programming in general, these compact function declarations might seem daunting at first. But as you get more comfortable with the syntax and the functional programming style, they’ll start to feel more natural, and you’ll appreciate the ability to remove the clutter so you can see more clearly what the code is doing. Once you get used to reading code written like this, it’ll be even easier to parse at a glance than the equivalent code written with a conventional for loop.
Sometimes, Swift needs a helping hand with inferring types. And sometimes, you may get something wrong and the types aren’t what you think they should be. If ever you get a mysterious error when trying to supply a closure expression, it’s a good idea to write out the full form (first version above), complete with types. In many cases, that will help clear up where things are going wrong. Once you have the long form compiling, take the types out again one by one until the compiler complains. And if the error was yours, you’ll have fixed your code in the process.
Swift will also insist you be more explicit sometimes. For example, you can’t completely ignore input parameters. Suppose you wanted an array of random numbers. A quick way to do this is to map a range with a function that just generates random numbers. Nonetheless, you must supply an argument. You can use _ in such a case to indicate to the compiler that you acknowledge there’s an argument but that you don’t care what it is:
(0..<3).map { _ in Int.random(in: 1..<100) } // [2, 24, 61]
When you need to explicitly type the variables, you don’t have to do it inside the closure expression. For example, try defining isEven without any types:
let isEven = { $0 % 2 == 0 }
Above, the type of isEven is inferred to be (Int) -> Bool in the same way that let i = 1 is inferred to be Int — because Int is the default type for integer literals.
This is because of a type alias,
IntegerLiteralType, in the standard library:protocol ExpressibleByIntegerLiteral { associatedtype IntegerLiteralType /// Create an instance initialized to `value`. init(integerLiteral value: IntegerLiteralType) } /// The default type for an otherwise-unconstrained integer literal. typealias IntegerLiteralType = IntIf you were to define your own type alias, it would override the default one and change this behavior:
typealias IntegerLiteralType = UInt32
let i = 1 // i will be of type UInt32.
This is almost certainly a bad idea.
If, however, you need a version of isEven for a different type, you could type the argument and the return value inside the closure expression:
let isEvenAlt = { (i: Int8) -> Bool in i % 2 == 0 }
But you could also supply the context from outside the closure:
let isEvenAlt2: (Int8) -> Bool = { $0 % 2 == 0 }
let isEvenAlt3 = { $0 % 2 == 0 } as (Int8) -> Bool
Since closure expressions are most commonly used in some context of existing input or output types, adding an explicit type isn’t often necessary, but it’s useful to know you can do this.
Properties
Properties in Swift come in two variants: stored properties and computed properties. Stored properties store values, whereas computed properties are similar to functions: they don’t provide storage, rather they only provide a way to get and (optionally) set a value. In a way, you can think of computed properties like methods with a different syntax.
You can think of properties like variables that are defined on a type. Most of what we say in this chapter also applies to local and global variables. Variables can be stored or computed, have change observers, and use property wrappers. We consider properties a “special case” of variables, rather than the other way around.
There are two important features built on top of properties: key paths and property wrappers. Key paths are a way to reference the path of a property without referencing the value. More and more libraries adopt key paths as a way to write very concise, generic code, and we’ll see some examples of that in this chapter. A property wrapper allows you to modify the behavior of a property with a very minimal syntax. Property wrappers were instrumental in providing SwiftUI with its lightweight syntax.
Let’s look at the various ways to define properties. We’ll start with a struct that represents a GPS track. It stores all the recorded points in an array called record, which is a stored property:
import CoreLocation

struct GPSTrack {
    var record: [(CLLocation, Date)] = []
}
If we want to make the record property available as read-only to the outside but read-write internally, we can use the private(set) or fileprivate(set) modifiers:
struct GPSTrack {
    private(set) var record: [(CLLocation, Date)] = []
}
To access all the timestamps in a GPS track, we create a computed property:
extension GPSTrack {
    /// Returns all the timestamps for the GPS track.
    /// - Complexity: O(*n*), where *n* is the number of points recorded.
    var timestamps: [Date] {
        return record.map { $0.1 }
    }
}
Because we didn’t specify a setter, the timestamps property is read-only. The result isn’t cached; each time you access the property, it computes the result. The Swift API Design Guidelines recommend you document the complexity of every computed property that isn’t O(1), because callers might assume that accessing a property is cheap.
Change Observers
We can also implement the willSet and didSet handlers for stored properties and variables to be called every time a property is set (even if the value doesn’t change). These are called immediately before and after the new value is stored, respectively. One useful case is when a view needs to lay itself out again based on certain properties. By calling setNeedsLayout in didSet we can be sure this will always happen. (In the section on property wrappers, we’ll look at an even shorter way to do this.)
class MyView: UIView {
    var pageSize: CGSize = CGSize(width: 800, height: 600) {
        didSet {
            self.setNeedsLayout()
        }
    }
}
The observers have to be defined at the declaration site of a property — you can’t add one retroactively in an extension. Therefore, they’re a tool for the designer of the type, and not the user. The willSet and didSet handlers are essentially shorthand for defining a pair of properties: one private stored property that provides the storage, and a public computed property whose setter performs additional work before and/or after storing the value in the stored property. This is fundamentally different from the key-value observing mechanism in Foundation, which is often used by consumers of an object to observe internal changes, whether or not the class’s designer intended this.
You can, however, override a property in a subclass to add an observer. Here’s an example:
Structs and Classes
When we’re designing our data types, Swift lets us choose between two alternatives that seem to be similar on the surface: structs and classes. Both can have stored and computed properties, and both can have methods defined on them. Furthermore, not only do both have initializers, but we can define extensions on them, and we can conform them to protocols. Sometimes our code even keeps compiling when we change the class keyword into struct or vice versa. However, the similarities on the surface are deceptive, as structs and classes have fundamentally different behaviors.
Structs are value types, whereas classes are reference types. Even if we don’t think in these terms, we’re all familiar with the behavior of values and references in our daily work. We’ll try to leverage this implicit understanding in the next section to shine some light on the formal distinction between value types and reference types in general, and structs and classes specifically.
Value Types and Reference Types
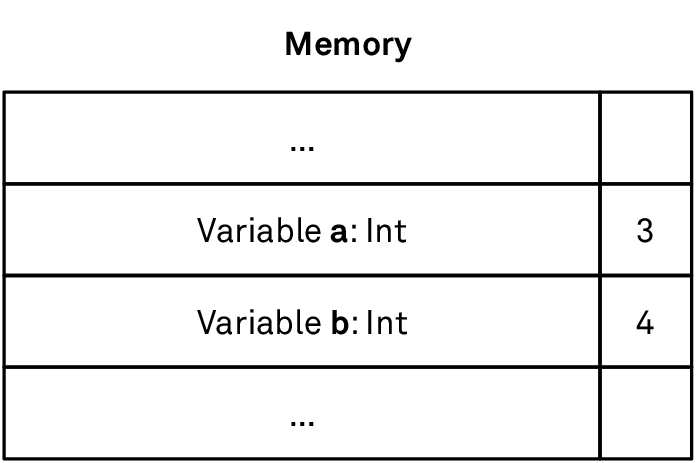
Let’s start by looking at one of the simplest types possible: integers. Consider the following code:
var a: Int = 3
var b = a
b += 1
What’s the value of a now? It’s probably safe to say that we all expect a to still hold the value 3, even though we’ve incremented b to 4. Anything else would be a big surprise. And this is indeed correct:
a // 3
b // 4
This behavior is the essence of value types: assignment copies the value. In other words, each value type variable holds its own independent value. If a type behaves that way, it’s also said to have value semantics.
Looking at the definition of Int in the standard library, we can indeed see that it’s a struct (and therefore has value semantics):
public struct Int: FixedWidthInteger, SignedInteger {
    ...
}
Before we proceed, let’s take a step back and look at this behavior from a more low-level perspective.
What do we mean by the term “variable?” We can say that a variable is a name for a location in memory that contains a value of a certain type. In the example above, we use the name a to refer to a location in memory of type Int currently holding the value 3. The second variable, b, is a name for a different location in memory, equally of type Int and containing the value 3 after the initial assignment. The statement b += 1 then takes the value stored in the memory location referred to as b, increments it by one, and writes it back to the same location in memory. Thus, b now contains the value 4. Since the increment statement only modifies the value of the b variable, a is unaffected by this statement.
Value types are characterized by this direct relationship between variable and value: the value (also referred to as the instance of the value type) resides directly at the location in memory behind the variable. This applies to simple value types like integers, but also to more complex types like custom structs with multiple properties (on a machine code level, this might not hold true due to compiler optimizations, but they’re invisible to the developer so that our description is at least semantically accurate).
Enums
Structs and classes, which we discussed in the previous chapter, are examples of record types. A record is composed of zero or more fields (properties), with each field having its own type. Tuples also fall into this category: a tuple is effectively a lightweight anonymous struct with fewer capabilities. Records are such an obvious concept that we take them for granted. Almost all programming languages allow you to define composite types of this kind (early versions of BASIC and the original Lisp are perhaps the best-known exceptions). Even assembly programmers have always used the concept of records to structure data in memory, albeit without language support.
Swift’s enumerations, or enums, belong to a fundamentally different category that’s sometimes referred to as tagged unions, variant types, or sum types. In spite of sum types being a concept equally as powerful as records, support for them is much less widespread in mainstream programming languages. Sum types are commonplace in functional languages, though, and have become popular in newer languages such as Rust. In our opinion, enums are one of Swift’s best features.
Overview
An enum consists of zero or more cases, with each case having an optional tuple-style list of associated values. In this chapter, we’ll sometimes use the singular term “associated value” when we talk about a single case’s associated value(s). A case can have multiple associated values, but you can think of these values as a single tuple.
Here’s an enum for representing the alignment of a paragraph. The cases don’t have associated values:
enum TextAlignment {
    case left
    case center
    case right
}
We saw in the Optionals chapter that Optional is a generic enum with two cases — none and some. The some case has an associated value for the boxed value:
@frozen enum Optional<Wrapped> {
    /// The absence of a value.
    case none
    /// The presence of a value, stored as `Wrapped`.
    case some(Wrapped)
}
(Ignore the @frozen attribute for now. We’ll discuss it in the Frozen and Non-Frozen Enums section later on.)
The Result type, whose purpose is to represent the success or failure of an operation, has a similar shape but adds a second associated value (and corresponding generic parameter) for the failure case, enabling it to capture detailed error information:
@frozen enum Result<Success, Failure: Error> {
    /// A success, storing a `Success` value.
    case success(Success)
    /// A failure, storing a `Failure` value.
    case failure(Failure)
}
We discuss Result in detail in the Error Handling chapter, and we’ll also use it in many examples in this chapter.
You create an enum value by specifying one of its cases, plus values for the case’s associated values, if it has any:
let alignment = TextAlignment.left
let download: Result<String, NetworkError> = .success("<p>Hello world!</p>")
Notice that in the second line, we have to provide the full type annotation, including all generic parameters. An expression like Result.success(htmlText) produces an error unless the compiler can infer the concrete type of the other generic parameter, Failure, from context. Having specified the complete type once, we can then rely on type inference using the leading-dot syntax. (The definition of NetworkError isn’t shown here.)
Enums Are Value Types
Enums are value types, just like structs are. They have almost all the same capabilities structs have:
Enums can have methods, computed properties, and subscripts.
Methods can be declared mutating or non-mutating.
You can write extensions for enums.
Enums can conform to protocols.
However, enums cannot have stored properties. An enum’s state is fully represented by its case plus the case’s associated value. Think of the associated values as the stored properties for a particular case.
Mutating methods on enums work the same way they do on structs. We saw in the Structs and Classes chapter that inside a mutating method, self is passed inout and is hence mutable. Because enums don’t have stored properties and there’s no way to mutate a case’s associated value directly, we mutate an enum by assigning a new value directly to self.
Enums don’t require explicit initializers because the usual way to initialize an enum variable is to assign it a case. However, it’s possible to add additional “convenience” initializers in the type definition or in an extension. For example, using the Locale API from Foundation, we can add an initializer to our TextAlignment enum that sets a default text alignment for a given locale:
extension TextAlignment {
    init(defaultFor locale: Locale) {
        guard let language = locale.languageCode else {
            // Default value if language is n/a.
            self = .left
            return
        }
        switch Locale.characterDirection(forLanguage: language) {
        case .rightToLeft:
            self = .right
        // Left is the default for everything else.
        case .leftToRight, .topToBottom, .bottomToTop, .unknown:
            self = .left
        @unknown default:
            self = .left
        }
    }
}

let english = Locale(identifier: "en_AU")
TextAlignment(defaultFor: english) // left
let arabic = Locale(identifier: "ar_EG")
TextAlignment(defaultFor: arabic) // right
(We’ll cover the @unknown default case in the Frozen and Non-Frozen Enums section.)
Sum Types and Product Types
An enum value contains exactly one of its cases (plus values for the case’s associated values, if any). In fact, enums were called “oneof” and later “union” back in the early days of Swift (before the first public release). More concretely, a Result value contains either a success value or a failure value, but never both (and never none). In contrast, an instance of a record type contains values for all of its fields: a (String, Int) tuple contains a string and an integer. (Note that we talk about compound records with more than one field here; UInt8 is a struct too, and you might say that it constrains instances to “one of 0…255.” But that’s not what we mean.)
This ability to model “or” relationships is fairly unique, and it’s what makes enums so useful. It allows us to write safer and more expressive code that takes full advantage of strong types in situations that often can’t be expressed as cleanly with structs, tuples, or classes.
We say “fairly unique” because protocols and subclassing can be used for the same purpose, albeit with very different tradeoffs and applications. A variable of a protocol type (also called an existential) can be one of any type that conforms to the protocol. Similarly, an object of type UIView on iOS can also refer to any one of UIView’s direct or indirect subclasses, such as UILabel or UIButton. When working with such an object, we can either use the common interface defined on the base type (equivalent to calling methods defined on an enum), or attempt to downcast the instance to a concrete subtype to access data that’s unique to that subtype (equivalent to switching over an enum).
The difference lies in which approach is more common — either dynamic dispatch through the common interface for protocols and classes, or switching for enums — and also in the particular capabilities and limitations the constructs have. For example, the list of cases of an enum is fixed and can’t be extended retroactively, whereas you can always conform one more type to a protocol or add another subclass (though subclassing across module boundaries is restricted unless you explicitly declare a class as open). Whether this freedom is desirable or even required depends on the problem to be solved. As value types, enums are also generally more lightweight and better suited for modeling “plain old values.”
There’s a neat correspondence between the two categories of types (“or” and “and”) and the mathematical concepts of addition and multiplication. Knowing about it isn’t essential to be a good Swift programmer, but we find it a helpful line of thinking when designing custom types.
There are many possible definitions for the term “type.” Here’s one: a type is the set of all possible values, or inhabitants, its instances can assume. Bool has two inhabitants, false and true. UInt8 has 28 (256) inhabitants. Int64 has 264 (about 18.4 quintillion) inhabitants. Types such as String have infinitely many inhabitants — you can always create another string by adding one more character (at least until you’ve filled up your computer’s memory).
Now consider a tuple of two Boolean fields: (Bool, Bool). How many inhabitants does this type have? The answer is four: (false, false), (true, false), (false, true), and (true, true). It’s impossible to construct any other value of this type except these four. What if we add another Bool, making it (Bool, Bool, Bool)? The number of inhabitants doubles to eight since each of the previous four inhabitants can be combined with false and true, respectively. This works not only with Bools, of course. A (Bool, UInt8) pair has 2 × 256 = 512 inhabitants because each of the 256 UInt8 inhabitants can be paired with one of the two Boolean values.
Generally speaking, the number of inhabitants of a tuple (or struct, or class) is equal to the product of the inhabitants of its members. For this reason, structs, classes, and tuples are also called product types.
Compare this to enums. Here’s an enum with three cases:
enum PrimaryColor {
    case red
    case yellow
    case blue
}
This type has three inhabitants — one per case. It’s impossible to construct any other PrimaryColor value than .red, .yellow, or .blue. What happens if we add associated values into the mix? Let’s add a fourth case that allows us to specify a grayscale value between 0 (black) and 255 (white):
enum ExtendedColor {
    case red
    case yellow
    case blue
    case gray(brightness: UInt8)
}
The .gray case alone has 256 possible values, resulting in 3 + 256 = 259 inhabitants for the entire enum. Generally speaking, the number of inhabitants of an enum is equal to the sum of the inhabitants of its cases. This is why enums are also called sum types.
Adding a field to a struct multiplies the number of possible states, often enormously. Adding a case to an enum only adds one additional inhabitant (or, if the case has an associated value, it adds the payload’s inhabitants). This is a useful property for writing safe code, and the Designing with Enums section later in this chapter covers how to take advantage of this property in our code.
Strings
All modern programming languages have support for Unicode strings, but that often only means that the native string type can store Unicode data — it’s not a promise that simple operations, like getting the length of a string, will return “sensible” results. In fact, most languages, and in turn, most string manipulation code written in those languages, exhibit a certain level of denial about Unicode’s inherent complexity. This can lead to some unpleasant bugs.
Swift’s string implementation goes to heroic efforts to be as Unicode-correct as possible. A String in Swift is a collection of Character values, where a Character is what a human reader of a text would perceive as a single character, regardless of how many Unicode scalars it’s composed of. As a result, all standard Collection operations — like count or prefix(5) — work on the level of user-perceived characters.
This is great for correctness, but it comes at a price, mostly in terms of unfamiliarity; if you’re used to manipulating strings with integer indices in other languages, Swift’s design will seem unwieldy at first, leaving you wondering: Why can’t I write str[999] to access a string’s one-thousandth character? Why doesn’t str[idx+1] get the next character? Why can’t I loop over a range of Character values such as "a"..."z"? It also has performance implications: String does not support random access, i.e. jumping to an arbitrary character isn’t an O(1) operation. It can’t be — when characters have variable width, the string doesn’t know where the nth character is stored without looking at all the characters that come before it.
In this chapter, we’ll discuss the string architecture in detail, along with some techniques for getting the most out of Swift strings in terms of functionality and performance. But we’ll start with an overview of the required Unicode terminology.
Unicode
Things used to be so simple. ASCII strings were a sequence of integers between 0 and 127. If you stored them in an 8-bit byte, you even had a bit to spare! Since every character was of a fixed size, ASCII strings could be random access.
But ASCII wasn’t enough if you were writing in anything other than English or for a non-U.S. audience; other countries and languages needed other characters (even English-speaking Britain needed a £ sign). Most of them needed more characters than would fit into seven bits. ISO 8859 takes the extra bit and defines 16 different encodings above the ASCII range, such as Part 1 (ISO 8859-1, aka Latin-1), covering several Western European languages; and Part 5, covering languages that use the Cyrillic alphabet.
This is still limiting, though: if you want to use ISO 8859 to write in Turkish about Ancient Greek, you’re out of luck, since you’d need to pick either Part 7 (Latin/Greek) or Part 9 (Turkish). And eight bits is still not enough to encode many languages. For example, Part 6 (Latin/Arabic) doesn’t include the characters needed to write Arabic-script languages such as Urdu or Persian. Meanwhile, Vietnamese — which is based on the Latin alphabet but with a large number of diacritic combinations — only fits into eight bits by replacing a handful of ASCII characters from the lower half. And this isn’t even an option for other East Asian languages.
When you run out of room with a fixed-width encoding, you have a choice: either increase the size, or switch to variable-width encoding. Initially, Unicode was defined as a 2-byte fixed-width format, now called UCS-2. This was before reality set in and it was accepted that even two bytes (i.e. ~65,000 code points) wouldn’t be sufficient, while four would be horribly inefficient for most purposes. So today, Unicode is a variable-width format, and it’s variable in two different senses:
A single character (also known as an extended grapheme cluster) consists of one or more Unicode scalars.
A scalar is encoded by one or more code units.
To understand why, we need to clarify what these terms mean.
The basic building block of Unicode is the code point: an integer value in the Unicode code space, which ranges from 0 to 0x10FFFF (in decimal notation: 1,114,111). Every character or other unit of script that’s part of Unicode is assigned a unique code point. In Unicode 14 (published in September 2021), only about 145,000 of the 1.1 million available code points are currently in use, so there’s a lot of room for more emoji. Code points are commonly written in hex notation with a “U+” prefix. For example, the euro sign is at code point U+20AC (or 8364 in decimal).
Unicode scalars are almost, but not quite, the same as code points. They’re all the code points except the 2,048 surrogate code points in the range 0xD800 to 0xDFFF (which are used by the UTF-16 encoding to represent code points greater than 65,535). Scalars are represented in Swift string literals as "\u{xxxx}", where xxxx represents hex digits. So the euro sign can be written in Swift as either "€" or "\u{20AC}". The corresponding Swift type is Unicode.Scalar, which is a wrapper around a UInt32 value.
The same Unicode data (i.e. a sequence of scalars) can be encoded with different encodings, with UTF-8 and UTF-16 being the most common ones. The smallest entity in an encoding is called a code unit. The UTF-8 encoding has 8-bit-wide code units, and UTF-16 has 16-bit-wide code units. UTF-8 has the added benefit of being backward compatible with 8-bit ASCII — a feature that’s helped it overtake ASCII as the most popular encoding on the web and in file formats. Code units are different from code points or scalars because a single scalar is often encoded with multiple code units. Since there are more than a million potential code points, UTF-8 takes one to four code units (one to four bytes) to encode a single scalar, whereas UTF-16 takes either one or two code units (two or four bytes). Swift represents UTF-8 and UTF-16 code units as UInt8 and UInt16 values, respectively (aliased as Unicode.UTF8.CodeUnit and Unicode.UTF16.CodeUnit).
To represent each scalar by a single code unit, you’d need a 21-bit encoding scheme, which usually gets rounded up to 32-bit and is called UTF-32. This is what Unicode.Scalar does in Swift. But even that wouldn’t get you a fixed-width encoding: Unicode is still a variable-width format when it comes to “characters.” What a user might consider “a single character” — as displayed on the screen — might require multiple scalars composed together. The Unicode term for such a user-perceived character is an (extended) grapheme cluster.
The rules for how scalars form grapheme clusters determine how text is segmented. For example, if you hit the backspace key on your keyboard, you expect your text editor to delete exactly one grapheme cluster, even if that “character” is composed of multiple Unicode scalars, each of which may use a varying number of code units in the text’s representation in memory. Grapheme clusters are represented in Swift by the Character type, which can encode an arbitrary number of scalars, as long as they form a single user-perceived character.
The following diagram shows three different views of the string “AB⃣•😛”. Depending on how you look at it, the string is made up of four Characters, five Unicode scalars, or twelve UTF-8 code units:

We’ll see more examples, as well as how Swift deals with the arising complexity, in the next section.
Grapheme Clusters and Canonical Equivalence
Combining Marks
A quick way to see how String handles Unicode data is to look at the two different ways to write é. Unicode defines U+00E9, Latin small letter e with acute, as a single value. But you can also write it as the plain letter e, followed by U+0301, combining acute accent. In both cases, what’s displayed is é, and users have the expectation that two strings displayed as “résumé” would not only be equal to each other but also have a “length” of six characters, no matter which technique was used to produce the é in either one. They’d be what the Unicode specification describes as canonically equivalent.
And in Swift, this is exactly the behavior you get:
let single = "Pok\u{00E9}mon" // Pokémon
let double = "Poke\u{0301}mon" // Pokémon
They both display identically:
(single, double) // ("Pokémon", "Pokémon")
And both have the same character count:
single.count // 7
double.count // 7
Consequently, they also compare equal:
single == double // true
Only if you drop down to a view of the underlying representation can you see that they’re different:
single.unicodeScalars.count // 7
double.unicodeScalars.count // 8
Compare this with NSString in Foundation: the two strings aren’t equal, and the length property — which many Objective-C programmers probably use to count the number of characters to be displayed on the screen — gives different results:
let nssingle = single as NSString
nssingle.length // 7
let nsdouble = double as NSString
nsdouble.length // 8
nssingle == nsdouble // false
Here, == is defined as the version for comparing two NSObjects:
extension NSObject: Equatable {
    static func ==(lhs: NSObject, rhs: NSObject) -> Bool {
        return lhs.isEqual(rhs)
    }
}
In the case of NSString, == will do a literal comparison on the level of UTF-16 code units rather than one accounting for equivalent but differently composed characters. Most string APIs in other languages work this way too. If you really want to perform a canonical comparison of two NSStrings, you must use NSString.compare(_:).
Of course, there’s one big benefit to just comparing code units: it’s faster! This is an effect that can still be achieved with Swift strings via the utf8 view:
single.utf8.elementsEqual(double.utf8) // false
Why does Unicode support multiple representations of the same character at all? The existence of precomposed characters is what enables the opening range of Unicode code points to be compatible with Latin-1, which already had characters like é and ñ. While they might be a pain to deal with, it makes conversion between the two encodings quick and simple.
And ditching precomposed forms wouldn’t have helped anyway, because composition doesn’t just stop at pairs; you can compose more than one diacritic together. For example, Yoruba has the character ọ́, which could be written three different ways: by composing ó with a dot, or by composing ọ with an acute, or by composing o with both an acute and a dot. And for that last one, the two diacritics can be in either order! So these are all equal:
let chars: [Character] = [
    "\u{1ECD}\u{300}",      // ọ́
    "\u{F2}\u{323}",        // ọ́
    "\u{6F}\u{323}\u{300}", // ọ́
    "\u{6F}\u{300}\u{323}"  // ọ́
]
let allEqual = chars.dropFirst().allSatisfy { $0 == chars.first } // true
In fact, some diacritics can be added ad infinitum. A famous internet meme illustrates this nicely:
let zalgo = "s̼̐͗͜o̠̦̤ͯͥ̒ͫ́ͅo̺̪͖̗̽ͩ̃͟ͅn̢͔͖͇͇͉̫̰ͪ͑"

zalgo.count // 4
zalgo.utf8.count // 68
In the above, zalgo.count (correctly) returns 4, while zalgo.utf8.count returns 68. And if your code doesn’t work correctly with internet memes, then what good is it, really?
Unicode’s grapheme-breaking rules even affect you when all strings you deal with are pure ASCII: CR+LF, the character pair of carriage return and line feed that’s commonly used as a line break on Windows, is a single grapheme:
// CR+LF is a single Character.
let crlf = "\r\n"
crlf.count // 1
Emoji
Strings containing emoji can also be surprising in various other programming languages. Many emoji are assigned Unicode scalars that don’t fit in a single UTF-16 code unit. Languages that represent strings as collections of UTF-16 code units, such as Java or C#, would say that the string "😂" is two “characters” long. Swift handles this case correctly:
let oneEmoji = "😂" // U+1F602
oneEmoji.count // 1
Notice that the important thing is how the string is exposed to the program, and not how it’s stored in memory. Swift uses UTF-8 as its internal encoding, but that’s an implementation detail. The public API is based on grapheme clusters.
Other emoji are composed of multiple scalars. An emoji flag is a combination of two regional indicator symbols that correspond to an ISO country code. Swift treats the flag correctly as one Character:
let flags = "🇧🇷🇳🇿"
flags.count // 2
To inspect the Unicode scalars a string is composed of, use the unicodeScalars view. Here, we format the scalar values as hex numbers in the common format for code points:
flags.unicodeScalars.map {
    "U+\(String($0.value, radix: 16, uppercase: true))"
}
// ["U+1F1E7", "U+1F1F7", "U+1F1F3", "U+1F1FF"]
Skin tones combine a base character such as 👧 with one of five skin tone modifiers (e.g. 🏽, or the type-4 skin tone modifier) to yield the final emoji (👧🏽). Again, Swift handles this correctly:
let skinTone = "👧🏽" // 👧 + 🏽
skinTone.count // 1
Emoji depicting families and couples, such as 👨👩👧👦 and 👩❤️👩, present another challenge to the Unicode standards body. Due to the countless possible combinations of gender and the number of people in a group, providing a separate code point for each variation is problematic. Combine this with a distinct skin tone for each person and it becomes impossible. Unicode solves this by specifying that these emoji are actually sequences of multiple emoji combined with the invisible zero-width joiner (ZWJ) character (U+200D). So the family 👨👩👧👦 is really man 👨 + ZWJ + woman 👩 + ZWJ + girl 👧 + ZWJ + boy 👦. The ZWJ serves as an indicator to the operating system that it should use a single glyph if available.
You can verify that this is really what’s going on:
let family1 = "👨👩👧👦"
let family2 = "👨\u{200D}👩\u{200D}👧\u{200D}👦"
family1 == family2 // true
And once again, Swift is smart enough to treat such a sequence as a single Character:
family1.count // 1
family2.count // 1
Emoji for professions are ZWJ sequences too. For example, the female firefighter 👩🚒 is composed of woman 👩 + ZWJ + fire engine 🚒, and the male health worker 👨⚕️ is a sequence of man 👨 + ZWJ + staff of Aesculapius ⚕.
Rendering these sequences into a single glyph is the task of the operating system. On Apple platforms in 2022, the OS includes glyphs for the subset of sequences the Unicode standard lists as “recommended for general interchange” (RGI), i.e. the ones “most likely to be widely supported across multiple platforms.” When no glyph is available for a syntactically valid sequence, the text-rendering system falls back to rendering each component as a separate glyph. Notice that this can cause a mismatch “in the other direction” between user-perceived characters and what Swift sees as a grapheme cluster; all examples up until now were concerned with programming languages overcounting characters, but here we see the reverse. As an example, family sequences containing skin tones are currently not part of the RGI subset. But even if the operating system renders such a sequence as multiple glyphs, Swift still counts it as a single Character because the Unicode text segmentation rules aren’t concerned with rendering:
// Family with skin tones is rendered as multiple glyphs
// on most platforms in 2022.
let family3 = "👱🏾\u{200D}👩🏽\u{200D}👧🏿\u{200D}👦🏻"
// But Swift still counts it as a single Character.
family3.count // 1
No matter how carefully a string API is designed, text is so complicated that it may never catch all edge cases.
Swift uses the grapheme-breaking algorithm of the operating system’s ICU library. As a result, your programs will automatically adopt new Unicode rules as users update their OSes. This means you can’t rely on users seeing the same behavior you see during development. For example, when you deploy server-side Swift code on Linux, the code might behave differently because the Linux distribution might ship with a different ICU version than your development machine does.
In the examples we discussed in this section, we treated the length of a string as a proxy for all sorts of things that can go wrong when a language doesn’t take the full complexity of Unicode into account. Just think of the gibberish a simple task such as reversing a string containing composed character sequences can produce in a programming language that doesn’t process strings by grapheme clusters. This isn’t a new problem, but the emoji explosion has made it much more likely that bugs caused by sloppy text handling will come to the surface, even if you have a predominantly English-speaking user base. And the magnitude of errors has increased as well: whereas a decade ago, a botched accented character would cause an off-by-one error, messing up a modern emoji can easily cause results to be off by 10 or more “characters.” For example, a four-person family emoji is 11 (UTF-16) or 25 (UTF-8) code units long:
family1.count // 1
family1.utf16.count // 11
family1.utf8.count // 25
It’s not that other languages don’t have Unicode-correct APIs at all — most do. For instance, NSString has the enumerateSubstrings method that can be used to walk through a string by grapheme clusters. But defaults matter, and Swift’s priority is to do the correct thing by default. And if you ever need to drop down to a lower level of abstraction, String provides views that let you operate directly on Unicode scalars or code units. We’ll say more about those below.
Strings and Collections
As we’ve seen, String is a collection of Character values. In Swift’s first three years of existence, String went back and forth between conforming and not conforming to the Collection protocol. The argument for not adding the conformance was that programmers would expect all generic collection-processing algorithms to be completely safe and Unicode-correct, which wouldn’t necessarily be true for all edge cases.
As a simple example, you might assume that if you concatenate two collections, the resulting collection’s length would be the sum of the lengths of the two source collections. But this doesn’t hold for strings if a suffix of the first string forms a grapheme cluster with a prefix of the second string:
let flagLetterJ = "🇯"
let flagLetterP = "🇵"
let flag = flagLetterJ + flagLetterP // 🇯🇵
flag.count // 1
flag.count == flagLetterJ.count + flagLetterP.count // false
To this end, String itself wasn’t made a Collection in Swift 2 and 3; rather, a collection-of-characters view was moved to a property, characters, which put it on a footing similar to the other collection views: unicodeScalars, utf8, and utf16. Picking a specific view prompted you to acknowledge you were moving into a collection-processing mode and that you should consider the consequences of the algorithm you were about to run.
In practice, the gain in correctness for a few edge cases that are rarely relevant in real code (unless you’re writing a text editor) turned out to not be worth the loss in usability and learnability caused by this change. So String was made a Collection again in Swift 4.
Bidirectional, Not Random Access
However, for reasons that should be clear from the examples we’ve seen so far in this chapter, String is not a random-access collection. How could it be, when knowing where the nth character of a particular string is involves evaluating just how many Unicode scalars precede that character? For this reason, String conforms only to BidirectionalCollection. You can start at either end of the string, moving forward or backward, and the code will look at the composition of the adjacent characters and skip over the correct number of bytes. However, you need to iterate up and down one character at a time.
Keep the performance implications of this in mind when writing string-processing code. Algorithms that depend on random access to maintain their performance guarantees aren’t a good match for Unicode strings. Consider this String extension for generating a list of a string’s prefixes, which works by generating an integer range from zero to the string’s length and then mapping over the range to create the prefix for each length:
extension String {
    var allPrefixes1: [Substring] {
        return (0...count).map(prefix)
    }
}

let hello = "Hello"
hello.allPrefixes1 // ["", "H", "He", "Hel", "Hell", "Hello"]
As simple as this code looks, it’s very inefficient. It first walks over the string once to calculate the length, which is fine. But then, each of the n + 1 calls to prefix is another O(n) operation, because prefix always starts at the beginning and has to work its way through the string to count the desired number of characters. Running a linear process inside another linear loop means this algorithm is accidentally O(n2) — as the length of the string increases, the time this algorithm takes increases quadratically.
If possible, an efficient string algorithm should walk over a string only once and then operate on string indices to denote the substrings it’s interested in. Here’s a better version of the same algorithm:
extension String {
    var allPrefixes2: [Substring] {
        return [""] + indices.map { index in self[...index] }
    }
}

hello.allPrefixes2 // ["", "H", "He", "Hel", "Hell", "Hello"]
This code also has to iterate over the string once to generate the indices collection. But once that’s done, the subscripting operation inside map is O(1). This makes the whole algorithm O(n).
Range-Replaceable, Not Mutable
String also conforms to RangeReplaceableCollection. Here’s an example of how you’d replace part of a string by first identifying the appropriate range in terms of string indices and then calling replaceSubrange. The replacement string can have a different length or could even be empty (which would be equivalent to calling removeSubrange):
var greeting = "Hello, world!"
if let comma = greeting.firstIndex(of: ",") {
    greeting[..<comma] // Hello
    greeting.replaceSubrange(comma..., with: " again.")
}
greeting // Hello again.
As always, keep in mind that results may be surprising if parts of the replacement string form new grapheme clusters with adjacent characters in the original string.
One collection-like feature that strings do not provide is that of MutableCollection. This protocol adds one feature to a collection — that of the single-element subscript set — in addition to get. This isn’t to say strings aren’t mutable — as we just saw, they have several mutation methods. But what you can’t do is replace a single character using the subscript operator. The reason comes back to variable-length characters. Most people can probably intuit that a single-element subscript update would happen in constant time, as it does for Array. But since a character in a string may be of variable width, updating a single character could take linear time in proportion to the length of the string: changing the width of a single element would require shuffling all the later elements up or down in memory. Moreover, indices that come after the replaced index would become invalid through the shuffling, which is equally unintuitive. For these reasons, you have to use replaceSubrange, even if the range you pass in is only a single character.
String Indices
Most programming languages use integers for subscripting strings, e.g. str[5] would return the sixth “character” of str (for whatever that language’s idea of a “character” is). Swift doesn’t allow this. Why? The answer should sound familiar to you by now: subscripting is supposed to take constant time (intuitively, as well as per the requirements of the Collection protocol), and looking up the nth Character is impossible without looking at all the bytes that come before it.
String.Index, which is the index type used by String and its views, is an opaque value that essentially stores a byte offset into the string’s in-memory representation (usually UTF-8). It’s still an O(n) operation if you want to compute the index for the nth character and have to start at the beginning of the string, but once you have a valid index, subscripting the string with it will only take O(1) time. And crucially, finding the next index after an existing index is also fast because you can start at the existing index’s byte offset — you don’t need to go back to the beginning again. This is why iterating over the characters in a string in order (forward or backward) is efficient.
String index manipulation is based on the same Collection APIs you’d use with any other collection. It’s easy to miss this equivalence since the collections we use the most — arrays — use integer indices, and we usually use simple arithmetic to manipulate those. The index(after:) method returns the index of the next character:
let s = "abcdef"
let second = s.index(after: s.startIndex)
s[second] // b
You can automate iterating over multiple characters in one go via the index(_:offsetBy:) method:
// Advance 4 more characters.
let sixth = s.index(second, offsetBy: 4)
s[sixth] // f
If there’s a risk of advancing past the end of the string, you can add a limitedBy: parameter. The method returns nil if it hits the limit before reaching the target index:
let safeIdx = s.index(s.startIndex, offsetBy: 400, limitedBy: s.endIndex)
safeIdx // nil
This is undoubtedly more code than simple integer indices would require, but again, that’s the point. If Swift allowed integer subscripting of strings, the temptation to accidentally write horribly inefficient code (e.g. by using integer subscripting inside a loop) would be too big.
Nevertheless, to someone used to dealing with fixed-width characters, working with strings in Swift seems challenging at first — how will you navigate without integer indices? And indeed, some seemingly simple tasks, like extracting the first four characters of a string, can turn into monstrosities like this one:
s[..<s.index(s.startIndex, offsetBy: 4)] // abcd
But thankfully, being able to access the string via the Collection interface also means you have several helpful techniques at your disposal. Most of the methods that operate on Array also work on String. Using the prefix method, the same thing looks much clearer:
s.prefix(4) // abcd
(Note that both expressions return a Substring; you can convert it back into a String by wrapping it in a String.init. We’ll talk more about substrings in the next section.)
As a slightly more complex example, extracting the month from a date string can be accomplished entirely without performing any subscripting operations on the string:
let date = "2019-09-01"
date.split(separator: "-")[1] // 09
date.dropFirst(5).prefix(2) // 09
For finding a specific character, you can use firstIndex(of:):
var hello = "Hello!"
if let idx = hello.firstIndex(of: "!") {
    hello.insert(contentsOf: ", world", at: idx)
}
hello // Hello, world!
The insert(contentsOf:at:) method inserts another collection of the same element type (e.g. Character for strings) before a given index. This doesn’t have to be another String; you could insert an array of characters into a string just as easily.
Having established that opaque indices are the way to work with strings, the Swift team recognizes there are valid use cases where you just want to do the “easy” thing. To that end, they proposed adding a subscripting syntax for integer offsets to all collection types, and not just strings. The core team ultimately returned the proposal for revision to incorporate feedback that came up during the review, but this revision never happened, perhaps because other things were more pressing.
String Parsing
Of course, there are also tasks that cannot be accomplished just by using the Collection APIs on a string: parsing a CSV file is a good example of this. We can’t naively split a line on comma characters, because commas can also appear within values that are wrapped in quotes. To solve tasks like this, we can iterate over the string, character by character, while keeping track of some state. Essentially, we’re writing a very simple parser:
func parse(csv: String) -> [[String]] {
    var result: [[String]] = [[]]
    var currentField = ""
    var inQuotes = false
    for c in csv {
        switch (c, inQuotes) {
        // ...
        }
    }
    return result
}
First, we create a result as an array of arrays of strings. Each line is represented by an array of strings, and the CSV string can contain many lines. The currentField variable acts as a buffer to collect the characters of one field while we iterate over the string. Finally, the inQuotes Boolean keeps track of whether or not we’re currently within a quoted string. It’s the only piece of state we need for this simple parser.
Now we have to fill in the cases for the switch statement:
(",", false)— a comma outside of quotes ends the current field("\n", false)— a newline outside of quotes ends the current line("\"", _)— a quote toggles theinQuotesBooleandefault— in all other cases, we append the current character tocurrentField
func parse(csv: String) -> [[String]] {
    // ...
    for c in csv {
        switch (c, inQuotes) {
        case (",", false):
            result[result.endIndex-1].append(currentField)
            currentField.removeAll()
        case ("\n", false):
            result[result.endIndex-1].append(currentField)
            currentField.removeAll()
            result.append([])
        case ("\"", _):
            inQuotes = !inQuotes
        default:
            currentField.append(c)
        }
    }
    result[result.endIndex-1].append(currentField)
    return result
}
(We’re creating a temporary tuple to switch over two values at once. You may remember this technique from the Enums chapter.)
After the for loop, we still have to append currentField one last time before returning the result, because the CSV string might not end on a newline.
Let’s try the CSV parser with an example:
let csv = #"""
    "Values in quotes","can contain , characters"
    "Values without quotes work as well:",42
    """#

parse(csv: csv)
/*
[["Values in quotes", "can contain , characters"],
 ["Values without quotes work as well:", "42"]]
*/
The string literal above is using the extended delimiters syntax (enclosing the string literal in
#characters), which allows us to write quotes within the string literal without having to escape them.
Being able to write small parsers like this one significantly enhances your string-handling skills. In this way, tasks that are difficult or impossible to accomplish with Collection APIs or even regular expressions often become easier to write and read.
The CSV parser above isn’t complete, but it’s already useful. It’s short because we don’t have to track a lot of state; there’s just a single Boolean variable. With a bit of extra work, we could ignore empty lines, ignore whitespace around quoted fields, and support escaping of quotes within quoted fields (by using two quote characters). Instead of using a single Boolean for tracking the parser’s state, we’d then use an enum to distinguish all possible states unambiguously.
However, the more state we add to the parser, the easier it becomes to make mistakes in its implementation. Therefore, this approach of parsing within a single loop is only advisable for small parsers. If we have to keep track of more state, we’d have to change the strategy from writing everything in a single loop to breaking the parser up into multiple functions.
Substrings
Like all collections, String has a specific slice, or SubSequence type, named Substring. A substring is much like an ArraySlice: it’s a view of a base string with different start and end indices. Substrings share the text storage of their base strings. This has the huge benefit that slicing a string is an inexpensive operation. Creating the firstWord variable in the following example requires no expensive copies or memory allocation:
let sentence = "The quick brown fox jumped over the lazy dog."
let firstSpace = sentence.firstIndex(of: " ") ?? sentence.endIndex
let firstWord = sentence[..<firstSpace] // The
type(of: firstWord) // Substring
Slicing being cheap is especially important in loops where you iterate over the entire (potentially long) string to extract its components. Tasks like finding all occurrences of a word in a text, or parsing CSV data, like we did above, come to mind. A useful string processing operation in this context is splitting. The split method is defined on Collection and returns an array of subsequences (i.e. [Substring]). Its most common variant is defined like so:
extension Collection where Element: Equatable {
    public func split(separator: Element, maxSplits: Int = Int.max,
        omittingEmptySubsequences: Bool = true) -> [SubSequence]
}
You can use it like this:
let poem = """
    Over the wintry
    forest, winds howl in rage
    with no leaves to blow.
    """
let lines = poem.split(separator: "\n")
// ["Over the wintry", "forest, winds howl in rage", "with no leaves to blow."]
type(of: lines) // Array<Substring>
This can serve a function similar to the components(separatedBy:) method String inherits from NSString, with added configurations for whether or not to drop empty components. Again, no copies of the input string are made. And since there’s another variant of split that takes a closure, it can do more than just compare characters. Here’s an example of a primitive word wrap algorithm, where the closure captures a count of the length of the line thus far:
extension String {
    func wrapped(after maxLength: Int = 70) -> String {
        var lineLength = 0
        let lines = self.split(omittingEmptySubsequences: false) { character in
            if character.isWhitespace && lineLength >= maxLength {
                lineLength = 0
                return true
            } else {
                lineLength += 1
                return false
            }
        }
        return lines.joined(separator: "\n")
    }
}

sentence.wrapped(after: 15)
/*
 The quick brown
 fox jumped over
 the lazy dog.
*/
Or, consider writing a version that takes a sequence of multiple separators:
extension Collection where Element: Equatable {
    func split<S: Sequence>(separators: S) -> [SubSequence]
        where Element == S.Element
    {
        return split { separators.contains($0) }
    }
}
This way, you can write the following:
"Hello, world!".split(separators: ",! ") // ["Hello", "world"]
StringProtocol
Substring has almost the same interface as String. This is achieved through a common protocol named StringProtocol, which both types conform to. Since almost the entire string API is defined on StringProtocol, you can mostly work with a Substring as you would with a String. At some point, though, you’ll have to turn your substrings back into String instances; like all slices, substrings are only intended for short-term storage so as to avoid expensive copies during an operation. When the operation is complete and you want to store the results or pass them on to another subsystem, you should create a new String. You can do this by initializing a String with a Substring, as we do in this example:
func lastWord(in input: String) -> String? {
    // Process the input, working on substrings.
    let words = input.split(separators: [",", " "])
    guard let lastWord = words.last else { return nil }
    // Convert to String for return.
    return String(lastWord)
}

lastWord(in: "one, two, three, four, five") // Optional("five")
The rationale for discouraging long-term storage of substrings is that a substring always holds on to the entire original string. A substring representing a single character of a huge string will hold the entire string in memory, even after the original string’s lifetime would normally have ended. Long-term storage of substrings would therefore effectively cause memory leaks because the original strings have to be kept in memory even when they’re no longer accessible.
By working with substrings during an operation and only creating new strings at the end, we defer copies until the last moment and make sure to only incur the cost of those copies that are actually necessary. In the example above, we split the entire (potentially long) string into substrings, but we only pay the cost for a single copy of one short substring at the end. (Ignore for a moment that this algorithm isn’t efficient anyway; iterating backward from the end until we find the first separator would be the better approach.)
Encountering a function that only accepts a Substring when you want to pass a String is less common — most functions should take either a String or any StringProtocol-conforming type. But if you do need to pass a Substring, the quickest way is to subscript the string with the range operator ... without specifying any bounds:
// Substring that encompasses the entire string.
let substring = sentence[...]
You may be tempted to take full advantage of the existence of StringProtocol and convert all your APIs to take StringProtocol instances rather than plain Strings. But the advice of the Swift team is not to do that:
Our general advice is to stick with
String. Most APIs would be simpler and clearer just usingStringrather than being made generic (which itself can come at a cost), and user conversion on the way in on the few occasions that’s needed isn’t much of a burden.
APIs that are extremely likely to be used with substrings, and at the same time aren’t further generalizable to the Sequence or Collection level, are an exception to this rule. An example of this in the standard library is the joined method. The standard library provides an overload for sequences with StringProtocol-conforming elements:
extension Sequence where Element: StringProtocol {
    /// Returns a new string by concatenating the elements of the sequence,
    /// adding the given separator between each element.
    public func joined(separator: String = "") -> String
}
This lets you call joined directly on an array of substrings (which you got from a call to split, for example) without having to map over the array and copy every substring into a new string. This is more convenient and much faster.
The number-type initializers that take a string and convert it into a number also take StringProtocol values. Again, this is especially handy if you want to process an array of substrings:
let commaSeparatedNumbers = "1,2,3,4,5"
let numbers = commaSeparatedNumbers.split(separator: ",")
    .compactMap { Int($0) }
numbers // [1, 2, 3, 4, 5]
Since substrings are intended to be short-lived, it’s generally not advisable to return one from a function unless you’re dealing with Sequence or Collection APIs that return slices. If you write a similar function that only makes sense for strings, having it return a substring tells readers it doesn’t make a copy. However, functions that create new strings requiring memory allocations, such as uppercased(), should always return String instances.
If you want to extend String with new functionality, placing the extension on StringProtocol is a good idea to keep the API surface between String and Substring consistent. StringProtocol is explicitly designed to be used whenever you would’ve previously extended String. If you want to move existing extensions from String to StringProtocol, the only change you should have to make is to replace any passing of self into an API that takes a concrete String with String(self).
Keep in mind, though, that StringProtocol isn’t intended as a conformance target for your own custom string types. The documentation explicitly warns against it:
Do not declare new conformances to
StringProtocol. Only theStringandSubstringtypes of the standard library are valid conforming types.
Generics
Generic programming is a technique for writing reusable code while maintaining type safety. For example, the standard library uses generic programming to make the sort method take a custom comparator function while making sure the types of the comparator’s parameters match up with the element type of the sequence being sorted. Likewise, an array is generic over the kind of elements it contains in order to provide a type-safe API for accessing and mutating the array’s contents.
When we talk about generic programming in Swift, we usually mean programming with generics (signified by angle brackets in Swift’s syntax, e.g. Array<Int>). However, it’s helpful to see the broader context in which generics exist. Generics are a form of polymorphism. Polymorphism means using a single interface or name that works with multiple types.
There are at least four different concepts that can all be grouped under polymorphic programming:
We can define multiple functions with the same name but different types. For example, in the Functions chapter, we defined three different functions named
sortDescriptor, all of which had different parameter types. This is called overloading, or more technically, ad hoc polymorphism.When a function or method expects a class
C, we can also pass in a subclass ofC. This is called subtype polymorphism.When a function has a generic parameter (in angle brackets), we call it a generic function (and likewise for generic types). This is called parametric polymorphism. The generic parameters are also called generics.
We can define protocols and make multiple types conform to them. This is another (more structured) form of ad hoc polymorphism, which we’ll discuss in the Protocols chapter.
Which concept is used to solve a particular problem is often a matter of taste. In this chapter, we’ll talk about the third technique, parametric polymorphism. Generics are often used together with protocols to specify constraints on generic parameters. We’ll see examples of this in the Protocols chapter, but this chapter focuses on just generics.
Generic Types
The most generic function we can write is the identity function, i.e. the function that returns its input unchanged:
func identity<A>(_ value: A) -> A {
    return value
}
The identity function has a single generic parameter: for any A we choose, it has the type (A) -> A. However, the identity function has an unlimited number of concrete types (types with no generic parameters, such as Int, Bool, and String). For example, if we choose A to be Int, the concrete type is (Int) -> Int; if we choose A to be (String -> Bool), then its type is ((String) -> Bool) -> (String) -> Bool; and so on.
Functions and methods aren’t the only generic types. We can also have generic structs, classes, and enums. For example, here’s the definition of Optional:
enum Optional<Wrapped> {
    case none
    case some(Wrapped)
}
We say that Optional is a generic type. When we choose a value for Wrapped, we get a concrete type. For example, Optional<Int> or Optional<UIView> are both concrete types. We can think of Optional (without the angle brackets) as a type constructor: given a concrete type (e.g. Int), it constructs a different concrete type (e.g. Optional<Int>).
When we look at the standard library, we see there are many concrete types, but also many generic types (for example: Array, Dictionary, and Result). The Array type has a single generic parameter, Element. This means we can pick any concrete type and use it to create an array. We can also create our own generic types. For example, here’s an enum that describes a binary tree with values at the nodes:
enum BinaryTree<Element> {
    case leaf
    indirect case node(Element, l: BinaryTree<Element>, r: BinaryTree<Element>)
}
BinaryTree is a generic type with a single generic parameter, Element. To create a concrete type, we have to choose a concrete type for Element. For example, we can pick Int:
let tree: BinaryTree<Int> = .node(5, l: .leaf, r: .leaf)
When we want to turn a generic type into a concrete type, we have to choose exactly one concrete type for each generic parameter. You might already be familiar with this limitation when creating an Array. For example, when we create an empty array, we’re required to provide an explicit type; otherwise, Swift doesn’t know what concrete type to use for its elements:
// Type annotation is required.
var emptyArray: [String] = []
You can put values with different concrete types in an array as long as the array’s element type is a common supertype of all members. For an array of objects, the compiler automatically infers the element type to be their most specific common superclass:
// Type is inferred to be [UIView].
let subviews = [UILabel(), UISwitch()]
In other situations, Swift forces you to explicitly acknowledge that you meant to create an array of Any:
// Type annotation is required.
let multipleTypes: [Any] = [1, "foo", true]
We’ll discuss Any in the section on generic functions.
Protocols
When we work with generic types, we often want to constrain their generic parameters. Protocols allow us to do exactly this. Here are some common examples:
You can use a protocol to build an algorithm that depends on a type being a number (regardless of the concrete numeric type) or a collection. By programming against a protocol, all conforming types receive the new functionality.
You can use a protocol to abstract over different “backends” for your code. You’d do this by programming against a protocol, which is then implemented by different types. For example, a drawing program could use a
Drawableprotocol and be implemented by an SVG renderer and a Core Graphics renderer. Likewise, cross-platform code could use aPlatformprotocol with specific instances for Linux, macOS, and iOS.You can use protocols to make code testable. More specifically, when you write code that uses a protocol rather than a concrete type, you can use different concrete implementations in your production code and in your tests.
A protocol in Swift declares a formal set of requirements. For example, the Equatable protocol requires that a conforming type implements the == operator:
public protocol Equatable {
    static func == (lhs: Self, rhs: Self) -> Bool
}
These requirements can consist of methods, initializers, associated types, properties, and inherited protocols. Most protocols also have additional semantic requirements that can’t be expressed in Swift’s type system. For example, the Collection protocol expects that slices use the same index as the original collection to access a particular element. Semantic requirements can include performance promises, like RandomAccessCollection’s guarantee to be able to jump between indices in constant time. A type must not conform to a protocol unless it satisfies the protocol’s semantics. This is important because algorithms written against the protocol rely on these semantic requirements.
Let’s run through a number Swift’s major protocol features. Throughout the chapter, we’ll discuss each of these features in depth.
Protocols in Swift can provide additional functionality beyond their requirements in extensions. The simplest example is Equatable: it requires the == operator to be implemented, but then it adds the != operator, which uses the definition of ==:
extension Equatable {
    public static func != (lhs: Self, rhs: Self) -> Bool {
        return !(lhs == rhs)
    }
}
Likewise, the Sequence protocol has few requirements (you need to provide a way to make an iterator) but adds a lot of methods through extensions.
Only protocol requirements are dynamically dispatched. That is, when you call a requirement on a variable, the decision of which concrete function is invoked is made at runtime based on the variable’s dynamic type. Protocol extensions that aren’t requirements, however, are always statically dispatched based on the variable’s static type. We’ll see why this distinction is important in the Customizing Protocol Extensions section below.
Protocols can also have conditional extensions to add APIs that require additional constraints. For example, Sequence has a method, max(), that only exists for collections with an Element type that conforms to Comparable:
extension Sequence where Element: Comparable {
    /// Returns the maximum element in the sequence.
    public func max() -> Element? {
        return self.max(by: <)
    }
}
Protocols can inherit from other protocols. For example, Hashable specifies that any types conforming to it must be Equatable as well. Likewise, RangeReplaceableCollection inherits from Collection, which in turn inherits from Sequence. In other words, we can form protocol hierarchies.
Additionally, protocols can be combined. For example, Codable is defined as a type alias that combines Encodable and Decodable. This combination is called a protocol composition.
In some cases, protocol conformances are dependent on other conformances. For example, an array conforms to Equatable if and only if its Element type conforms to Equatable. This is called conditional conformance: the conformance of Array to Equatable is conditional on its elements conforming to Equatable:
extension Array: Equatable where Element: Equatable { … }
Protocols can declare one or more associated types, i.e. placeholders for related types that are then used to define the other requirements for the protocol. A conforming type must specify a concrete type for each associated type. For example, the Sequence protocol defines an associated type, Element, and every type that conforms to Sequence has defined what its Element type is. String’s element type is Character; Data’s is UInt8.
Collection Protocols
We mentioned in the Built-In Collections chapter that Swift’s collection types — like Array, Dictionary, and Set — are implemented on top of a rich set of abstractions for processing sequences of elements. This chapter is all about the Sequence and Collection protocols, which form the cornerstones of this model. We’ll cover how these protocols work, why they work the way they do, and how you can write your own sequences and collections.
To better understand collection protocols, it can help to see them in an inheritance diagram:
Sequenceprovides iteration. It allows you to create an iterator, but there are no guarantees about whether the sequence is single-pass (e.g. reading from standard input) or multi-pass (iterating over an array).CollectionextendsSequence. It guarantees that the sequence is multi-pass, and it allows you to look up elements by their indices. It also adds slicing capabilities via itsSubSequencetype, which is a collection itself.MutableCollectionadds the ability to mutate an element through a subscript in constant time. It does not allow you to add or remove elements.Arrayis aMutableCollection, but notably,Stringis not because it cannot guarantee constant-time mutation, as characters don’t have a fixed width.RangeReplaceableCollectionadds the ability to replace a contiguous range of elements in a collection. By extension, this also adds methods likeappend,remove, and so on. Many mutable collections are range-replaceable as well, but there are exceptions. Most notably,SetandDictionarydon’t conform, but types likeStringandArraydo.BidirectionalCollectionadds the ability to iterate backward through a collection. For example, aDictionarydoesn’t allow reverse iteration and doesn’t conform, but aStringdoes. Backward iteration is critical for some algorithms.RandomAccessCollectionextendsBidirectionalCollectionand adds the ability to compute with indices more efficiently: it requires that measuring the distance between indices and moving indices by a certain distance takes constant time. For example, anArrayis a random-access collection, but aStringis not, because computing the distance between two string indices takes linear time.LazySequenceProtocolmodels a sequence that computes its elements lazily while it’s being iterated. This is mostly useful for writing algorithms in a functional style: you can take an infinite sequence and filter it, and then take the first element, all without incurring the (infinite) cost of computing elements the subsequent code doesn’t need.LazyCollectionProtocolis the same asLazySequenceProtocol, but for collections.
In this chapter, we’ll look at each of these protocols in detail. Keep the protocol hierarchy in mind when you write your own collection algorithms: if you can write an algorithm on one of the protocols toward the root of the hierarchy, more types can take advantage of the algorithm.
Sequences
The Sequence protocol stands at the base of the hierarchy. A sequence is a series of values of the same type that lets you iterate over the values. The most common way to traverse a sequence is a for loop:
for element in someSequence {
    doSomething(with: element)
}
This seemingly simple capability of enumerating elements forms the foundation for a large number of useful operations Sequence provides to adopters of the protocol. We already saw many of them in the previous chapters. Whenever you come up with a common operation that depends on sequential access to a series of values, you should consider implementing it on top of Sequence too.
The requirements of the Sequence protocol are fairly small. All a conforming type must do is provide a makeIterator() method that returns an iterator:
protocol Sequence {
    associatedtype Element
    associatedtype Iterator: IteratorProtocol

    func makeIterator() -> Iterator
    // ...
}
We can learn two things from this (simplified) definition of Sequence: a Sequence has an associated Element type, and it knows how to make an iterator. So let’s first take a closer look at iterators.
Iterators
Sequences provide access to their elements by creating an iterator. The iterator produces the values of the sequence one at a time and keeps track of its own iteration state as it traverses the sequence. The only method defined in IteratorProtocol is next(), which must return the next element in the sequence on each subsequent call, or nil when the sequence is exhausted:
protocol IteratorProtocol {
    associatedtype Element
    mutating func next() -> Element?
}
Most protocols don’t end in
Protocol, but there are a few exceptions in the standard library:[Async]IteratorProtocol,StringProtocol,Keyed[En|De]CodingContainerProtocol, andLazy[Collection|Sequence]Protocol. This is done to avoid name clashes with associated or concrete types that use the suffixless names. The API Design Guidelines suggest that protocols should either be nouns or have a suffix of -able, -ible, or -ing, depending on the protocol’s role.
The associated Element type specifies the type of the values the iterator produces. For example, the element type of the iterator for String is Character. By extension, the iterator also defines its sequence’s element type. This is done through a constraint on Sequence’s associated Iterator type — Iterator.Element == Element ensures that both element types are the same:
protocol Sequence {
    associatedtype Element
    associatedtype Iterator: IteratorProtocol
       where Iterator.Element == Element
    // ...
}
You normally only have to care about iterators when you implement one for a custom sequence type. Other than that, you rarely need to use iterators directly, because a for loop is the idiomatic way to traverse a sequence. In fact, this is how a for loop works under the hood: the compiler creates a fresh iterator for the sequence and repeatedly calls next on that iterator until nil is returned. The for loop example we showed above is essentially shorthand for the following:
var iterator = someSequence.makeIterator()
while let element = iterator.next() {
    doSomething(with: element)
}
Iterators are single-pass constructs; they can only be advanced, and they can never be reversed or reset. To restart iteration, you create a new iterator (in fact, that’s exactly what Sequence allows through makeIterator()). While most iterators will produce a finite number of elements and eventually return nil from next(), nothing stops you from vending an infinite series that never ends. As a matter of fact, the simplest iterator imaginable — short of one that immediately returns nil — is one that just returns the same value over and over again:
struct ConstantIterator: IteratorProtocol {
    typealias Element = Int
    mutating func next() -> Int? {
        1
    }
}
The explicit type alias for Element is optional (but it’s often useful for documentation purposes, especially in larger protocols). If we omit it, the compiler infers the concrete type of Element from the return type of next():
struct ConstantIterator: IteratorProtocol {
    mutating func next() -> Int? {
        1
    }
}
Notice that the next() method is declared as mutating. This isn’t strictly necessary in this simplistic example because our iterator has no mutable state. In practice, though, iterators are inherently stateful. Almost any useful iterator requires mutable state to keep track of its position in the sequence.
We can create a new instance of ConstantIterator and loop over the sequence it produces in a while loop, printing an endless stream of ones:
var iterator = ConstantIterator()
while let x = iterator.next() {
    print(x)
}
Let’s look at a more elaborate example. FibsIterator produces the Fibonacci sequence. It keeps track of the current position in the sequence by storing the upcoming two numbers. The next method then returns the first number and updates the state for the following call. Like the previous example, this iterator also produces an “infinite” stream; it keeps generating numbers until it reaches integer overflow, and then the program crashes:
struct FibsIterator: IteratorProtocol {
    var state = (0, 1)
    mutating func next() -> Int? {
        let upcomingNumber = state.0
        state = (state.1, state.0 + state.1)
        return upcomingNumber
    }
}
Conforming to Sequence
A more useful example of a (finite) sequence would be the sequence of all nodes in an HTML document. In the Enums chapter, we defined an enum to represent HTML nodes:
enum Node: Hashable {
    case text(String)
    indirect case element(
       name: String,
       attributes: [String: String] = [:],
       children: Node = .fragment([]))
    case fragment([Node])
}
Here’s an example of a Node (in the Enums chapter, we also defined a number of helper methods to create nodes, but we’ll omit them here for the sake of brevity):
let header: Node = .element(name: "h1", children: .fragment([
    .text("Hello "),
    .element(name: "em", children: .text("World"))
]))
We can conform our Node type to Sequence by creating a custom iterator. Inside the iterator, we keep track of all the “remaining” nodes. We’ll start by adding the root node of our HTML tree. The iterator always removes and returns the first element in the array of remaining nodes. If that element has any children, it’ll add them to the remaining nodes:
struct NodeIterator: IteratorProtocol {
    var remaining: [Node]

    mutating func next() -> Node? {
        guard !remaining.isEmpty else { return nil }
        let result = remaining.removeFirst()
        switch result {
        case .text(_):
            break
        case .element(name: _, attributes: _, children: let children):
            remaining.append(children)
        case .fragment(let elements):
            remaining.append(contentsOf: elements)
        }
        return result
    }
}
This isn’t the only possible way to iterate over a tree of nodes. This iterator is a breadth-first traversal of the tree, but you could just as well use any other tree traversal algorithm. However, you can only conform
NodetoSequenceonce, so you have to pick the algorithm that makes the most sense.
Conforming Node to Sequence is now as simple as creating the NodeIterator:
extension Node: Sequence {
    func makeIterator() -> NodeIterator {
        NodeIterator(remaining: [self])
    }
}
Just conforming to Sequence makes a lot of useful methods available on Node. For example, we can use contains(where:) to check if the document contains emphasized nodes:
header.contains(where: { node in
     guard case .element(name: "em", _, _) = node else { return false }
     return true
})
// true
Or we can use compactMap to extract all the text from a document:
header.compactMap { node -> String? in
    guard case let .text(t) = node else { return nil }
    return t
}
// ["Hello ", "World"]
There are many other useful operations: we can use Array’s initializer to create an array of all the nodes, allSatisfy to check whether a condition holds for every element, or just a for loop to iterate over all the nodes of a document.
We can create sequences for ConstantIterator and FibsIterator in a similar way. We’re not showing them here, but you may want to try this yourself. Just keep in mind that these iterators create infinite sequences. Use a construct like for i in fibsSequence.prefix(10) to slice off a finite piece.
Concurrency
In Swift 5.5, fundamental concurrency features were added to the language. This allows us to write concurrent code with strong compiler support, making a certain class of bugs impossible.
Async/await is the most prominent change, and it enables us to use Swift’s structured programming techniques, such as the built-in error handling, for asynchronous code as if we were writing synchronous code. Compared to completion handlers, async/await is simpler and easier to reason about.
In this chapter, we’ll load Swift Talk episodes, collections, and related data from the network as an example. We predefined Episode and Collection structs that both conform to Codable and Identifiable. For example, here’s the Episode type:
struct Episode: Identifiable, Codable {
    var id: String
    var poster_url: URL
    var collection: String
    // ...

    static let url = URL(string: "https://talk.objc.io/episodes.json")!
}
Loading the episodes from the network and parsing them as JSON looks like this using async/await:
func loadEpisodes() async throws -> [Episode] {
    let session = URLSession.shared
    let (data, _) = try await session.data(from: Episode.url)
    return try JSONDecoder().decode([Episode].self, from: data)
}
Here’s the same example without async/await, using a completion handler instead:
func loadEpisodesCont(
    _ completion: @escaping (Result<[Episode], Error>) -> ())
{
    let session = URLSession.shared
    let task = session.dataTask(with: Episode.url) { data, _, err in
        completion(Result {
            guard let d = data else {
                throw (err ?? UnknownError())
            }
            return try JSONDecoder().decode([Episode].self, from: d)
        })
    }
    task.resume()
}
Note that in the first example (using async/await), the execution is from top to bottom, just like in normal structured programming. While the data is being loaded from the network, the function is suspended. Meanwhile, in the second example (using completion handlers), the execution branches: one part continues running after resuming the data task, whereas the other part (the body of the completion handler) runs asynchronously when the network request has finished (or failed). Looking at the types of our functions, we can see that the first function returns an array or throws an error. With the completion handler, it’s only by convention that we assume the completion handler will be called exactly once.
A completion handler can also be called a continuation. The name describes the handler’s purpose as the point where execution continues when loadEpisodesCont has finished its work. Likewise, the session.dataTask method doesn’t return the data; rather it calls the provided continuation (in this case, the closure expression). Async/await also uses continuations under the hood. In the above example, the part after await is the continuation.
The concurrency system in Swift is only in its beginnings. More features will be added in the future, and the existing features will be refined and improved. Additionally, some compile-time checks aren’t yet fully implemented. To make sure your code is future-proof, add the following Swift compiler flags:
-Xfrontend -warn-concurrencyand-Xfrontend -enable-actor-data-race-checks. These will give you useful warnings when you use unsafe constructs.
Error Handling
As programmers, we constantly have to deal with things going wrong: the network connection may go down, a file we expected to exist may not be there, and so on. Handling failures well is one of those intangible factors that distinguishes good programs from bad ones, and yet we often tend to see error handling as a subordinate task — something to be added later (and which then often gets cut as a deadline looms).
And we get it: error handling can be messy, and coding for the happy path is usually more fun. Therefore, it’s all the more important that a programming language provides a good model that supports programmers in this task. Here are some of the things Swift’s built-in error handling architecture with throw, try, and catch provides:
Safety — Swift makes it impossible for programmers to ignore errors accidentally.
Conciseness — The code for throwing and catching errors doesn’t overwhelm the code for the happy path.
Universality — A single error throwing and handling mechanism can be used everywhere, including in asynchronous code. The new async/await pattern for asynchronous functions fully supports
throw/try-based error handling. (Before async/await, the common idiom of using callbacks for concurrency didn’t integrate with the language’s native error handling approach at all.)Propagation — An error shouldn’t have to be handled where it occurred, because the logic for recovering from an error is often far removed from the place where the error originated. Swift’s error handling architecture makes it easy to communicate errors up the call stack to the appropriate level. Intermediate functions (functions that call throwing functions, but neither throw nor handle errors themselves) can pass errors through without requiring big syntax changes.
Documentation — The compiler enforces both throwing functions and their call sites to be annotated, making it easy for programmers to see where errors can occur. The type system does not expose which errors a function can throw, though.
We’ll revisit these points throughout the chapter.
Error Categories
The terms “error” and “failure” can mean all sorts of things. Let’s try to come up with some categories of “things that can go wrong,” differentiated by how we commonly handle them in code:
Expected errors — These are failures the programmer expects (or should expect) to happen during normal operation. These include things like network issues (a network connection is never 100 percent reliable), or when a string the user has entered is malformed. We can further segment expected errors by the complexity of the failure reason.
Trivial errors — Some operations have exactly one expected failure condition. For example, when you look up a key in a dictionary, the key is either present (success) or absent (failure). In Swift, we tend to return optionals from functions that have a single clear and commonly used “not found” or “invalid input” error condition. Returning a rich error value wouldn’t give the caller more information than what’s already present in the optional value.
Assuming the failure reason is obvious to the caller, optionals perform well in terms of conciseness (partly thanks to syntactic sugar for optionals), safety (we have to unwrap the value before we can use it), documentation (functions have optional return types), propagation (optional chaining), and universality (optionals are ubiquitous).
Rich errors — Networking and file system operations are examples of tasks that require more substantial error information than “something went wrong.” There are many different things that can fail in these situations, and programmers will regularly want to react differently depending on the type of failure (e.g. a program may want to retry a request when it times out but display an error to the user if a URL doesn’t exist). Errors of this type are the main focus of this chapter.
While most failable standard library APIs return trivial errors (i.e. optionals), the
Codablesystem uses rich errors. Encoding and decoding have many different error conditions, and precise error information is valuable for clients to figure out what went wrong. The methods for encoding and decoding are annotated withthrowsto tell callers to prepare for handling errors.
Unexpected errors — A condition that the programmer didn’t anticipate occurred and that makes it difficult or impossible to continue. This usually means that an assumption the programmer made (“this can never happen”) turned out to be false. Examples where the standard library follows this pattern include accessing an array with an out-of-bounds index, creating a range with an upper bound that’s smaller than the lower bound, integer overflow, and integer division by zero.
The usual way to deal with an unexpected error in Swift is to let the program crash, because continuing with an unknown program state would be unsafe. Moreover, these situations are considered programmer errors that should be caught in testing — it’d be inappropriate to handle them e.g. by displaying an error to the user.
In code, we use assertions (i.e. assert, precondition, or fatalError) to validate our expectations and trap if an assumption doesn’t hold. We looked at these functions in the Optionals chapter. Assertions are a great tool for identifying bugs in your code. Used correctly, they show you at the earliest possible moment when your program is in a state you didn’t expect. They’re also a useful documentation tool: every assert or precondition call makes the author’s (usually implicit) assumptions about program state visible to other readers of the code.
Assertions should never be used to signal expected errors — doing so would make graceful handling of these errors impossible because programs can’t recover from assertions. The opposite — using optionals or throwing functions to point out programmer errors — should also be avoided, because it’s better to catch a wrong assumption at the source than let it permeate through other layers of the program.
Encoding and Decoding
Serializing a program’s internal data structures into some kind of data interchange format and vice versa is one of the most common programming tasks. Swift calls these operations encoding and decoding.
The Codable system (named after its base “protocol,” which is really a type alias) is a standardized design for encoding and decoding data that all custom types can opt into. It’s designed around three central goals:
Universality — It should work with structs, enums, and classes.
Type safety — Interchange formats such as JSON are often weakly typed, whereas your code should work with strongly typed data structures.
Reducing boilerplate — Developers should have to write as little repetitive “adapter code” as possible to let custom types participate in the system. The compiler should generate this code automatically.
Types declare their ability to be (de)serialized by conforming to the Encodable and/or Decodable protocols. Each of these protocols has just one requirement — Encodable defines an encode(to:) method in which a value encodes itself, and Decodable specifies an initializer for creating an instance from serialized data:
/// A type that can encode itself to an external representation.
public protocol Encodable {
    /// Encodes this value into the given encoder.
    public func encode(to encoder: Encoder) throws
}

/// A type that can decode itself from an external representation.
public protocol Decodable {
    /// Creates a new instance by decoding from the given decoder.
    public init(from decoder: Decoder) throws
}
Because most types that adopt one will also adopt the other, the standard library provides the Codable type alias as shorthand for both:
public typealias Codable = Decodable & Encodable
All basic standard library types — including Bool, the number types, and String — are codable out of the box, as are optionals, arrays, dictionaries, sets, and ranges containing codable elements. Furthermore, many common data types used by Apple’s frameworks — including Data, Date, URL, CGPoint, and CGRect — have adopted Codable. Lastly, the Swift compiler can synthesize the conformance to Codable for structs, classes, and enums if the types of their properties or associated values conform to Codable.
The flipside of relying on both the built-in coding capabilities of all these types and the compiler-generated Codable conformance is a lack of control over the serialized data format. The Codable system works best if you’re looking for an easy way to serialize (and deserialize) your data but you don’t have special requirements for how exactly the data has to be represented in its serialized format. If you want to interface with external data formats, e.g. a JSON API you don’t control, Codable can still be a good fit if the format only deviates slightly from Swift’s defaults. If the data format has too many incompatibilities with the defaults of the Codable system, it’s still possible to build your serialization code on top of the Codable architecture, but you’ll have to write a lot of custom encoding and decoding code to make this work.
Below, we’ll first look at how the Codable system can be used for out-of-the-box serialization. Then, we’ll explore how property wrappers can be used to selectively customize the serialized data format. Finally, we’ll look into the encoding and decoding process in depth.
Interoperability
One of Swift’s strengths is the low friction when interoperating with Objective-C and C. Swift can automatically bridge Objective-C types to native Swift types, and it can even bridge with many C types. This allows us to use existing libraries and provide a nice interface on top.
In this chapter, we’ll create a wrapper around the C reference implementation of CommonMark. CommonMark is a formal specification for Markdown, which is a popular syntax for formatting plain text. If you’ve ever written a post on GitHub or Stack Overflow, you’ve probably used Markdown. After this practical example, we’ll take a look at the tools the standard library provides for working with memory, and we’ll see how they can be used to interact with C code.
Wrapping a C Library
Swift’s ability to call into C code allows us to take advantage of the abundance of existing C libraries. C APIs are often clunky, and memory management is tricky, but writing a wrapper around an existing library’s interface in Swift is often much easier and involves less work than building something from scratch; meanwhile, users of our wrapper will see no difference in terms of type safety or ease of use when compared to a fully native solution. All we need to start is the dynamic library and its C header files.
Our example, the CommonMark C library, is a reference implementation of the CommonMark spec that’s both fast and well tested. In this tutorial, we’ll take a layered approach to make CommonMark accessible from Swift. First, we’ll create a thin Swift class around the opaque types the library exposes. Then, we’ll wrap this class with Swift enums to provide a more idiomatic API.
Final Words
We hope you enjoyed this journey through Swift with us.
Despite its young age, Swift is already a complex language. It’d be a daunting task to cover every aspect of it in one book, let alone expect readers to remember it all. But even if you don’t immediately put everything you learned to practical use, we’re confident that having a better understanding of your language makes you a more accomplished programmer.
If you take one thing away from this book, we hope it’s that Swift’s many advanced aspects are there to help you write better, safer, and more expressive code. While you can write Swift code that feels not much different from Objective-C, Java, or C#, we hope we’ve convinced you that features like enums, generics, first-class functions, and structured concurrency can greatly improve your code.
The native concurrency model is perhaps Swift’s last big headline feature for a while, but that’s not to say the language won’t continue to improve. Here are some of the areas where we expect major enhancements in the coming years:
Extensions to the concurrency model. Compile-time checking will ramp up gradually to give library developers time to audit their code for concurrency, and the Swift team is already working on distributed actors, which are an extension of the actor model to multiple processes or machines.
Additions to the generics system. We mention some of these additions in the book, such as
whereconstraints for opaque types, and the lifting of restrictions on existentials.Explicit control over memory management and ownership. The goal is to give the compiler all the information it needs to avoid unnecessary copies when passing values to functions, thereby making Swift more suitable for writing low-level code with strict performance requirements.
More powerful introspection. The compiler bakes a lot of metadata about types and their properties into the binaries. This information is already being used by debugging tools, but there aren’t yet any public APIs to access it. The existence of this data opens the door for more powerful reflection and introspection capabilities that go way beyond what the current
Mirrortype can do.Major improvements to the string APIs. The Swift team is working on support for regular expressions and a result builder-based syntax for writing parsers under the moniker of declarative string processing.
If you’re interested in shaping how these and other features turn out, remember that Swift is being developed in the open. Consider joining the Swift Forums and adding your perspective to the discussions.
Finally, we’d like to encourage you to take advantage of the fact that Swift is open source. When you have a question the documentation doesn’t answer, the source code can often give you the answer. If you made it this far, you’ll have no problem finding your way through the standard library source files. Being able to check how things are implemented there was a big help for us when writing this book.