Have you ever tried to set up a continuous integration server for iOS? From my personal experience, it is not easy. You have to organize a Mac and install software and plugins. You have to manage user accounts and provide security. You have to grant access to the repositories and configure all build steps and certificates. During the project lifetime, you have to keep the server healthy and up to date.
In the end, you will spend a lot of time maintaining the server -- time you wanted to save in the first place. But if your project is hosted on GitHub, there is hope: Travis CI. This service offers continuous integration, which means it takes care of all the hosting aspects. In the Ruby world, Travis CI is well-known already. Since April 2013, the software supports iOS and Mac as well.
In this article, I want to show you step by step how to set up your project for Travis. This does not only include building and running unit tests, but also shipping the app to all your test devices. For demonstration purposes, I put an example project on GitHub. At the end of this article, I will give some tips on how to tackle problems with Travis.
GitHub Integration
What I really like about Travis is how well it is embedded in the GitHub web UI. One example is pull requests. Travis will run the build for each request. The pull request on GitHub will look like this if everything is ok:

In case the build doesn't succeed, the page will be colored accordingly on GitHub:

Link Travis and GitHub
Let's have a look on how to link your GitHub project with Travis. Sign in on the Travis website using your GitHub account. For private repositories, you need to sign up for a Travis Pro account.
Once signed in, you have to enable your project for Travis. Navigate to the profile page, which lists all your GitHub projects. Please note, when you create a new repository later, use the Sync now button. Travis only updates the list occasionally.
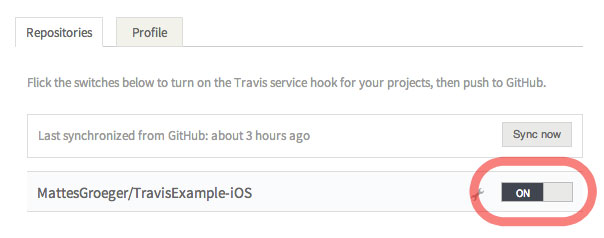
Enable your project now by using the switch. Afterward, you should see the Travis hook in your GitHub project settings. The next step is telling Travis what to do once it gets notified of a change.
Minimal Project Configuration
Travis CI needs some basic information about your project. Create a file called .travis.yml in the project root with the following content:
language: objective-c
Travis builds run in a virtual machine environment. They are pre-configured with Ruby, Homebrew, CocoaPods, and some default build scripts. The above configuration should be enough to build your project.
The pre-installed build script analyzes your Xcode project and builds each target. The build succeeds if everything compiled without error and the tests didn't break. Push your changes to GitHub now and see if the build succeeds.
While this is really easy to set up, it might not work for your project. There is not much documentation on how to configure the default build behavior. I had, for example, code signing issues because it didn't use the iphonesimulator SDK. If that minimal solution doesn't suit you, let's instead have a look at how to use Travis with a custom build command.
Custom Build Commands
Travis builds your project from the command line. Therefore, the first step is to make your project compile locally. As part of the Xcode Command Line Tools, Apple ships xcodebuild.
Open your terminal and type:
xcodebuild --help
This should list all possible arguments for xcodebuild. If it fails, make sure the Command Line Tools are properly installed. This is how a typical build command would look:
xcodebuild -project {project}.xcodeproj -target {target} -sdk iphonesimulator ONLY_ACTIVE_ARCH=NO
The iphonesimulator SDK is set in order to avoid signing issues. This is necessary until we include the certificates later. By setting ONLY_ACTIVE_ARCH=NO we make sure that we can build for the simulator architecture. You can also set additional attributes (e.g. configuration). Type man xcodebuild to read the documentation.
For CocoaPods projects, you have to specify the workspace and scheme instead:
xcodebuild -workspace {workspace}.xcworkspace -scheme {scheme} -sdk iphonesimulator ONLY_ACTIVE_ARCH=NO
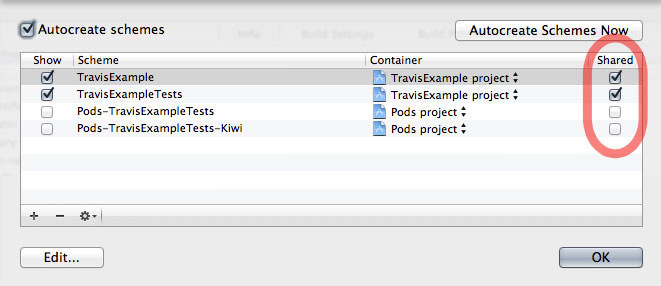
Schemes get created automatically with XCode, but this won't happen on the server. Make sure to declare the schemes as shared and add them to the repository. Otherwise it will work locally but not on Travis CI.
The .travis.yml for our example project would look like this now:
								language: objective-c
script: xcodebuild -workspace TravisExample.xcworkspace -scheme TravisExample -sdk iphonesimulator ONLY_ACTIVE_ARCH=NO
Running Tests
Usually for testing, you would use a command like this (note the test attribute):
xcodebuild test -workspace {workspace}.xcworkspace -scheme {test_scheme} -sdk iphonesimulator ONLY_ACTIVE_ARCH=NO
Unfortunately, xcodebuild doesn't properly support test targets and application tests for iOS. There are attempts to fix this problem but I suggest using Xctool instead.
Xctool
Xctool is a command-line tool from Facebook to make building and testing easier. The output is less verbose than with xcodebuild. It can create a nicely structured and colored output instead. It also fixes the problems with logic and application tests.
Travis comes with xctool pre-installed. To test it locally, install it with Homebrew:
								brew update
brew install xctool
The usage is really simple, as it takes exactly the same arguments as xcodebuild:
xctool test -workspace TravisExample.xcworkspace -scheme TravisExampleTests -sdk iphonesimulator ONLY_ACTIVE_ARCH=NO
Once we get these commands working locally, it's time to put them in our .travis.yml:
								language: objective-c
script:
  - xctool -workspace TravisExample.xcworkspace -scheme TravisExample -sdk iphonesimulator ONLY_ACTIVE_ARCH=NO
  - xctool test -workspace TravisExample.xcworkspace -scheme TravisExampleTests -sdk iphonesimulator ONLY_ACTIVE_ARCH=NO
What we looked at so far is enough to use Travis for library projects. We can ensure that it compiles properly and tests pass. But for iOS apps, we want to test on a physical device. That means we have to distribute it to all our test devices. Of course, we want to do this automatically using Travis. As a first step, we have to sign our app.
App Signing
In order to sign our app on Travis, we have to create all necessary certificates and profiles. As every iOS developer knows, this might be the most difficult step. Afterward, we will write some scripts that do the signing on the server.
Certificates and Profiles
1. Apple Worldwide Developer Relations Certification Authority
Download it from the Apple page or export it from your Keychain. Save it in your project under scripts/certs/apple.cer.
2. iPhone Distribution Certificate + Private Key
Create a new distribution certificate if you don't have one already. To do this, go to your Apple Developer Account and follow the steps to create a new certificate for Production (Certificates > Production > Add > App Store and Ad Hoc). Make sure to download and install the certificate. Afterward, you should find it in your Keychain with a private key attached to it. Open the application Keychain Access on your Mac:
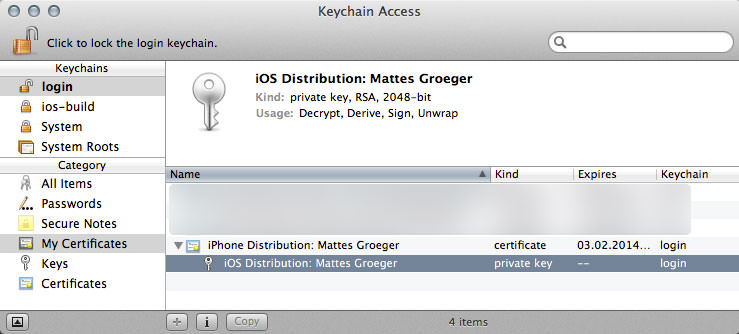
Export the certificate into scripts/certs/dist.cer by right-clicking the item and choosing Export.... Then export the private key and save it into scripts/certs/dist.p12. Enter a password of your choice.
As Travis needs to know this password, we have to store it somewhere. Of course, we don't want to save it as plain text. But we can make use of the Travis secure environment variables. Open terminal and navigate to your project folder that contains the .travis.yml. First, let's install the Travis gem by running gem install travis. Afterward, you can add the password by executing:
travis encrypt "KEY_PASSWORD={password}" --add
This will add an encrypted environment variable called KEY_PASSWORD to your .travis.yml. It can then be used in any script executed by Travis CI.
3. iOS Provisioning Profile (Distribution)
If you haven't already, create a new distribution profile. Based on your account, you can either create an Ad Hoc or In House profile (Provisioning Profiles > Distribution > Add > Ad Hoc or In House). Download and save it under scripts/profile/.
As we need to access this profile from Travis, we have to store the name as a global environment variable. Add it to the .travis.yml global environment variables section. For example, if the file name were to be TravisExample_Ad_Hoc.mobileprovision, add this:
								env:
  global:
  - APP_NAME="TravisExample"
  - 'DEVELOPER_NAME="iPhone Distribution: {your_name} ({code})"'
  - PROFILE_NAME="TravisExample_Ad_Hoc"
There are two more environment variables declared. The APP_NAME (line 3) is usually the same name as your main target. The DEVELOPER_NAME (line 4) is what you see when checking the XCode Build Settings of your main target under Code Signing Identity > Release. Search for the Ad Hoc or In House profile of your app. Take the text part that is in black letters. Depending on your setup, it may or may not include a code in brackets.
Encrypt Certificates and Profiles
If your GitHub project is public, you might want to encrypt your certificates and profiles, as they contain sensitive data. If you have a private repository, you can move on to the next section.
First, we have to come up with a password that encrypts all our files (the secret). In our example, let's choose "foo," but you should come up with a more secure password for your project. On the command line, encrypt all three sensitive files using openssl:
								openssl aes-256-cbc -k "foo" -in scripts/profile/TravisExample_Ad_Hoc.mobileprovision -out scripts/profile/TravisExample_Ad_Hoc.mobileprovision.enc -a
openssl aes-256-cbc -k "foo" -in scripts/certs/dist.cer -out scripts/certs/dist.cer.enc -a
openssl aes-256-cbc -k "foo" -in scripts/certs/dist.p12 -out scripts/certs/dist.p12.enc -a
This will create encrypted versions of our files with the ending .enc. You can now remove or ignore the original files. At the very least, make sure not to commit them, otherwise they will show up on GitHub. If you accidentally committed or pushed them already, get some help.
Now that our files are encrypted, we need to tell Travis to decrypt them again. For that, Travis needs the secret. We use the same approach that we used already for the KEY_PASSWORD:
travis encrypt "ENCRYPTION_SECRET=foo" --add
Lastly, we have to tell Travis which files to decrypt. Add the following commands to the before-script phase in the .travis.yml:
								before_script:
- openssl aes-256-cbc -k "$ENCRYPTION_SECRET" -in scripts/profile/TravisExample_Ad_Hoc.mobileprovision.enc -d -a -out scripts/profile/TravisExample_Ad_Hoc.mobileprovision
- openssl aes-256-cbc -k "$ENCRYPTION_SECRET" -in scripts/certs/dist.cer.enc -d -a -out scripts/certs/dist.cer
- openssl aes-256-cbc -k "$ENCRYPTION_SECRET" -in scripts/certs/dist.p12.enc -d -a -out scripts/certs/dist.p12
With that, your files on GitHub will be secured, while Travis can still read and use them. There is only one security issue that you have to be aware of: You could (accidentally) expose a decrypted environment variable in the Travis build log. Note, however, that decryption is disabled for pull requests.
Add Scripts
Now we have to make sure that the certificates get imported in the Travis CI keychain. To do this, we should add a new file, add-key.sh, in the scripts folder:
								#!/bin/sh

# Create a custom keychain
security create-keychain -p travis ios-build.keychain

# Make the custom keychain default, so xcodebuild will use it for signing
security default-keychain -s ios-build.keychain

# Unlock the keychain
security unlock-keychain -p travis ios-build.keychain

# Set keychain timeout to 1 hour for long builds
# see http://www.egeek.me/2013/02/23/jenkins-and-xcode-user-interaction-is-not-allowed/
security set-keychain-settings -t 3600 -l ~/Library/Keychains/ios-build.keychain

# Add certificates to keychain and allow codesign to access them
security import ./scripts/certs/apple.cer -k ~/Library/Keychains/ios-build.keychain -T /usr/bin/codesign
security import ./scripts/certs/dist.cer -k ~/Library/Keychains/ios-build.keychain -T /usr/bin/codesign
security import ./scripts/certs/dist.p12 -k ~/Library/Keychains/ios-build.keychain -P $KEY_PASSWORD -T /usr/bin/codesign


# Put the provisioning profile in place
mkdir -p ~/Library/MobileDevice/Provisioning\ Profiles
cp "./scripts/profile/$PROFILE_NAME.mobileprovision" ~/Library/MobileDevice/Provisioning\ Profiles/
Here we create a new temporary keychain called ios-build that will contain all the certificates, and make sure it's ready to be used for codesigning. Note that we use the $KEY_PASSWORD here to import the private key. As a final step, the mobile provisioning profile is copied into the Library folder.
After creating this file, make sure to give it executable rights. On the command line, type chmod a+x scripts/add-key.sh. You have to do this for the following scripts as well.
Now that all certificates and profiles are imported we can sign our application. Please note that we have to build the app before we can sign it. As we need to know where the build is stored on disk, I recommend specifying the output folder by declaring OBJROOT and SYMROOT in the build command. Also, we should create a release version by setting the SDK to iphoneos and the configuration to Release:
xctool -workspace TravisExample.xcworkspace -scheme TravisExample -sdk iphoneos -configuration Release OBJROOT=$PWD/build SYMROOT=$PWD/build ONLY_ACTIVE_ARCH=NO 'CODE_SIGN_RESOURCE_RULES_PATH=$(SDKROOT)/ResourceRules.plist'
If you run this command, you should find the app binary in the build/Release-iphoneos folder afterward. Now we can sign it and create the IPA file. Do this by creating a new script:
								#!/bin/sh
if [[ "$TRAVIS_PULL_REQUEST" != "false" ]]; then
  echo "This is a pull request. No deployment will be done."
  exit 0
fi
if [[ "$TRAVIS_BRANCH" != "master" ]]; then
  echo "Testing on a branch other than master. No deployment will be done."
  exit 0
fi

PROVISIONING_PROFILE="$HOME/Library/MobileDevice/Provisioning Profiles/$PROFILE_NAME.mobileprovision"
OUTPUTDIR="$PWD/build/Release-iphoneos"

xcrun -log -sdk iphoneos PackageApplication "$OUTPUTDIR/$APP_NAME.app" -o "$OUTPUTDIR/$APP_NAME.ipa" -sign "$DEVELOPER_NAME" -embed "$PROVISIONING_PROFILE"
Lines two through nine are quite important. You don't want to create a new release while working on a feature branch. The same is true for pull requests. Builds for pull requests wouldn't work anyway, as secured environment variables are disabled.
In line fourteen, we do the actual signing. This results in two new files in the build/Release-iphoneos folder: TravisExample.ipa and TravisExample.app.dsym. The first one contains the app which is ready to be delivered to your phone. The dsym file contains debug information of your binary. This is important for logging crashes on the devices. We will use both files later when we distribute the app.
The last script will remove the temporary keychain again and delete the mobile provisioning profile. It is not really necessary but helps when testing locally:
								#!/bin/sh
security delete-keychain ios-build.keychain
rm -f "~/Library/MobileDevice/Provisioning Profiles/$PROFILE_NAME.mobileprovision"
As a last step, we have to tell Travis when to execute these three scripts. The keys should be added before the app is built and the signing and cleanup should happen afterwards. Add/replace the following steps in your .travis.yml:
								before_script:
- ./scripts/add-key.sh
- ./scripts/update-bundle.sh
script:
- xctool -workspace TravisExample.xcworkspace -scheme TravisExample -sdk iphoneos -configuration Release OBJROOT=$PWD/build SYMROOT=$PWD/build ONLY_ACTIVE_ARCH=NO
after_success:
- ./scripts/sign-and-upload.sh
after_script:
- ./scripts/remove-key.sh
With that done, we can push everything to GitHub and wait for Travis to sign our app. We can verify if it worked by investigating the Travis console on the project page. If everything works fine, we can have a look on how to distribute the signed app to our testers.
Distributing the App
There are two well-known services that help you with distributing your app: TestFlight and HockeyApp. Choose whatever is more sufficient for your needs. Personally, I prefer HockeyApp, but I'll show how to integrate both services.
We will extend our existing shell script sign-and-build.sh for that. Let's create some release notes first:
								RELEASE_DATE=`date '+%Y-%m-%d %H:%M:%S'`
RELEASE_NOTES="Build: $TRAVIS_BUILD_NUMBER\nUploaded: $RELEASE_DATE"
Note that we use a global environment variable set by Travis here (TRAVIS_BUILD_NUMBER).
TestFlight
Create a TestFlight account and set up your app. In order to use the TestFlight API, you need to get the api_token and team_token first. Again, we have to make sure to encrypt them. On the command line execute:
								travis encrypt "TESTFLIGHT_API_TOKEN={api_token}" --add
travis encrypt "TESTFLIGHT_TEAM_TOKEN={team_token}" --add
Now we can call the API accordingly. Add this to the sign-and-build.sh:
								curl http://testflightapp.com/api/builds.json \
  -F file="@$OUTPUTDIR/$APP_NAME.ipa" \
  -F dsym="@$OUTPUTDIR/$APP_NAME.app.dSYM.zip" \
  -F api_token="$TESTFLIGHT_API_TOKEN" \
  -F team_token="$TESTFLIGHT_TEAM_TOKEN" \
  -F distribution_lists='Internal' \
  -F notes="$RELEASE_NOTES"
Make sure NOT to use the verbose flag (-v), as this would expose your decrypted tokens!
HockeyApp
Sign up for a HockeyApp account and create a new app. Then grab the App ID from the overview page. Next, we have to generate an API token. Go to this page and create one. If you want to automatically distribute new versions to all testers, choose the 'Full Access' version.
Encrypt both tokens:
								travis encrypt "HOCKEY_APP_ID={app_id}" --add
travis encrypt "HOCKEY_APP_TOKEN={api_token}" --add
Then call their API from the sign-and-build.sh script:
								curl https://rink.hockeyapp.net/api/2/apps/$HOCKEY_APP_ID/app_versions \
  -F status="2" \
  -F notify="0" \
  -F notes="$RELEASE_NOTES" \
  -F notes_type="0" \
  -F ipa="@$OUTPUTDIR/$APP_NAME.ipa" \
  -F dsym="@$OUTPUTDIR/$APP_NAME.app.dSYM.zip" \
  -H "X-HockeyAppToken: $HOCKEY_APP_TOKEN"
Note that we also upload the dsym file. If you integrate the TestFlight or HockeyApp SDK, you can get human-readable crash reports without further ado.
Troubleshooting Travis
Using Travis over the last month wasn't always flawless. It's important to know how to approach issues with your build without having direct access to the build environment.
As of writing this article, there are no VM images available for download. If your build doesn't work anymore, first try to reproduce the problem locally. Run the exact same build commands that Travis executes locally:
xctool ...
For debugging the shell scripts, you have to define the environment variables first. What I did for this is create a new shell script that sets all the environment variables. This script is added to the .gitignore file because you don't want it exposed to the public. For the example project, my config.sh looks like this:
								#!/bin/bash

# Standard app config
export APP_NAME=TravisExample
export DEVELOPER_NAME=iPhone Distribution: Mattes Groeger
export PROFILE_NAME=TravisExample_Ad_Hoc
export INFO_PLIST=TravisExample/TravisExample-Info.plist
export BUNDLE_DISPLAY_NAME=Travis Example CI

# Edit this for local testing only, DON'T COMMIT it:
export ENCRYPTION_SECRET=...
export KEY_PASSWORD=...
export TESTFLIGHT_API_TOKEN=...
export TESTFLIGHT_TEAM_TOKEN=...
export HOCKEY_APP_ID=...
export HOCKEY_APP_TOKEN=...

# This just emulates Travis vars locally
export TRAVIS_PULL_REQUEST=false
export TRAVIS_BRANCH=master
export TRAVIS_BUILD_NUMBER=0
In order to expose these environment variables, execute this (be sure config.sh has executable rights):
. ./config.sh
Then try echo $APP_NAME to check if it worked. If it did, you can run any of your shell scripts locally without modifications.
If you get different build results locally, you might have different versions of your libraries and gems installed. Try to imitate the exact same setup as on the Travis VM. They have a list of their installed software versions online. You can also figure out the exact versions of all gems and libraries by putting debug information into your Travis config:
								gem cocoapod --version
brew --version
xctool -version
xcodebuild -version -sdk
After you install the exact same versions locally, re-run the build.
If you still don't get the same results, try to do a clean checkout into a new directory. Also, make sure all caches are cleared. As Travis sets up a new virtual machine for each build, it doesn't have to deal with cache problems, but your local test environment might have to.
Once you can reproduce the exact same behavior as on the server, you can start to investigate what the problem is. It really depends, then, on your concrete scenario of how to approach it. Usually Google is a great help in figuring out what could be the cause of your problem.
If, after all, the problem seems to affect other projects on Travis as well, it might be an issue with the Travis environment itself. I saw this happening several times (especially in the beginning). In this case, try to contact their support. My experience is that they react super fast.
Criticism
There are some limitations when using Travis CI compared to other solutions on the market. As Travis runs from a pre-configured VM, you have to install custom dependencies for every build. That costs additional time. They put effort in providing caching mechanisms lately, though.
To some extent, you rely on the setup that Travis provides. For example, you have to deal with the currently installed version of Xcode. If you use a version that is newer than Travis CI, you probably won't be able to run your build on the server. It would be helpful if there were different VMs set up for each major Xcode version.
For complex projects, you might want to split up your build jobs into compiling the app, running integration tests, and so forth. This way, you get the build artifacts faster, without having to wait for all tests to be processed. There is no direct support for dependent builds so far.
When pushing your project to GitHub, Travis gets triggered instantly. But builds usually won’t start right away. They will be put in a global language-specific build queue. However, the pro version allows more builds to be executed concurrently.
Conclusion
Travis CI provides you with a fully functional continuous integration environment that builds, tests, and distributes your iOS apps. For open source projects, this service is even free. Community projects benefit from the great GitHub integration. You might have seen buttons like this already:
![]()
Even for commercial projects, their support for private GitHub repositories with Travis Pro opens up an easy and fast way to use continuous integration.
If you haven't tried Travis yet, go and do it now. It's awesome!