It may be hard to believe, but a UIScrollView isn't much different than a standard UIView. Sure, the scroll view has a few more methods, but those methods are really just facades of existing UIView properties. Thus, most of the understanding of how a UIScrollView works comes from understanding UIView - specifically, the details of the two-step view rendering process.
Rasterization and Composition
The first part of the rendering process is known as rasterization. Rasterization simply means to take a set of drawing instructions and produce an image. UIButtons, for example, draw an image with a rounded rectangle and a title in the center. These images aren't drawn to the screen; instead, they are held onto by their view to be used during the next step.
Once each view has its rasterized image, these images are drawn on top of each other to produce one screen-sized image in a step called composition. The view hierarchy plays a big role in how composition occurs: a view's image is composited on top of its superview's image. Then, that composited image is composited on top of the super-superview's image, and so on. The view at the top of the hierarchy is the window and its composited image (which is a composite of every image in the view hierarchy) is what the user sees.
Conceptually, this idea of layering independent images on top of each other to produce a final, flat image should make sense, especially if you have used a tool like Photoshop before. We also have another article in this issue explaining in detail how pixels get onto the screen.
Now, recall that every view has a bounds and frame rectangle. When laying out an interface, we deal with the frame rectangle of a view. This allows us to position and size the view. The frame and bounds of a view will commonly have the same size (though transforms can alter this), but their origin will usually differ. Understanding how these two rectangles work is the key to understanding how UIScrollView works.
During the rasterization step, a view doesn't care about what is going to happen in the upcoming composition step. That is to say, it doesn't care about its frame (which will be used to position the view's image) or its place in the view hierarchy (which will determine the order in which it is composited). The only thing a view cares about at this time is drawing its own content. This drawing occurs in each view's drawRect: method.
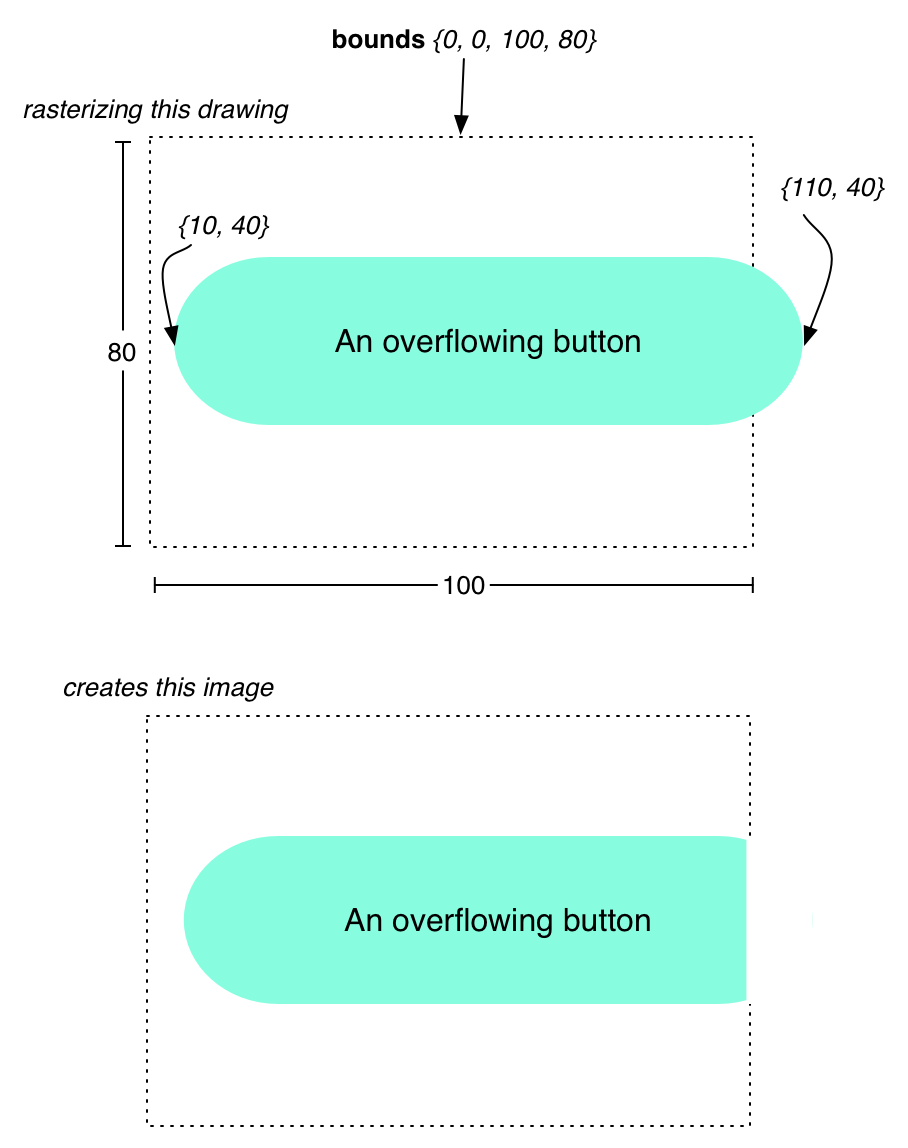
Before drawRect: is called, a blank image is created for the view to draw its content in. This image's coordinate system is the bounds rectangle of the view. For nearly every view, the bounds rectangle's origin is {0, 0}. Thus, to draw something in the top-left corner of the rasterized image, you would draw at the origin of the bounds, the point {x:0, y:0}. To draw something in the bottom right corner of an image, you would draw at point {x:width, y:height}. If you draw outside of a view's bounds, that drawing is not part of the rasterized image and is discarded.
During the composition step, each view composites its rasterized image on top of its superview's image (and so on). A view's frame rectangle determines where the view's image is drawn on its superview's image - the origin of the frame indicates the offset between the top-left corner of the view's image and its superview's image. So, a frame origin of {x:20, y:15} will create a composited image where the view's image is drawn on top of its superview's image, shifted to the right 20 points and down 15 points. Because the frame and bounds rectangle of a view are always the same size, the image is composited pixel for pixel to its superview's image. This ensures there is no stretching or shrinking of the rasterized image.

Remember, we're talking about just one composite operation between a view and its superview. Once those two views are composited together, the resulting composite image is composited with the super-superview's image and so on: a snowball effect.
Think about the math behind compositing an image onto another. The top-left corner of a view's image is offset by its frame's origin and then drawn onto its superview's image:
								CompositedPosition.x = View.frame.origin.x - Superview.bounds.origin.x;
CompositedPosition.y = View.frame.origin.y - Superview.bounds.origin.y;
Now, as we have said before, the origin of a view's bounds rectangle is typically just {0, 0}. Thus, when doing the math, we just drop out one of the values and we get:
								CompositedPosition.x = View.frame.origin.x;
CompositedPosition.y = View.frame.origin.y;
So, we can look at a few different frames and see how they would look:
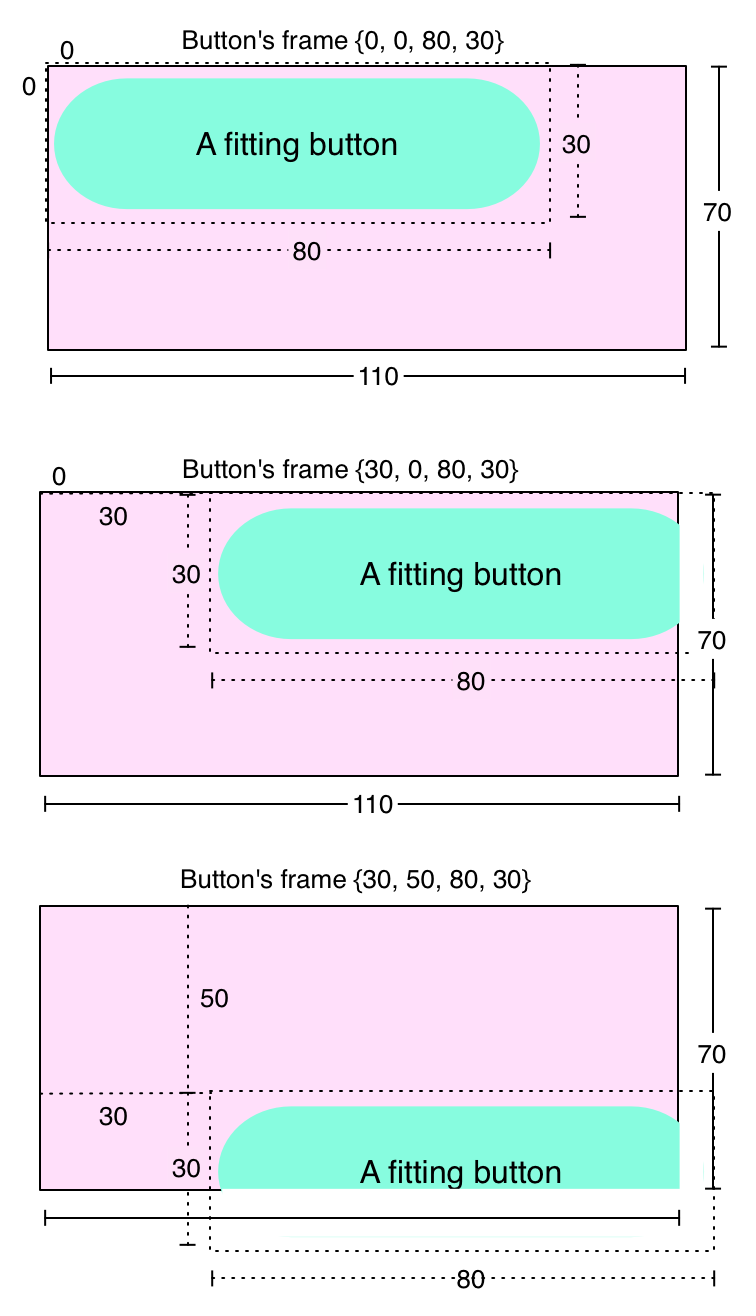
And this should make sense. We change the frame's origin of the button, and it changes its position relative to its lovely purple superview. Notice that if we move the button so that parts of it are outside of the bounds of the purple superview, those parts are clipped in the same way drawing during rasterization would be clipped. However, technically, because of how iOS handles compositing under the hood, you can have a subview render outside of its superview's bounds, but drawing during rasterization cannot occur outside of a view's bounds.
Scroll View's Content Offset
Now, what does all of this have to do with UIScrollView? Everything. Think about a way we could accomplish scrolling: we could have a view whose frame we change when we drag it. It accomplishes the same thing, right? If I drag my finger to the right, I increase the origin.x of the view I'm dragging and voila, scroll view!
The problem with that, of course, is that there are typically many views in a scroll view. To implement this panning feature, you would have to change the frames of every view every time the user moved his or her finger. But we're missing something. Remember that equation that we came up with to determine where a view composited its image onto its superview?
								CompositedPosition.x = View.frame.origin.x - Superview.bounds.origin.x;
CompositedPosition.y = View.frame.origin.y - Superview.bounds.origin.y;
We dropped the Superview.bounds.origin values because they were always 0. But what if they weren't? What if, say, we used the same frames from the previous diagram, but we changed the purple view's bounds origin to something like {-30, -30}. We'd get this:
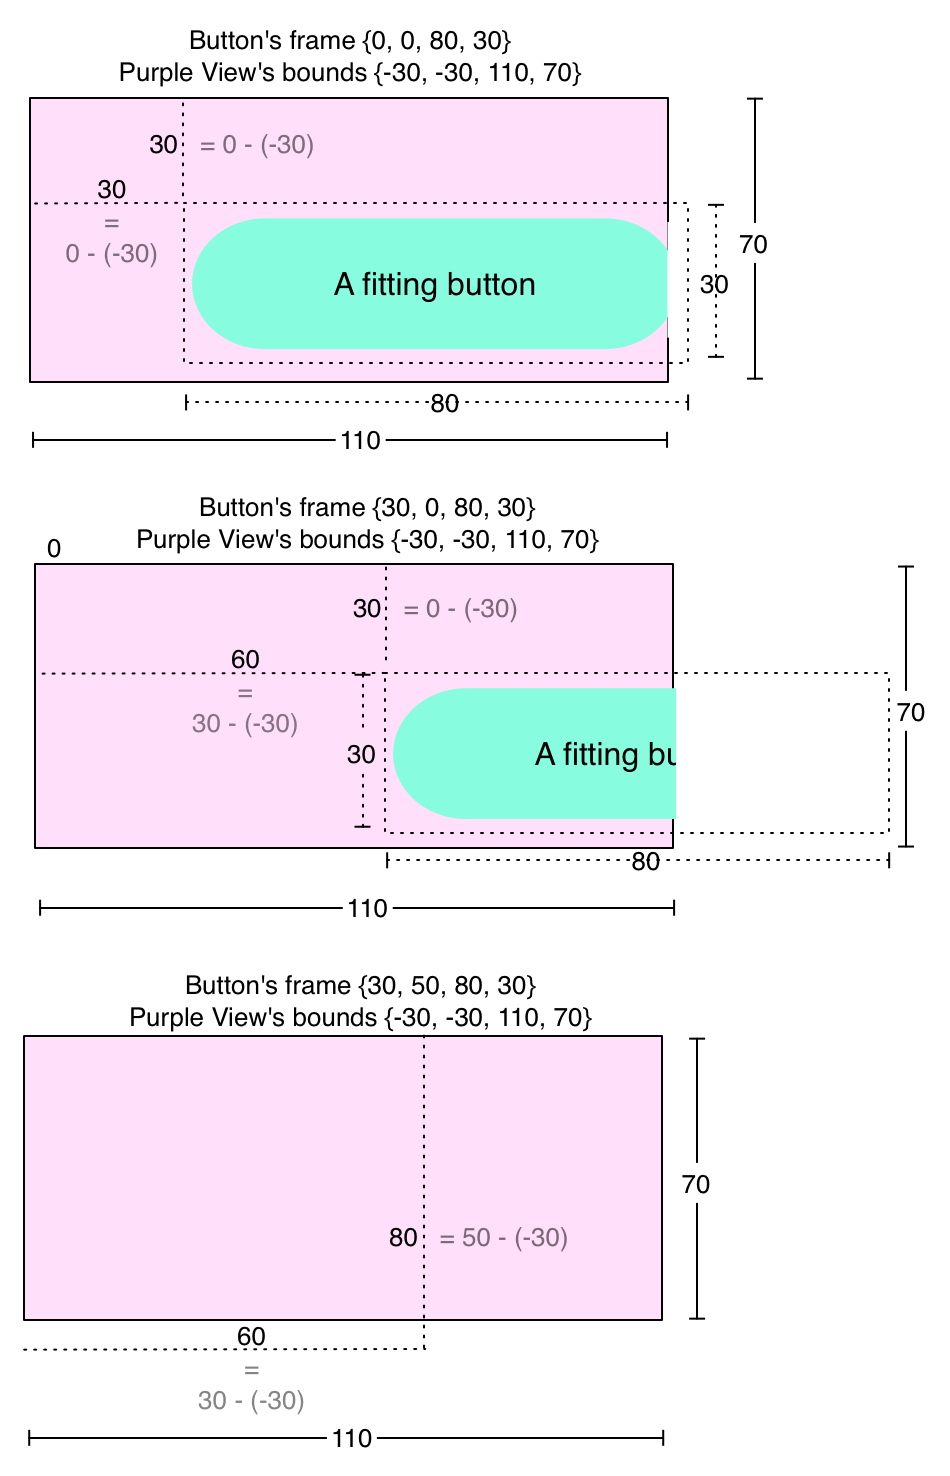
Now, the beauty of this is that every single subview of this purple view is shifted by the change to its bounds. This is, in fact, exactly how a scroll view works when you set its contentOffset property: it changes the origin of the scroll view's bounds. In fact, contentOffset isn't even real! Its code probably looks like this:
								- (void)setContentOffset:(CGPoint)offset
{
    CGRect bounds = [self bounds];
    bounds.origin = offset;
    [self setBounds:bounds];
}
Notice that in the previous diagram, changing the bounds' origin enough moved the button outside of the composited image produced by the purple view and the button. This is just what happens when you scroll a scroll view enough so that a view disappears!
A Window into the World: Content Size
Now that the hard part is out of the way, let's look at another property of UIScrollView, contentSize.
The content size of a scroll view doesn't change anything about the bounds of a scroll view and therefore does not impact how a scroll view composites its subviews. Instead, the content size defines the scrollable area. By default, a scroll view's content size is a big, fat {w:0, h:0}. Since there is no scrollable area, the user can't scroll, but the scroll view will still display all of the subviews that fit inside the scroll view's bounds.
When the content size is set to be larger than the bounds of the scroll view, the user is allowed to scroll. You can think of the bounds of a scroll view as a window into the scrollable area defined by the content size:
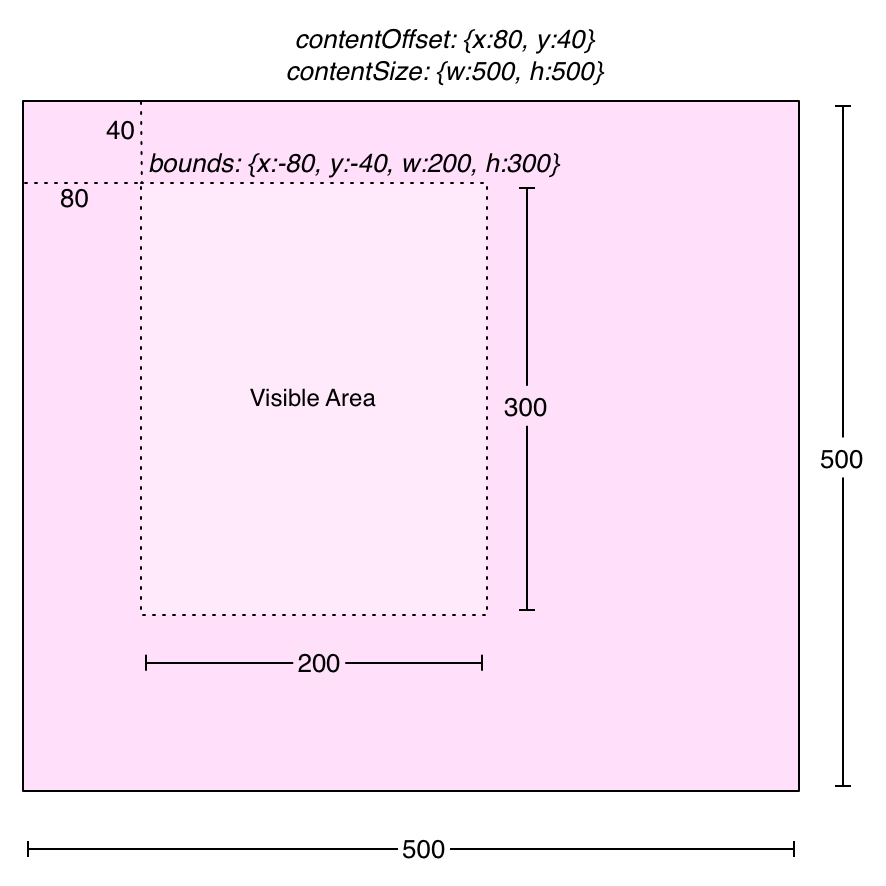
When the content offset is {x:0, y:0}, the viewing window's top-left corner is in the top-left corner of the scrollable area. This is also the minimum value of the content offset; the user can't scroll to the left or above the scrollable area. There's nothing there!
The maximum value for the content offset is the difference between the content size and the scroll view's bounds' size. This makes sense; scrolling all the way to the bottom right, the user is stopped so that the bottom-right edge of the scrolling area is flush with the bottom-right edge of the scroll view's bounds. You could write the maximum content offset like this:
								contentOffset.x = contentSize.width - bounds.size.width;
contentOffset.y = contentSize.height - bounds.size.height;
Tweaking the Window with Content Insets
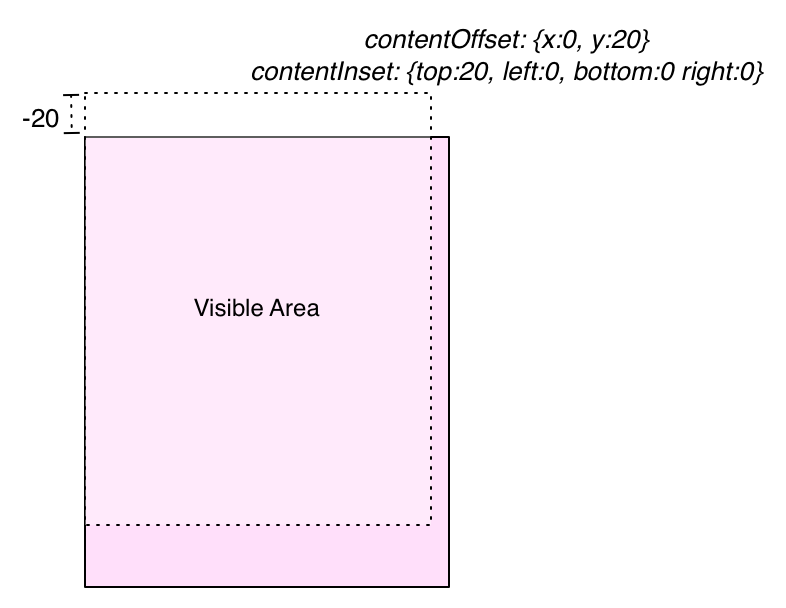
The property contentInset can change the maximum and minimum values of the content offset to allow scrolling outside of the scrollable area. Its type is UIEdgeInsets, which consists of 4 numbers: {top, left, bottom, right}. When you introduce an inset, you change the range of the content offset. For example, setting the content inset to have a value of 10 for its top value allows the content offset's y value to reach -10. This introduces padding around the scrollable area.
This may not seem very useful at first. In fact, why not just increase the content size? Well, you should avoid changing the content size of a scroll view unless you have to. To understand why, consider a table view (UITableView is a subclass of UIScrollView, so it has all of the same properties). The table view's scrollable area has been carefully calculated to fit each one of its cells snugly. When you scroll past the boundaries of the table view's first or last cells, the table view snaps the content offset back into place, so that the cells once again fit snugly in the scroll view's bounds.
Now, what happens when you want to implement pull to refresh using a UIRefreshControl? You can't put the UIRefreshControl within the scrollable area of the table view, otherwise, the table view would allow the user to stop scrolling halfway through the refresh control, and the top would snap to the top of the refresh control. Thus, you must put refresh control just above the scrollable area. This allows the content offset to snap back to the first row, not the refresh control.
But wait, if you initiate the pull-to-refresh mechanism by scrolling far enough, the table view does allow the content offset to snap refresh control into the scrollable area, and this is because of the table view's content inset. When the refresh action is initiated, the content inset is adjusted so that the minimum content offset includes the entirety of the refresh control. When the refresh completes, the content inset is returned to normalcy, the content offset follows suit, and none of the math required for determining the content size needs to be re-computed.
How can you use the content inset in your own code? Well, there is one great use for the it: when the keyboard is on the screen. Typically, you try to design a user interface that fits the screen snugly. When the keyboard appears on the screen, you lose a few hundred pixels of that space. All of the stuff underneath the keyboard is obscured.
Now, the scroll view's bounds haven't changed, and neither has its content size (nor should it). But the user can't scroll the scroll view. Think about the equation from earlier: the maximum content offset is the difference between the content size and the bounds' size. If they are equal, which they are in your snug interface that now has a keyboard messing up your day, the maximum content offset is {x:0, y:0}.
The trick, then, is to put the interface in a scroll view. The content size of the scroll view remains fixed at the same size as the scroll view's bounds. When the keyboard appears on the screen, you set the bottom of the content inset equal to the height of the keyboard.
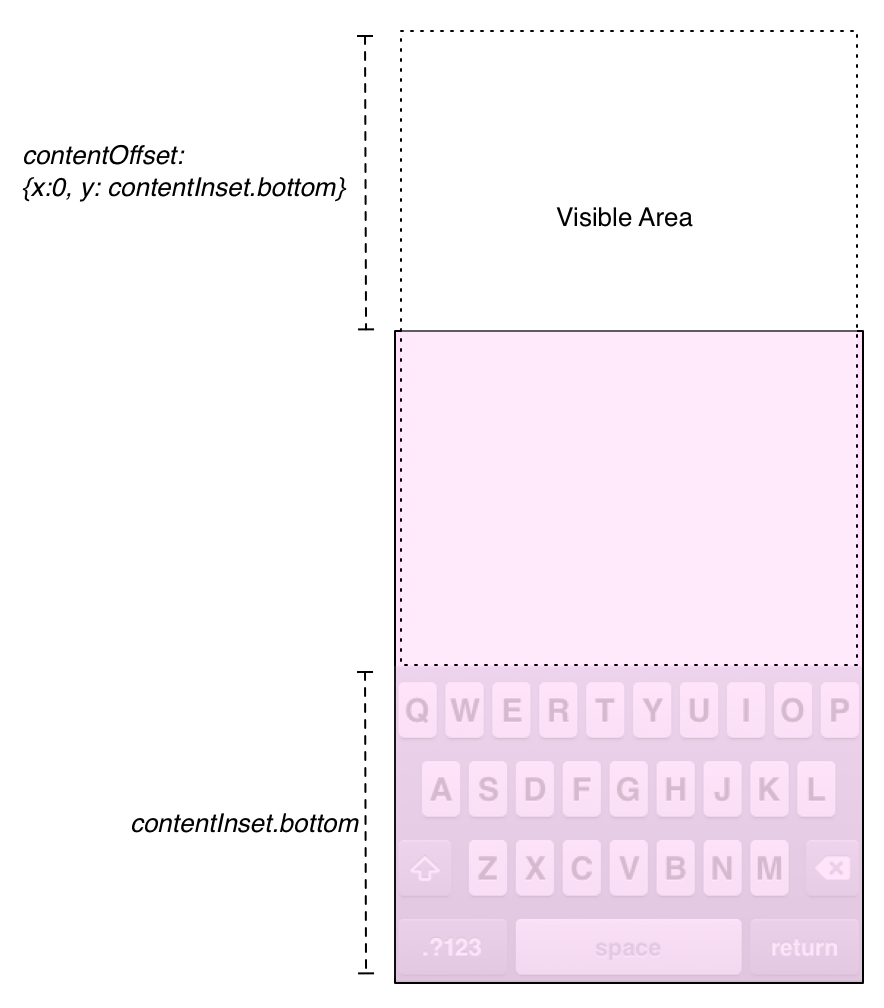
This allows the maximum value of the content offset to show the area beyond the scrollable area. The top of the visible area is outside the bounds of the scroll view, and is therefore clipped (although it is also off the screen itself, so that doesn't matter too much).
Hopefully, this gives you some insight into the inner workings of scroll views. Are you wondering about zooming? Well, we won't talk about it today, but here's a fun tip: check the transform property of the view you return from viewForZoomingInScrollView:. Once again, you'll find that a scroll view is just cleverly using already-existing properties of UIView.