Almost four months ago, our team (Marco, Arne, and Daniel) set out to write the model layer of a new app. We wanted to use testing as part of our development process. After some discussion, we chose XCTest as our testing framework.
Our code base (excluding tests) has since grown to 544 kilobytes of source code spread across 190 files and 18,000 lines. Our tests click in at about 1,200 kilobytes, roughly twice that of the code they're testing. We're not quite done yet, but we're closing in. We wanted to share some of what we have learned, both about testing in general, and about testing with XCTest.
Note that some of the model classes and methods in this article have been renamed, because the project is not in the App Store yet.
We chose XCTest for its simplicity and its tight integration into the Xcode IDE. With this article, we hope to shed some light on when XCTest is a good option, and when you might want to pick something else.
We tried to link to the other articles in this issue where it makes sense.
Why We Are Testing
As the article about bad practices in testing mentions, many people believe that "the only time a test will give value back is when we want to change our code." There's obviously more to it, and you should read that article. But it is also important to remember that even when writing the first version of any code, most of the time will be spent changing code — as the project evolves, more and more features get added, and we realize that behavior needs to change slightly here and there. So even though you're not yet working on version 1.1 or 2.0, you'll still do a lot of changing, and tests do provide invaluable help at that point in time.
We are still finishing the initial version of our framework, and have just recently passed 1,000 test cases with more than 10 man months of effort spent on the project. Even though we had a clear vision of the project's architecture, we've still had to change and adapt the code along the way. The ever-growing set of test cases have helped us do this.
They have given us a level of comfort with the quality of our code, and at the same time given us the ability to refactor and change the code while knowing that we didn't break things. And we have been able to actually run our code from day one; we didn't have to wait for all the pieces to be in place.
How XCTest Works
Apple has some decent documentation on using XCTest. Tests are grouped into classes that subclass from XCTestCase. Each method that has a name starting with test is a test.
Because tests are simply classes and methods, we can add @property and helper methods to the class, as we see fit.
In order to be able to reuse code, we have a common superclass, TestCase, for all our test classes. This class subclasses from XCTestCase. All our test classes subclass from our TestCase.
We also put shared helper methods into the TestCase class. And we even have properties on it that get pre-populated for each test.
Naming
Since a test is simply a method that begins with the word test, a typical test method would look like this:
								- (void)testThatItDoesURLEncoding
{
  // test code
}
All our tests start with the words "testThatIt." Another frequently used way of naming tests is to use the method or class being tested, as in testHTTPRequest. But which class and method being tested should be obvious by simply looking at the test.
The "testThatIt" style shifts the focus to the desired outcome, which, in most cases, is more difficult to understand at first glance.
There is a test case class for each production code class, and one is named after the other, e.g. HTTPRequest and HTTPRequestTests. If a class gets a bit bigger, we use categories to split up the test by topics.
If we ever need to disable a test, we simply prefix the name with DISABLED:
- (void)DISABLED_testThatItDoesURLEncoding
It's easy to search for this string, and since the method name no longer starts with test, XCTest will skip this method.
Given / When / Then
We structure our tests by using the Given-When-Then pattern — every test is split into three parts.
The given section sets up the environment for the test by creating model objects or bringing the system under test to a certain state. The when section contains the code we want to test. In most cases, this is only one method call. In the then section, we check the result of our action: Did we get the desired output? Was the object changed? This section consists mainly of assertions.
In a fairly simple test, it looks like this:
								- (void)testThatItDoesURLEncoding
{
    // given
    NSString *searchQuery = @"$&?@";
    HTTPRequest *request = [HTTPRequest requestWithURL:@"/search?q=%@", searchQuery];

    // when
    NSString *encodedURL = request.URL;

    // then
    XCTAssertEqualObjects(encodedURL, @"/search?q=%24%26%3F%40");
}
This simple pattern makes it easier to write and understand tests, as they all follow the same basic pattern. For faster visual scanning, we even put the words "given," "when," and "then" as comments on top of their respective sections. This way, the method being tested immediately sticks out.
Reusable Code
Over time, we noticed that we repeated some code again and again in our tests, like waiting for an asynchronous operation to finish, or setting up an in-memory Core Data stack. To avoid code duplication, we began to gather all these useful snippets into a common base class for all our tests.
It turned out that this is not only useful as a collection of utility methods. The test base class can run its own -setUp and -tearDown methods to set up the environment. We use this mostly to initialize Core Data stacks for testing, to reseed our deterministic NSUUID (which is one of those small things that makes debugging a lot easier), and to set up background magic to simplify asynchronous testing.
Another useful pattern we started using recently is to implement delegate protocols directly in our XCTestCase classes. This way, we don't have to awkwardly mock the delegate. Instead, we can interact with the tested class in a fairly direct way.
Mocking
Our mocking framework is OCMock. As described in the article about mocking in this issue, a mock is an object that returns a prepared answer for method calls.
We use mocks for all dependencies of an object. This way, we can test the behavior of a class in isolation. The obvious disadvantage is that changes in a class don't automatically lead to failing unit tests for other classes that depend on it. But this is remedied by the fact that we also have integration tests, which test all the classes together.
It is important not to 'over-mock,' which is the habit of mocking every object except for the one being tested. When we started, we got into this habit at times, and we even mocked rather simple objects that were used as input to methods. Now we use many objects just the way they are, without mocking them.
As part of our common superclass for all test classes, we also added a
- (void)verifyMockLater:(id)mock;
method. It makes sure that the mocks get verified at the end of that method / test. This makes using mocks even more convenient. We can specify that a mock should be verified right at the point where we create that mock:
								- (void)testThatItRollsBackWhenSaveFails;
{
    // given
    id contextMock = [OCMockObject partialMockForObject:self.uiMOC];
    [self verifyMockLater:contextMock];
    NSError *error = [NSError errorWithDomain:NSCocoaErrorDomain code:NSManagedObjectValidationError userInfo:nil];
    [(NSManagedObjectContext *)[[contextMock stub] andReturnValue:@NO] save:[OCMArg setTo:error]];

    // expect
    [[contextMock expect] rollback];

    // when
    [ZMUser insertNewObjectInManagedObjectContext:self.uiMOC];
    [self.uiMOC saveOrRollback];
}
State and Statelessness
A lot has been said about stateless code during the last few years. But at the end of the day, our apps need state. Without state, most apps would be pretty pointless. But managing state is the source of a lot of bugs, because managing state is very complex.
We made our code a lot easier to work on by isolating the state. A few classes contain state, while most are stateless. In addition to the code, testing got a whole lot easier, too.
For example, we have a class, EventSync, that is responsible for sending local changes to our server. It needs to keep track of which local objects have changes that need to get pushed to the server, and which changes are currently being pushed. We can send multiple changes at once, but we don't want to send the same change twice.
We also had interdependencies between objects to keep track of. If A has a relationship to B, and B has local changes, we need to wait for those local changes to be pushed first, before we can send the changes of A.
We have a UserSyncStrategy that has a -nextRequest method that generates the next request. This request will send local changes to the server. The class itself is stateless, though. Or rather: All its state is encapsulated inside an UpstreamObjectSync class, which keeps track of all the user objects that have local changes, and for which we have running requests. There is no state outside this class.
This way, it was easy for us to have one set of tests for the UpstreamObjectSync. They check that this class manages the state correctly. For the UserSyncStrategy, we were mocking the UpstreamObjectSync and didn't have to worry about any state inside the UserSyncStrategy itself. That reduced the test complexity a lot, even more so because we were syncing many different kind of objects, and our different classes were all stateless and able to reuse the UpstreamObjectSync class.
Core Data
Our code relies heavily on Core Data. Since we need our tests to be isolated from one another, we have to bring up a clean Core Data stack for each test case, and then tear it down afterward. We need to be sure that we don't reuse the store from one test case for the next test.
All of our code is centered around two managed object contexts: one that the user-interface uses and that is tied to the main queue, and one that we use for synchronization and that has its own private queue.
We didn't want to repeat creating managed object contexts inside every test that needs them. Hence, inside our shared TestCase superclass' -setUp method, we create this set of two managed object contexts. This makes each individual test a lot easier to read.
A test that needs a managed object context can simply call self.managedObjectContext or self.syncManagedObjectContext, like so:
								- (void)testThatItDoesNotCrashWithInvalidFields
{
    // given
    NSDictionary *payload =     // expected JSON response
    @{
      @"status": @"foo",
      @"from": @"eeeee",
      @"to": @44,
      @"last_update": @[],
    };

    // when
    ZMConnection *connection = [ZMConnection connectionFromTransportData:payload
                                                    managedObjectContext:self.managedObjectContext];

    // then
    XCTAssertNil(connection);
}
We are using NSMainQueueConcurrencyType and NSPrivateQueueConcurrencyType to make the code consistent. But we implemented our own -performGroupedBlock: on top of -performBlock:, in order to solve the isolation problem. More about this under our section about testing asynchronous code.
Merging Multiple Contexts
We have two contexts in our code. In production, we rely heavily on being able to merge from one context to another by means of -mergeChangesFromContextDidSaveNotification:. At the same time, we are using a separate persistent store coordinator for each context. Both contexts can then access the same SQLite store with minimal contention.
But for testing, we had to change this. We wanted to be able to use an in-memory store.
Using an on-disk SQLite store for testing does not work, because there are race conditions associated with deleting the store on disk. This would break isolation between tests. In-memory stores are a lot faster, which is good for testing.
We use factory methods to create all our NSManagedObjectContext instances. The base test class alters the behavior of these factory methods slightly, so that all contexts share the same NSPersistentStoreCoordinator. At the end of each test, we discard that shared persistent store coordinator to make sure that the next test uses a new one, and a new store.
Testing Asynchronous Code
Asynchronous code can be tricky. Most testing frameworks offer some basic helpers for asynchronous code.
Let's say we have an asynchronous message on NSString:
- (void)appendString:(NSString *)other resultHandler:(void(^)(NSString *result))handler;
With XCTest, we could test it like this:
								- (void)testThatItAppendsAString;
{
    NSString *s1 = @"Foo";
    XCTestExpectation *expectation = [self expectationWithDescription:@"Handler called"];
    [s1 appendString:@"Bar" resultHandler:^(NSString *result){
        [expectation fulfill];
        XCTAssertEqualObjects(result, @"FooBar");
    }]
    [self waitForExpectationsWithTimeout:0.1 handler:nil];
}
Most testing frameworks have something like this.
But the main problem with asynchronous testing is isolation. Isolation is the “I“ in FIRST, as mentioned by the article about testing practices.
With asynchronous code, it can be very tricky to ensure that code from one test has completely stopped running on all threads and queues before the next test starts.
We found that the best solution to this problem is to consistently use groups, namely dispatch_group_t.
Don't Be Alone — Join a Group
Some of our classes need to use dispatch_queue_t internally. Some of our classes enqueue blocks onto an NSManagedObjectContext's private queue.
Inside our -tearDown method, we need to wait for all such asynchronous work to be completed. To achieve that, we had to do multiple things, as shown below.
Our test classes have a property:
@property (nonatomic) dispatch_group_t;
We define this once in our common superclass and set it there.
Next, we can inject this group into any class that we're using that uses a dispatch_queue or similar, e.g. instead of calling dispatch_async(), we're consistently using dispatch_group_async().
Since we're relying heavily on Core Data, we added a method to NSManagedObjectContext called
								- (void)performGroupedBlock:(dispatch_block_t)block ZM_NON_NULL(1);
{
    dispatch_group_enter(self.dispatchGroup);
    [self performBlock:^{
        block();
        dispatch_group_leave(self.dispatchGroup);
    }];
}
and added a new dispatchGroup property to all managed object contexts. We then exclusively used -performGroupedBlock: in all our code.
With this, we could wait for all asynchronous work to be done inside our tearDown method:
								- (void)tearDown
{
    [self waitForGroup];
    [super tearDown];
}

- (void)waitForGroup;
{
    __block BOOL didComplete = NO;
    dispatch_group_notify(self.requestGroup, dispatch_get_main_queue(), ^{
        didComplete = YES;
    });
    NSDate *end = [NSDate dateWithTimeIntervalSinceNow:timeout];
    while (! didComplete) {
        NSTimeInterval const interval = 0.002;
        if (! [[NSRunLoop currentRunLoop] runMode:NSDefaultRunLoopMode beforeDate:[NSDate dateWithTimeIntervalSinceNow:interval]]) {
            [NSThread sleepForTimeInterval:interval];
        }
    }
}
This works, because -tearDown gets called on the main loop. We spun the main loop to make sure that any code that might get enqueued onto the main queue got to run. The above code will hang indefinitely if the group never empties. In our case, we adapted it slightly, so that we had a timeout.
Waiting for All Work to Be Done
With this in place, a lot of our other tests became a lot easier, too. We created a WaitForAllGroupsToBeEmpty() helper, which we use like this:
								- (void)testThatItDoesNotAskForNextRequestIfThereAreNoChangesWithinASave
{
    // expect
    [[self.transportSession reject] attemptToEnqueueSyncRequestWithGenerator:OCMOCK_ANY];
    [[self.syncStrategy reject] processSaveWithInsertedObjects:OCMOCK_ANY updateObjects:OCMOCK_ANY];
    [self verifyMockLater:self.transportSession];

    // when
    NSError *error;
    XCTAssertTrue([self.testMOC save:&error]);
    WaitForAllGroupsToBeEmpty(0.1);
}
The last line waits for all asynchronous work to be done, i.e. the test makes sure that even asynchronous blocks enqueuing additional asynchronous work are all done, and that none of them trigger any of the rejected methods.
We implemented this with a simple macro
								#define WaitForAllGroupsToBeEmpty(timeout) \
    do { \
        if (! [self waitForGroupToBeEmptyWithTimeout:timeout]) { \
            XCTFail(@"Timed out waiting for groups to empty."); \
        } \
    } while (0)
which, in turn, uses a method on our shared test case superclass:
								- (BOOL)waitForGroupToBeEmptyWithTimeout:(NSTimeInterval)timeout;
{
    NSDate * const end = [[NSDate date] dateByAddingTimeInterval:timeout];

    __block BOOL didComplete = NO;
    dispatch_group_notify(self.requestGroup, dispatch_get_main_queue(), ^{
        didComplete = YES;
    });
    while ((! didComplete) && (0. < [end timeIntervalSinceNow])) {
        if (! [[NSRunLoop currentRunLoop] runMode:NSDefaultRunLoopMode beforeDate:[NSDate dateWithTimeIntervalSinceNow:0.002]]) {
            [NSThread sleepForTimeInterval:0.002];
        }
    }
    return didComplete;
}
Custom Expectations
At the beginning of this section, we mentioned how
XCTestExpectation *expectation = [self expectationWithDescription:@"Handler called"];
and
[self waitForExpectationsWithTimeout:0.1 handler:nil];
are some basic building blocks for asynchronous tests.
XCTest has some convenience stuff for NSNotification and key-value observing, both of which are built on top of these building blocks.
Sometimes, though, we found ourselves using the same patters in multiple places, e.g. if we are asynchronously expecting a managed object context to be saved, we may have code like this:
								// expect
[self expectationForNotification:NSManagedObjectContextDidSaveNotification
                          object:self.syncManagedObjectContext
                         handler:nil];
We simplify this code by having a single, shared method
								- (XCTestExpectation *)expectationForSaveOfContext:(NSManagedObjectContext *)moc;
{
    return [self expectationForNotification:NSManagedObjectContextDidSaveNotification
                          object:moc
                         handler:nil];
}
and then use
								// expect
[self expectationForSaveOfContext:self.syncManagedObjectContext];
inside our tests. This is easier to read. Along this pattern, it is possible to add custom methods for other situations, too.
The Ol’ Switcheroo — Faking the Transport Layer
One important question in testing an application is how to test the interaction with the server. The most ideal solution would be to quickly spin up a local copy of the real server, to provision it with fake data, and to run tests directly against it over http.
We are, in fact, working on this solution. It gives us a very realistic test setup. But the sad reality is that it is also a very slow setup. Clearing the database of the server between each test is slow. We have 1,000 tests. Even if only 30 of them depend on having a real server, if clearing the database and bringing up a 'clean' server instance takes five seconds, that would be two-and-a-half minutes of our test spent on waiting for that to happen. And we also needed to be able to test a server API before that API had been implemented. We needed something else.
This alternative solution is our 'fake server.' From the get-go, we structured our code so that all our communication with the server is channeled through a single class, the TransportSession, which is similar in style to NSURLSession, but also handles JSON conversion.
We have a set of tests that use the API we provide to the UI, and all the interaction with the server is then channeled through a fake implementation of the TransportSession. This transport session mimics both the behavior of the real TransportSession and the behavior of the server. The fake session implements the entire protocol of the TransportSession and adds a few methods that allow us to set up its state.
Having a custom class here has several advantages over mocking the server in each test using OCMock. For one, we can create more complex scenarios than what, realistically, would be possible with a mock. We can simulate edge cases that are hard to trigger with a real server.
Also, the fake server has tests of its own, so its answers are more precisely defined. If we ever need to change the server's reaction to a request, we only have to do so in one place. This makes all the tests that depend on the fake server much more stable, and we can more easily find parts in our code that do not play well with the new behavior.
The implementation of our FakeTransportSession is simple. An HTTPRequest object encapsulates the relative URL, method, and optional payload of a request. The FakeTransportSession maps all endpoints to internal methods, which then generate responses. It even has its own in-memory Core Data stack to keep track of the objects it knows about. This way, a GET can return a resource that a previous operation added with a PUT.
All of this may sound like a hard-to-justify time investment. But the fake server is actually quite simple: it is not a real server; we cut a lot of corners. The fake server can only serve a single client, and we do not have to worry about performance / scalability. We also did not implement everything in one huge effort, but wrote the parts we needed while developing and testing.
One thing worked in our favor, though: the server API was already quite stable and well defined when we started.
Custom Assert Macros
With the Xcode Test framework, one uses XCTAssert macros to do the actual checks:
								XCTAssertNil(request1);
XCTAssertNotNil(request2);
XCTAssertEqualObjects(request2.path, @"/assets");
There's a full list of "Assertions Listed by Category" in Apple’s "Writing Test Classes and Methods" article.
But we found ourselves often using very domain-specific checks, such as:
								XCTAssertTrue([string isKindOfClass:[NSString class]] && ([[NSUUID alloc] initWithUUIDString:string] != nil),
              @"'%@' is not a valid UUID string", string);
That's very verbose and hard to read. And we didn't like the code duplication. We fixed that by writing our own simple assert macro:
								#define AssertIsValidUUIDString(a1) \
    do { \
        NSUUID *_u = ([a1 isKindOfClass:[NSString class]] ? [[NSUUID alloc] initWithUUIDString:(a1)] : nil); \
        if (_u == nil) { \
            XCTFail(@"'%@' is not a valid UUID string", a1); \
        } \
    } while (0)
Inside our tests, we then simply use:
AssertIsValidUUIDString(string);
This approach can make a huge difference in making the tests readable.
One Step Further
But we all know it: C preprocessor macros are a beast to dance with.
For some things, they're unavoidable, and it's all about limiting the pain. We need to use macros in this case in order for the test framework to know on which line and in which file the assertion failed. XCTFail() is itself a macro and relies on __FILE__ and __LINE__ to be set.
For more complex asserts and checks, we implemented a simple helper class called FailureRecorder:
								@interface FailureRecorder : NSObject

- (instancetype)initWithTestCase:(XCTestCase *)testCase filePath:(char const *)filePath lineNumber:(NSUInteger)lineNumber;

@property (nonatomic, readonly) XCTestCase *testCase;
@property (nonatomic, readonly, copy) NSString *filePath;
@property (nonatomic, readonly) NSUInteger lineNumber;

- (void)recordFailure:(NSString *)format, ... NS_FORMAT_FUNCTION(1,2);

@end


#define NewFailureRecorder() \
    [[FailureRecorder alloc] initWithTestCase:self filePath:__FILE__ lineNumber:__LINE__]
In our code, we had quite a few places where we wanted to check that two dictionaries are equal to one another. XCTAssertEqualObjects() can do that, but when it fails, the output is not very useful.
We wanted something like this
								NSDictionary *payload = @{@"a": @2, @"b": @2};
NSDictionary *expected = @{@"a": @2, @"b": @5};
AssertEqualDictionaries(payload, expected);
to output
Value for 'b' in 'payload' does not match 'expected'. 2 == 5
So we created
								#define AssertEqualDictionaries(d1, d2) \
    do { \
        [self assertDictionary:d1 isEqualToDictionary:d2 name1:#d1 name2:#d2 failureRecorder:NewFailureRecorder()]; \
    } while (0)
which forwards into our method
								- (void)assertDictionary:(NSDictionary *)d1 isEqualToDictionary:(NSDictionary *)d2 name1:(char const *)name1 name2:(char const *)name2 failureRecorder:(FailureRecorder *)failureRecorder;
{
    NSSet *keys1 = [NSSet setWithArray:d1.allKeys];
    NSSet *keys2 = [NSSet setWithArray:d2.allKeys];
    if (! [keys1 isEqualToSet:keys2]) {
        XCTFail(@"Keys don't match for %s and %s", name1, name2);
        NSMutableSet *missingKeys = [keys1 mutableCopy];
        [missingKeys minusSet:keys2];
        if (0 < missingKeys.count) {
            [failureRecorder recordFailure:@"%s is missing keys: '%@'",
             name1, [[missingKeys allObjects] componentsJoinedByString:@"', '"]];
        }
        NSMutableSet *additionalKeys = [keys2 mutableCopy];
        [additionalKeys minusSet:keys1];
        if (0 < additionalKeys.count) {
            [failureRecorder recordFailure:@"%s has additional keys: '%@'",
             name1, [[additionalKeys allObjects] componentsJoinedByString:@"', '"]];
        }
    }
    for (id key in keys1) {
        if (! [d1[key] isEqual:d2[key]]) {
            [failureRecorder recordFailure:@"Value for '%@' in '%s' does not match '%s'. %@ == %@",
             key, name1, name2, d1[key], d2[key]];
        }
    }
}
The trick is that the FailureRecorder captures __FILE__, __LINE__, and the test case. Inside its -recordFailure: method, it simply forwards the string to the test case:
								- (void)recordFailure:(NSString *)format, ...;
{
    va_list ap;
    va_start(ap, format);
    NSString *d = [[NSString alloc] initWithFormat:format arguments:ap];
    va_end(ap);
    [self.testCase recordFailureWithDescription:d inFile:self.filePath atLine:self.lineNumber expected:YES];
}
Integration with Xcode and Xcode Server
The best part about XCTest is that it integrates extremely well with the Xcode IDE. With Xcode 6 and the Xcode 6 Server, this has been improved even more. This tight integration was very helpful and improved our productivity.
Focus
While working on a single test or a set of tests inside a test class, the little diamond on the left-hand side gutter, next to the line numbers, lets us run that specific test or set of tests:
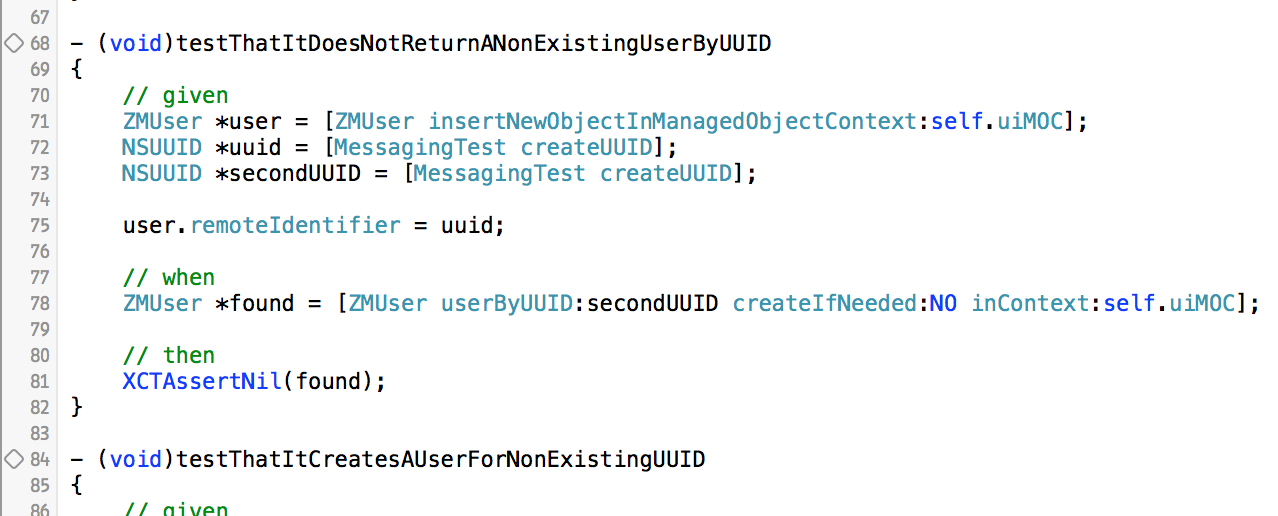
If the test fails, it turns red:

If it passes, it turns green:

One of our favorite keyboard shortcuts is ^⌥⌘G, which runs the last test or set of tests again. After clicking on the diamond in the gutter, we can change the test and then simply rerun it without having to take our hands off the keyboard. When debugging tests, that is extremely helpful.
Navigator
The navigators (on the left-hand side of the Xcode window) have a Test Navigator, which shows all tests grouped by their classes:
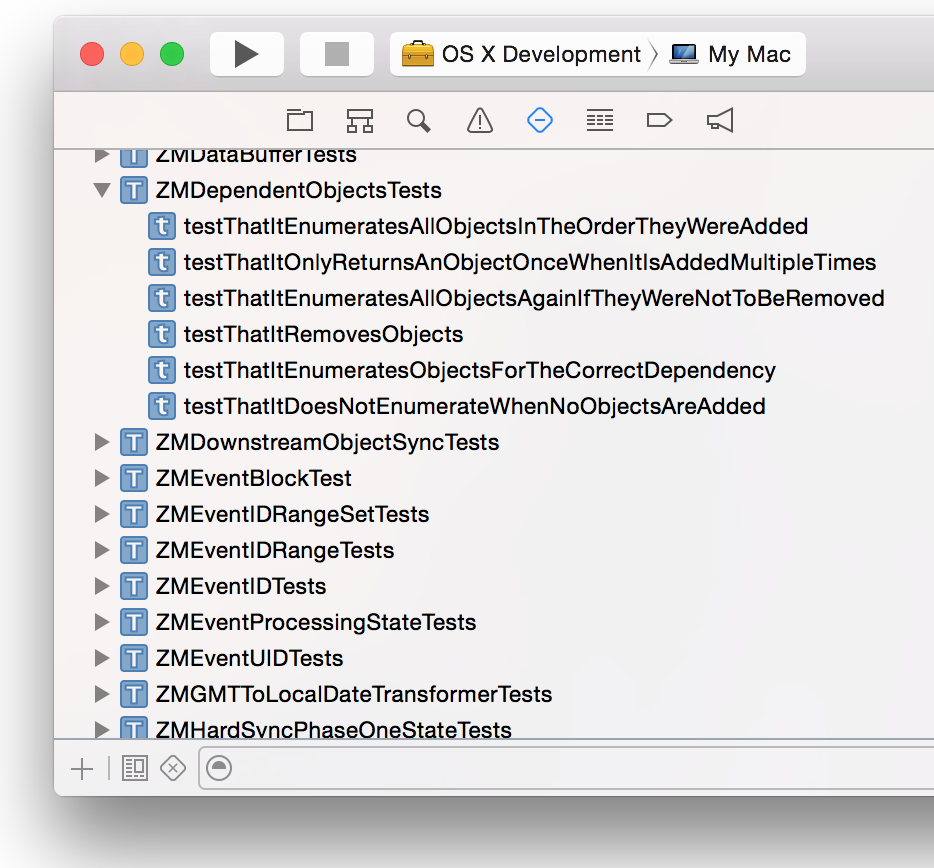
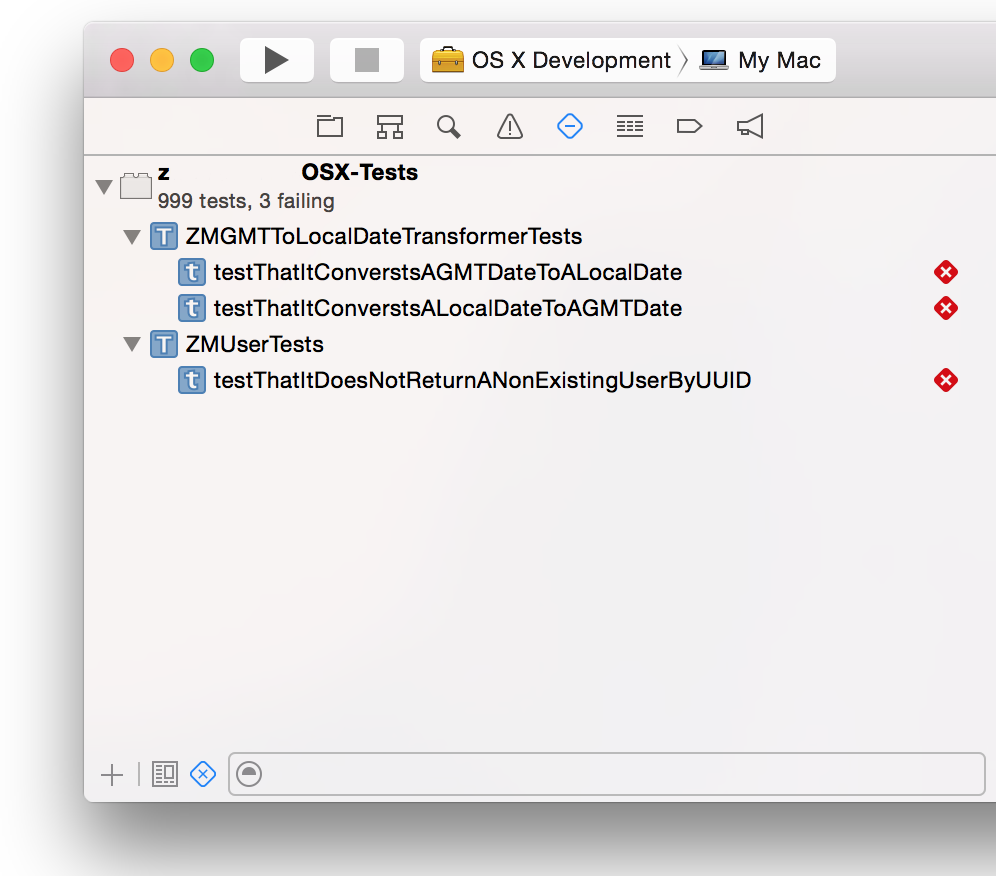
Groups of tests and individual tests can also be started from this UI. What's more useful, though, is we can filter this list to only show failing tests by enabling the third little icon at the bottom of the navigator:
Continuous Integration
OS X Server has a feature called Xcode Server, which is a continuous integration server based on Xcode. We have been using this.
Our Xcode Server automatically checks out the project from GitHub whenever there's a new commit. We have it configured to run the static analyzer, run all our tests on an iPod touch and a few iOS simulators, and finally create an Xcode archive that can be downloaded.
With Xcode 6, the feature set of Xcode Server should be rather good, even for complex projects.
We have a custom trigger that runs as part of the build on Xcode Server on our release branch. This trigger script uploads the generated Xcode archive to a file server. This way, we have versioned archives. The UI team can then download a specific version of the precompiled framework from the file server.
BDD and XCTest
If you are familiar with behavior-driven development, you might have noticed earlier that our style of naming is heavily inspired by this way of testing. Some of us have used Kiwi as a testing library before, so it felt natural to concentrate on a method or class behavior. But does this mean that XCTest can replace a good BDD library? The answer is: not quite.
It's both an advantage and disadvantage that XCTest is very simple. There is not much to it: you create a class, prefix methods that hold tests with the word "test," and you're good to go. The excellent integration into XCode speaks in XCTest's favor as well. You can press the diamond in the gutter to run just one test, you can easily display a list of failed tests, and you can quickly jump to a test by clicking on it in the list of tests.
Unfortunately, that is also pretty much all you get. We did not hit any roadblocks while developing and testing our app with XCTest, but often, a bit more comfort would have been nice. XCTest classes look like plain classes, while the structure of a BDD test suite, with its nested contexts, is very visible. And this possibility to create nested contexts for tests is missing most. Nested contexts allow us to create more and more specific scenarios, while keeping the individual tests very simple. This is, of course, possible in XCTest too, for example by calling custom setup methods for some of the tests. It is just not as convenient.
How important the additional features of BDD frameworks are depends on the size of the project. Our conclusion is that XCTest can certainly be a good choice for small- to medium-sized projects. But for larger projects, it might pay off to take a closer look at BDD frameworks like Kiwi or Specta.
Summary
Is XCTest the right choice? You will have to judge based on the project at hand. We chose XCTest as part of KISS — and have a wish list for things we'd like to be different. XCTest has served us well, even though we had to make tradeoffs. But with another testing framework, the tradeoff would have been something else.