People have their own motivations to write tests for their applications. This article isn't to persuade you that you should do it, though in my opinion, you should.
Writing tests for the visual aspects of an app is tricky. There's Apple built-in support for logical testing of objects, but no support for testing the end result of view-based code. This gap in functionality means a lot of people dismiss writing tests due to the difficulty of doing view-based tests.
When Facebook released FBSnapshotTestCase to CocoaPods, I initially dismissed it for this reason. I'm glad one of my coworkers didn't.
View-based testing means verifying that what the user sees is what you want the user to see. Doing this means being able to ensure that different versions of your views, or different states of your views, continue to look the same. View-based testing can be used to provide a high-level test covering a lot of use cases surrounding an object.
How It Works
FBSnapShotTestCase takes a UIView or CALayer subclass and renders it to a UIImage. This snapshot is used to create tests that compare a saved snapshot of the view/layer and the version generated by your test. When it fails, it will create a reference image of the failed test, and another image to show the difference of the two.
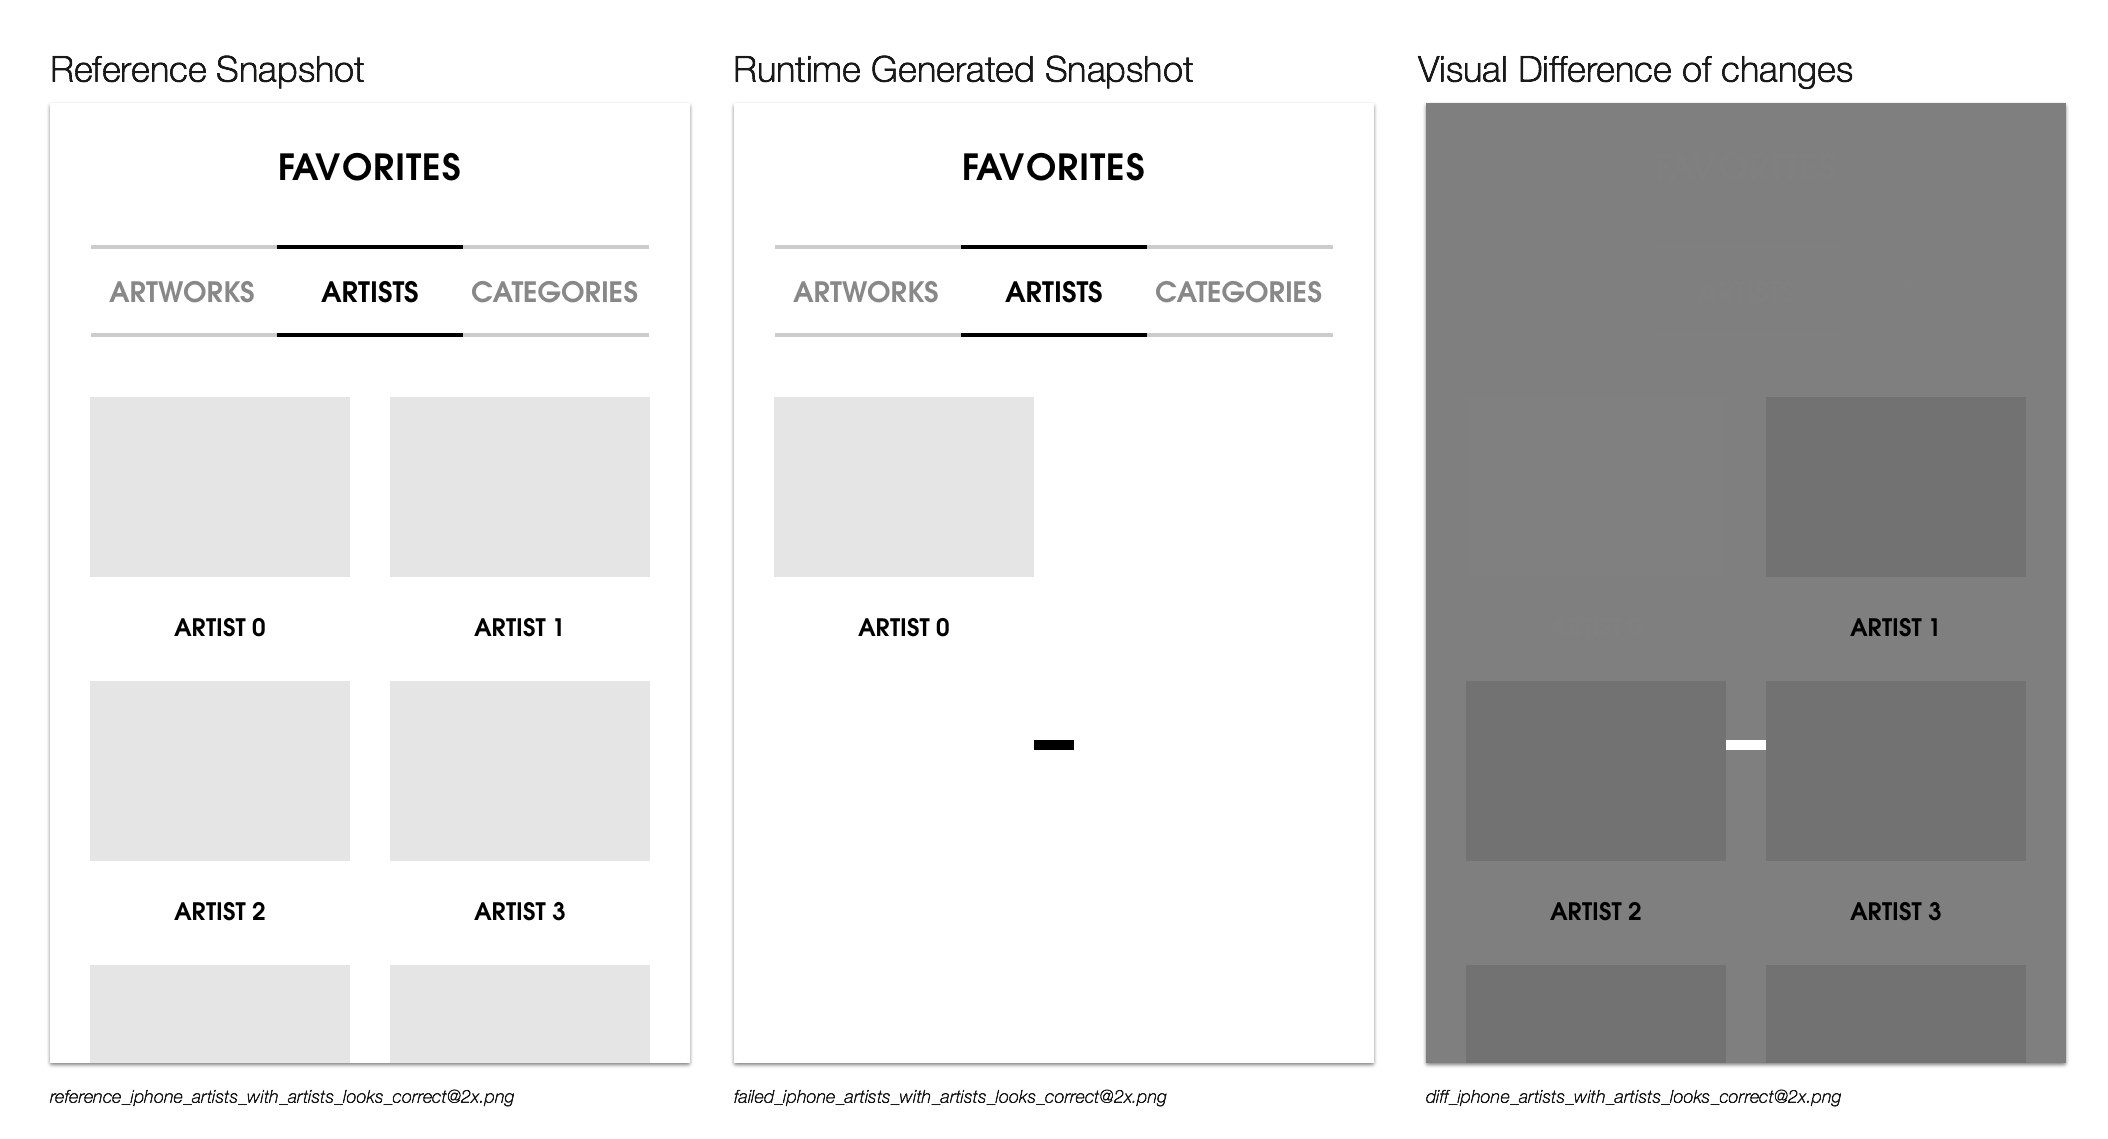
Here is an example of a failing test where we have less grid items than expected in a view controller:
It makes the comparison by drawing both the view or layer and the existing snapshot into two CGContextRefs and doing a memory comparison of them with the C function memcmp(). This makes it extremely quick, with my tests ranging from 0.013 to 0.086 seconds per image for fullscreen iPad and iPhone images on a MacBook Air.
When it's set up, it will default to storing the reference images inside your project's [Project]Tests folder, in a subfolder called ReferenceImages. Inside this is a library of folders based on the testcase class name. Inside the test case folders are the reference images per test. When a test fails, it will generate an output image of the resulting visuals from the test, and an image of the visual difference between itself and the reference. All three images are put inside the application's tmp folder. Snapshots will also NSLog a command to the console to load the two images into the visual diffing tool, Kaleidoscope.
Installation
Let's not beat around the bush here: you should be using CocoaPods. So installation is just adding pod "FBSnapshotTestCase" into the tests target of your Podfile. Running the command pod install will install the library.
XCTest with Snapshots
The default behavior of Snapshots is to subclass FBSnapshotTestCase instead of XCTestCase, and to then use the macro FBSnapshotVerifyView(viewOrLayer, "optional identifier") to verify against an already recorded image. There is a boolean property on the subclass recordMode that, when set, will make the macro record a new screenshot rather than check the result against a reference image.
								@interface ORSnapshotTestCase : FBSnapshotTestCase
@end

@implementation ORSnapshotTestCase

- (void)testHasARedSquare
{
    // Removing this will verify instead of recording
    self.recordMode = YES;

    UIView *view = [[UIView alloc] initWithFrame:CGRectMake(0, 0, 80, 80)];
    view.backgroundColor = [UIColor redColor];
    FBSnapshotVerifyView(view, nil);
}

@end
Disadvantages
Nothing's perfect. Let's start with the downsides.
-
Testing asynchronous code is hard. This is a similar pattern throughout testing in Cocoa. I tend to have two answers to this. Using testing frameworks like Specta or Kiwi provides ways of repeatedly running assertions in code until a timeout occurs or succeeds. This means you can give it 0.5 seconds to run, with the tests repeatedly being checked. Alternatively, you can build your application code so that asynchronous code is run synchronously if flagged.
-
Some components can be hard to test. There are two notable examples that come to mind: Some
UIViewclasses cannot be initiated without a frame in a test, so get into the habit of always giving a frame to your views to avoid these messages:<Error>: CGContextAddRect: invalid context 0x0. [..]. If you write Auto Layout code a lot, then this is unintuitive.CATiledLayer-backed views require being on the main screen and being visible before they will render their tiles. They also render asynchronously. I tend to add a two-second wait for these tests. -
Apple's OS patches can change the way their stock components are rendered. When Apple very subtly changed the font hinting in iOS 7.1, any snapshots with
UILabelsin them required re-recording. -
Each snapshot is a PNG file stored in your repository, and together they average out at about 30-100kb per file for me. I record all my tests in "@2x." The snapshots are as big as the view being rendered.
Advantages
-
I end up testing first. This is done by writing a screenshot test for every different view state as I add ways to make changes to the object. This gives me the ability to do a single test run and see the changes I make to the different states instantly. No tapping through my app to get to the right view, then changing state. I simply look at the images rendered by
FBSnapshotTestCase. This saves a lot of time in building. -
Snapshot tests are run at the same time as the rest of your tests. They don't have to run as another test scheme. They are written in the same language as the rest of your tests. They can mostly be run without pushing the view to the screen.
-
Snapshots give code reviews a narrative. Tests show up first, offering a promise of what is coming up in the changeset. Next is the snapshots, proof that what the tests promise is true. Finally, the changes to the codebase show up. By the time you've hit the changeset, you're primed both by what has changed internally, and by what will be seen externally by users.
-
Providing visuals during the code review also opens up the review to designers; they can keep on top of changes by watching the project's repo.
-
I've found that writing snapshot tests provides overreaching test coverage. I don't believe it's optimal to aim for 100% coverage via unit tests. I try to be pragmatic in my approach to testing, wherein most of the changes introduced are tested. Snapshots test a large amount of code paths without specifically denoting the paths called. This is because snapshots test the output from a combination of systems easily. Compare the use of snapshots to painting with a wide brush, giving you the chance to make broad stokes at getting test coverage swiftly.
-
Snapshot tests are fast. Average tests on a modern MacBook Air using retina iPad-sized images range from 0.015 to 0.080 seconds per test. Having hundreds in an application's test suite is no problem. The application I work on has hundreds of tests and they take less than five seconds.
Tooling
FBSnapShots + Specta + Expecta
I don't use vanilla XCTest. I uses Specta and Expecta, which provide a more concise and readable test environment to work in. This is the default testing setup when you create a new CocoaPod. I'm a contributor to the pod Expecta+Snapshots, which provides an Expecta-like API to FBSnapshotTestCase. It will handle naming screenshots for you, and can optionally run view controllers through their view event lifecycle. This means my Podfile looks like:
								target 'MyApp Tests', :exclusive => true do
    pod 'Specta','~> 1.0'
    pod 'Expecta', '~> 1.0'
    pod 'Expecta+Snapshots', '~> 1.0'
end
In turn, my tests look like:
								SpecBegin(ORMusicViewController)

it (@"notations in black and white look correct", ^{
    UIView *notationView = [[ORMusicNotationView alloc] initWithFrame:CGRectMake(0, 0, 80, 320)];
    notationView.style = ORMusicNotationViewStyleBlackWhite;

    expect(notationView).to.haveValidSnapshot();
});

it (@"Initial music view controller looks corrects", ^{
    id contoller = [[ORMusicViewController alloc] initWithFrame:CGRectMake(0, 0, 80, 80)];
    controller.view.frame = [UIScreen mainScreen].bounds;

    expect(controller).to.haveValidSnapshot();
});

SpecEnd
Snapshots Xcode Plugin
Parsing the console log to find the references to images is a lot of effort. Loading up all the different failing tests into a visual diff tool like Kaleidoscope requires running a lot of terminal commands.
To deal with nearly all of the common use cases, I built an Xcode plugin called Snapshots. It can be installed via Alcatraz or built yourself. It makes it simple to compare the success and failure images for any inline failed test in Xcode.
Conclusion
FBSnapshotTestCase gives you a way to test view-related code. It can be used to build and visualize view states without jumping through hoops in the simulator. You should use it with my plugin Snapshots if you use Xcode. Sometimes it can be a bit frustrating, but it pays off. It welcomes designers into the code review stage. It can be a very easy first step into writing tests on an existing project. You should give it a try.
Examples from Open Source: