The Mac is not only a great platform to develop on — it's also a great platform to develop for. Last year we started building our first Mac app, and it was a great experience to finally build something for the platform we're working on all day. However, we also had some difficulties discovering the peculiarities of the Mac compared to developing for iOS. In this article, we'll summarize what we've learned from this transition to hopefully give you a head start on your first Mac app.
In this article, we will assume OS X Yosemite to be the default platform we're talking about, as Apple made some significant strides this year to harmonize the platforms from a developer's perspective. However, we'll also point out what only applies to Yosemite, and what the situation was prior to this release.
What's Similar
Although iOS and OS X are separate operating systems, they share a lot of commonalities, starting with the development environment — same language, same IDE. So you'll feel right at home.
More importantly though, OS X also shares a lot of the frameworks that you're already familiar with from iOS, like Foundation, Core Data, and Core Animation. This year, Apple harmonized the platforms further and brought frameworks to the Mac that were previously only on iOS, one example being Multipeer Connectivity. Also, on a lower level, you'll immediately see the APIs you're familiar with: Core Graphics, Core Text, libdispatch, and many more.
The UI framework is where things really start to diverge — UIKit feels like a slimmed down and modernized version of the AppKit that has been around and evolving since the NeXT days. The reason why, is when Apple introduced the iPhone, there was the chance to start from a clean slate and take what had been learned from AppKit: bring over the concepts and pieces that had proven to work well, and improve those that were less fortunate designs.
If you're interested in how this transition came about, check out these excellent episodes of the Debug podcast with Nitin Ganatra, former iOS apps director at Apple: System 7 to Carbon, OS X to iOS, and iPhone to iPad.
With this in mind, it's no wonder that UIKit and AppKit still share a lot of concepts. The UI is constructed out of windows and views, with messages being sent over the responder chain just as on iOS. Furthermore, UIView is NSView, UIControl is NSControl, UIImage is NSImage, UIViewController is NSViewController, UITextView is NSTextView... The list goes on and on.
It's tempting to assume that you can use these classes in the same way, just by replacing UI with NS. But that's not going to work in many cases. The similarity is more on the conceptual level than in the implementation. You'll pretty much know about the building blocks to look for to construct your user interface, which is a great help. And a lot of the design patterns, such as delegation, will be similar. But the devil is in the details — you really need to read the documentation and learn how these classes should be used.
In the next section, we'll take a look at some of the pitfalls we fell into the most.
What's Different
Windows and Window Controllers
While you almost never interact with windows on iOS (since they take up the whole screen anyway), windows are key components on the Mac. Historically, Mac applications had multiple windows, each with its own role, very similar to view controllers on iOS. As a result, AppKit has an NSWindowController class that traditionally took on many of the tasks that you would handle in a view controller on iOS. View controllers are a relatively new addition to AppKit, and up until now, they did not receive actions by default, and missed a lot of the lifecycle methods, view controller containment, and other features you're used to from UIKit.
But AppKit has changed, since Mac apps are relying more and more on a single window. As of OS X 10.10 Yosemite, the NSViewController is similar in many ways to UIViewController. It is also part of the responder chain by default. Just remember that if you target your Mac app to OS X 10.9 or earlier, window controllers on the Mac are much more akin to what you're used to as view controllers from iOS. As Mike Ash writes, a good pattern to instantiate windows on the Mac is to have one nib file and one window controller per window type.
Furthermore, NSWindow is not a view subclass as is the case for UIWindow. Instead, each window holds a reference to its top-level view in the contentView property.
Responder Chain
If you're developing for OS X 10.9 or lower, be aware that view controllers are not part of the responder chain by default. Instead, events will bubble up through the view tree and then go straight to the window and the window controller. In this instance, if you want a view controller to handle events, you will have to add it to the responder chain manually.
In addition to the difference in the responder chain, AppKit also has a stricter convention as to the method signature of actions. In AppKit, an action method always looks like this:
- (void)performAction:(id)sender;
The variants that are permissible on iOS with no arguments at all, or with a sender and an event argument, don't work on OS X. Furthermore, in AppKit, controls usually hold a reference to one target and an action pair, whereas you can associate multiple target-action pairs with a control on iOS using the addTarget:action:forControlEvents: method.
Views
The view system works very differently on the Mac, for historic reasons. On iOS, views were backed by Core Animation layers by default from the beginning. But AppKit predates Core Animation by decades. When AppKit was designed, there was no such thing as a GPU as we know it today. Therefore, the view system heavily relied on the CPU doing the work.
When you're getting started with development on the Mac, we strongly recommend you check out Apple's Introduction to View Programming Guide for Cocoa. Furthermore, there are two excellent WWDC sessions you should watch: Layer-Backed Views: AppKit + Core Animation and Optimizing Drawing and Scrolling.
Layer-Backed Views
By default, AppKit views are not backed by Core Animation layers; layer-backing support has been integrated into AppKit retroactively. But while you never have to worry about this with UIKit, with AppKit there are decisions to make. AppKit differentiates between layer-backed and layer-hosting views, and layer backing can be turned on and off on a per-view-tree basis.
The most straightforward approach to enable layer backing is to set the wantsLayer property to YES on the window's content view. This will cause all views in the window's view tree to have their own backing layers, so there's no need to repeatedly set this property on each individual view. This can be done in code or simply in Interface Builder's View Effects Inspector.
In contrast to iOS, on the Mac you should treat the backing layers as an implementation detail. This means you should not try to interact with the layers directly, as AppKit owns those layers. For example, on iOS you could simply say:
self.layer.backgroundColor = [UIColor redColor].CGColor;
But in AppKit, you shouldn't touch the layer. If you want to interact with the layer in such ways, then you have to go one step further. Overriding NSView's wantsUpdateLayer method to return YES enables you to change the layer's properties. If you do this though, AppKit will no longer call the view's drawRect: method. Instead, updateLayer will be called during the view update cycle, and this is where you can modify the layer.
You can use this, for example, to implement a very simple view with a uniform background color (yes, NSView has no backgroundColor property):
								@interface ColoredView: NSView

@property (nonatomic) NSColor *backgroundColor;

@end


@implementation ColoredView

- (BOOL)wantsUpdateLayer
{
    return YES;
}

- (void)updateLayer
{
    self.layer.backgroundColor = self.backgroundColor.CGColor;
}

- (void)setBackgroundColor:(NSColor *)backgroundColor
{
    _backgroundColor = backgroundColor;
    [self setNeedsDisplay:YES];
}

@end
This example assumes that layer backing is already enabled for the view tree where you'll insert this view. The alternative to this would be to simply override the drawRect: method to draw the colored background.
Coalescing Layers
Opting into layer-backed views will increase the amount of memory needed (each layer has its own backing store, probably overlapping with other views' backing stores) and introduce a potentially costly compositing step of all the layers. Since OS X 10.9, you have been able to tell AppKit to coalesce the contents of a view tree into one common backing layer by using the canDrawSubviewsIntoLayer property. This can be a good option if you know that you will not need to animate subviews individually.
All subviews that are implicitly layer-backed (i.e. you didn't explicitly set wantsLayer = YES on these sub views) will now get drawn into the same layer. However, subviews that do have wantsLayer set to YES will still have their own backing layer and their drawRect: method will be called, no matter what wantsUpdateLayer returns.
Layer Redraw Policy
Another gotcha that's important to know is the fact that layer-backed views have their redraw policy set to NSViewLayerContentsRedrawDuringViewResize by default. This resembles the behavior of non-layer-backed views, but it might be detrimental to animation performance if a drawing step is introduced for each frame of the animation.
To avoid this, you can set the layerContentsRedrawPolicy property to NSViewLayerContentsRedrawOnSetNeedsDisplay. This way, you have control over when the layer contents need to be redrawn. A frame change will not automatically trigger a redraw anymore; you are now responsible for triggering it by calling -setNeedsDisplay:.
Once you change the redraw policy in this way, you might also want to look into the layerContentsPlacement property, which is the view's equivalent to the layer's contentGravity property. This allows you to specify how the existing layer content will be mapped into the layer as it is resized.
Layer-Hosting Views
NSView's layer story doesn't end here, though. There is a whole different option to work with Core Animation layers — called layer-hosting views. In short, with a layer-hosting view, you can do with the layer and its sublayers whatever you want. The price you pay for this is that you cannot add any subviews to this view anymore. A layer-hosting view is a leaf node in the view tree.
To create a layer-hosting view, you first have to assign a layer object to the layer property, and then set the wantsLayer to YES. Note that the sequence of these steps is crucial:
								- (instancetype)initWithFrame:(NSRect)frame
{
    self = [super initWithFrame:frame];
    if (self) {
        self.layer = [[CALayer alloc] init];
        self.wantsLayer = YES;
    }
}
It's important that you set wantsLayer after you've set your custom layer.
Other View-Related Gotchas
By default, the view's coordinate system origin is located at the lower left on the Mac, not the upper left as on iOS. This can be confusing at first, but you can also decide to restore the behavior you're used to by overriding isFlipped to return YES.
As AppKit views don't have background color properties that you can set to [NSColor clearColor] in order to let the background shine through, many NSView subclasses like NSTextView or NSScrollView have a drawsBackground property that you have to set to NO if you want the view to be transparent.
In order to receive events for the mouse cursor entering or exiting the view or being moved within the view, you need to create a tracking area. There's a special override point in NSView called updateTrackingAreas, which you can use to do this. A common pattern looks like this:
								- (void)updateTrackingAreas
{
    [self removeTrackingArea:self.trackingArea];
    self.trackingArea = [[NSTrackingArea alloc] initWithRect:CGRectZero
                                                     options:NSTrackingMouseEnteredAndExited|NSTrackingInVisibleRect|NSTrackingActiveInActiveApp
                                                       owner:self
                                                    userInfo:nil];
    [self addTrackingArea:self.trackingArea];
}
AppKit controls have been traditionally backed by NSCell subclasses. These cells should not be confused with table view cells or collection view cells in UIKit. AppKit originally made the distinction between views and cells in order to save resources — views would delegate all their drawing to a more lightweight cell object that could be reused for all views of the same type.
Apple is deprecating this approach step by step, but you'll still encounter it from time to time. For example, if you would want to create a custom button, you would subclass NSButton and NSButtonCell, implement your custom drawing in the cell subclass, and then assign your cell subclass to be used for the custom button by overriding the +[NSControl cellClass] method.
Lastly, if you ever wonder how to get to the current Core Graphics context when implementing your own drawRect: method, it's the graphicsPort property on NSGraphicsContext. Check out the Cocoa Drawing Guide for more details.
Animations
As a consequence of the differences in the view system discussed above, animations also work quite differently on the Mac. For a good overview, watch the WWDC session on Best Practices for Cocoa Animation.
If your views are not layer-backed, then naturally, animations will be a CPU-intensive process, as every step of the animation has to be drawn accordingly in the window-backing store. Since nowadays you'd mostly want to animate layer-backed views to get really smooth animations, we'll focus on this case here.
As mentioned above, you should never touch the backing layers of layer-backed views in AppKit (see the section "Rules for Modifying Layers on OS X" at the bottom of this page of the Core Animation Programming Guide. The layers are managed by AppKit, and — contrary to iOS — the views' geometry properties are not just a reflection of the corresponding layer properties, but AppKit actually syncs the view geometry internally to the layer geometry.
There are a few different ways you can trigger an animation on a view. First, you can use the animator proxy:
view.animator.alphaValue = .5;
Behind the scenes, this will enable implicit animations on the backing layer, set the alpha value, and disable the implicit animations again.
You can also wrap this into an animation context in order to get a completion handler callback:
								[NSAnimationContext runAnimationGroup:^(NSAnimationContext *context){
    view.animator.alphaValue = .5;
} completionHandler:^{
    // ...
}];
In order to influence the duration and the timing function, we have to set these values on the animation context:
								[NSAnimationContext runAnimationGroup:^(NSAnimationContext *context){
    context.duration = 1;
    context.timingFunction = [CAMediaTimingFunction functionWithName:kCAMediaTimingFunctionEaseIn];
    view.animator.alphaValue = .5;
} completionHandler:^{
    // ...
}];
If you don't need the completion handler, you can also use the shorthand form:
								[NSAnimationContext currentContext].duration = 1;
view.animator.alphaValue = .5;
Lastly, you can also enable implicit animations, so that you don't have to explicitly use the animator proxy each time:
								[NSAnimationContext currentContext].allowsImplicitAnimations = YES;
view.alphaValue = .5;
For more control over the animation, you can also use CAAnimation instances. Contrary to on iOS, you don't add them directly to the layer (as you're not supposed to touch the layer yourself), but you use the API defined in the NSAnimatablePropertyContainer, which is implemented by NSView and NSWindow. For example:
								CAKeyframeAnimation *animation = [CAKeyframeAnimation animation];
animation.values = @[@1, @.9, @.8, @.7, @.6];
view.animations = @{@"alphaValue": animation};
view.animator.alphaValue = .5;
For frame animations, it's important to set the view's layerContentsRedrawPolicy to NSViewLayerContentsRedrawOnSetNeedsDisplay, because the view's content will otherwise be redrawn on every frame.
Unfortunately, NSView doesn't expose all animatable properties of Core Animation layers, transform being the most important example. Check out this article by Jonathan Willings for a description of how you can work around this limitation. Just be aware that you're leaving officially sanctioned territory here.
All the things mentioned above apply to layer-backed views. If you have a layer-hosting view, you can use CAAnimations directly on the view's layer or sublayers, since you own them.
Collection View
Although AppKit comes with an NSCollectionView class, its capabilities lag far behind its UIKit counterpart. Since UICollectionView is such a versatile building block on iOS, depending on your UI concept, it's a tough pill to swallow that there is nothing like it in AppKit. So when you're planning your user interface, take into account that it might be a lot of work to create grid layouts that are otherwise very easy to achieve on iOS.
Images
Coming from iOS, you'll be familiar with UIImage, and conveniently, there is a corresponding NSImage class in AppKit. But you'll quickly notice that these classes are vastly different. NSImage is, in many ways, a more powerful class than UIImage, but this comes at the cost of increased complexity. Apple's Cocoa Drawing Guide has a good introduction of how to work with images in AppKit.
The most important conceptual difference is that NSImage is backed by one or more image representations. AppKit comes with some NSImageRep subclasses, like NSBitmapImageRep, NSPDFImageRep, and NSEPSImageRep. For example, one NSImage object could hold a thumbnail, a full-size, and a PDF representation for printing of the same content. When you draw the image, an image representation matching the current graphics context and drawing dimensions will be picked based on the color space, dimensions, resolution, and depth.
Furthermore, images on the Mac have the notion of resolution in addition to size. An image representation has three properties that play into that: size, pixelsWide, and pixelsHigh. The size property determines the size of the image representation when being rendered, whereas the pixel width and height values specify the raw image size as derived from the image data itself. Together, those properties determine the resolution of the image representation. The pixel dimensions can be different from the representation's size, which in turn can be different from the size of the image the representation belongs to.
Another difference from UIImage is that NSImage will cache the result when it's drawn to the screen (this behavior is configurable via the cacheMode property). When you change an underlying image representation, you have to call recache on the image for the change to take effect.
But working with images on the Mac isn't always more complex than on iOS. NSImage provides a very easy way to draw a new image, whereas on iOS you would have to create a bitmap context, then create a CGImage from that, and finally use it to initialize an UIImage instance. With NSImage, you can simply do:
								[NSImage imageWithSize:(NSSize)size
            flipped:(BOOL)drawingHandlerShouldBeCalledWithFlippedContext
     drawingHandler:^BOOL (NSRect dstRect)
{
    // your drawing commands here...
}];
Colors
The Mac supports fully color-calibrated workflows, so anything having to do with colors is potentially more complicated. Color management is a complex topic, and we're not even going to pretend that we're experts in this. Instead, we're going to refer you to Apple's guides on the topic: Introduction to Color Programming Topics for Cocoa and Introduction to Color Management.
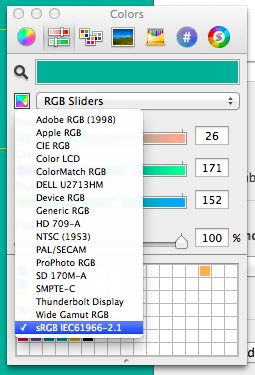
A common task is to use a color in your app that your designers have specified for you. In order to get the correct color, it's important to pick the color from the design template using the same color space as the one you use to programatically specify it. The standard system color picker has a drop-down menu, where you can choose the color space you want to use. We suggest to use the device-independent sRGB color space, and then later use the +[NSColor colorWithSRGBRed:green:blue:alpha:] class method to create the color in code.
Text System
With TextKit, iOS 7 finally got an equivalent to what has been around on the Mac for ages as the Cocoa Text System. But Apple didn't just transfer the system from the Mac to iOS; instead, Apple made some significant changes to it.
For example, AppKit exposes the NSTypesetter and NSGlyphGenerator, both of which you can subclass to customize their behaviors. On iOS, those classes are not exposed, but some of the hooks for customization are available via the NSLayoutManagerDelegate protocol.
Overall, it's still pretty similar, and you'll be able to do everything on the Mac that you can do on iOS (and more), but for some things, you will have to look for the appropriate hooks in different places.
Sandboxing
If you want to sell your Mac app through the Mac App Store, it has to be sandboxed. You might wonder why we're mentioning this here, since sandboxing has been the norm on iOS from day one (so you're very much familiar with it). However, we're so used to what apps were able to do on the Mac before sandboxing appeared on the radar, that it's sometimes easy to overlook the fact that a feature you want to implement might get you into conflict with the sandboxing restrictions.
The file system has always been exposed to the user on the Mac, so sandboxed apps are able to get access to files outside of their containers if the user signals clear intent to do so. It's the same model that has since come to iOS 8. However, whereas this approach enhances the prior possibilities on iOS, it restricts the prior possibilities on the Mac. That makes it easy to oversee or forget.
We're guilty of this ourselves, which is why we hope to be able to prevent you from falling into the same trap. When we started development of Deckset — an app that transforms simple Markdown into presentation slides — we never thought that we might run into sandboxing issues. After all, we only needed read access to the Markdown file.
What we forgot about is that we also needed to display the images that are referenced in the Markdown. And although you type the path to the image in your Markdown file, that's not a user intent that counts within the sandboxing system. In the end, we 'solved' the problem by adding a notification UI in the app that prompts the user to allow us access to the files by explicitly opening the common ancestor folder of all images in the file once.
Take a look at Apple's sandboxing guides early in the development process so that you don't get tripped up later on.
What's Unique
There are many things you can only do on the Mac, mostly either due to its different interaction model or to its more liberal security policies. In this issue, we have articles covering some of these things in depth: cross-process communication, making an app scriptable, scripting other apps in the sandbox, and creating a plugin infrastructure for your apps.
Of course, that's just a small subset of features unique to the Mac, but it gives you a good idea of the aspects that iOS 8 just starts to scratch the surface of in terms of extensibility and communication between apps. There's, of course, much more to explore: Drag and Drop, Printing, Bindings, OpenCL, to name just a few examples.